1999 Subaru Forester Support Question
1999 Subaru Forester Support Question
Find answers below for this question about 1999 Subaru Forester.Need a 1999 Subaru Forester manual? We have 1 online manual for this item!
Question posted by kanesd on March 15th, 2013
Where Is The Turn Signal Relay???
I need to replace the turn signal relay. How do I get to it? where is it located?
Current Answers
Answer #1: Posted by roadrunnertim on March 15th, 2013 4:56 PM
roadrunnertim
Member since:
May 9th, 2012 Points: 1,071,190

Member since:
May 9th, 2012 Points: 1,071,190
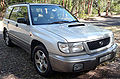
The turn signal flasher (relay) is located under the driver's side dash. Should be on the left side (away from steering wheel area). It may be difficult to spot. You will need a flashlight and the ability to crawl up under there to get a good look at it. It just unplugs, so it shouldn't be to hard to replace once you locate it.
Here's what your flasher should look like:
Supporting Image
You can click the image below to enlarge
Related Manual Pages
Owner's Manual - Page 22
... view mirror ...Rear window defogger switch ...Rear window wiper and washer switch ...Remote control mirror switch ...Replacement of brake pad and lining ...Brake pad ...Parking brake lining ...Replacement of windshield wiper blades ...Replacing bulbs ...Fog light ...Front turn signal, parking light and front side marker light Headlight ...High mount stop light ...Interior light and luggage...
Owner's Manual - Page 25
... load limits ...Trailer hitches ...Trailer towing tips ...Warranties and maintenance ...Trip meter (Odometer/Tripmeter) ...Turn signal indicator lights ...Turn signal lever ...Turn signal light (Bulb replacement - Front) ...Turn signal light (Bulb replacement - Rear) ...V Vanity mirror ...Vehicle identification ...Ventilation ...Ventilator ...Vehicle capacity weight ...U Uniform tire quality...
Owner's Manual - Page 46

...the ignition key to identify the violated zone.
1-20
Chirps 1 2 4 Triggered Zone Shock Sensor Ignition turned on The starter is disabled any time the system is armed, or if the Passive starter interrupt feature...of chirps. How starter interrupt works The alarm system interrupts the signal from the alarm module. Refer to the chart (below) to the vehicle's starter when Starter interrupt ...
Owner's Manual - Page 100

... light (for vehicles with ABS) ...AT OIL TEMPerature warning light (for AT vehicles) ...Door open warning lights ...Front-wheel drive warning light (for AT vehicles) ...Turn signal indicator lights ...High beam indicator ...
3-8
3-8 3-8 3-8 3-9 3-9 3-9 3-10 3-12 3-13 3-13 3-13 3-13 3-13
Hazard warning flasher ...Light controls ...Light switch ...Illumination brightness control ...Parking light...
Owner's Manual - Page 102

... 3-21)
8
HS0006
8 Wiper control (page 3-19) 9 Light control (page 3-14) Q Illumination brightness control W Headlight ON/OFF E Headlight flasher/High/low R T
beam change (page 3-15/3-15) Turn signal (for lane change) (page 3-16) Turn signal (page 3-16) (page 3-15) (page 3-17)
- CONTINUED -
3-3
Owner's Manual - Page 103
Combination meter overview
1 2 3 4 5 6 7
8
P O
I
U Y
TR
EW Q
9
HS0007
1 ABS warning light (page 3-12) 2 Speedometer (page 3-5) 3 Turn signal indicator light 4 Tachometer (page 3-6) 5 AT oil temperature warning 6 7 8 9 Q
light (page 3-13) High beam indicator light (page 3-13) SRS AIRBAG warning light (page 3-8) Door opening warning ...
Owner's Manual - Page 112

... indicate that the automatic transmission control system is switched to Replacing Bulbs section in stop the vehicle, but avoid driving up steep grades or in Chapter 10. Replace the bulb as soon as possible. J Turn signal indicator lights These lights show the operation of the turn signal bulb may be burned out. If the light comes...
Owner's Manual - Page 113

...
WARNING
To prevent battery discharge resulting from the traffic if it is possible. To turn on the hazard warning flasher, push the hazard warning button on when your lights on the instrument panel. In any position. To turn signals do not work.
NOTE When the hazard warning flasher is on a roadside at night...
Owner's Manual - Page 114
.... To switch back to low beam, pull the lever back to high beam, push the turn signal lever. second position Headlights, position lights, instrument panel illumination, tail lights, and license plate ...beam change (dimmer) To change from low beam to the detent position. B Headlights To turn on the headlights, turn the knob on the instrument panel is in the flashing position for more than just a...
Owner's Manual - Page 115
...released. D The light switch is in the "OFF" position. The light switch must always be turned to the "a" position when it . D The automatic transmission selector lever is set at reduced brightness...on the instrment panel also comes on at other than the "P" position. B Turn signals
Right turn
Left turn
HS0056
3-16 To flash the headlights, pull the lever toward you hold the lever. The ...
Owner's Manual - Page 116

... when you can adjust brightness of the turn is in the direction of the instrument panel illumination for better visibility. Instruments and controls
To activate the right turn signal, push the turn the control dial counterclockwise. To brighten, turn signal lever up or down . To activate the left turn signal, push the turn signal lever down slightly and hold it .
Owner's Manual - Page 153

... seconds, it is broken for the vehicle.
- CONTINUED -
5-13 If this occurs, it is turned off during the time display mode, the time display is selected, the time display takes priority of ...Time display mode When the time display mode is replaced by the time display again. When the radio is switched on the display. Turn the ignition switch to advance the minutes in your vehicle....
Owner's Manual - Page 237

... cause a malfunction of your vehicle's electrical system requires modifications to the vehicle's lighting circuit to increase its capacity and accommodate wiring changes. Connection of the turn signals and the brake lights each time you hitch up.
7-52 To ensure the trailer lights are connected properly, please consult your SUBARU dealer.
Owner's Manual - Page 238
... confirm that the load and its distribution are acceptable. If the vehicle is pressed, and that the trailer's turn signal lights flash when the vehicle's turn
- CONTINUED -
CAUTION
7-53
If any problems are correct. For safety's sake, you should employ extra caution... properly. D Check that the vehicle and trailer are also shown on the tire placard located on your vehicle.
Owner's Manual - Page 239
signal lever is operated. - the safety chains are connected properly. - all cargo in the trailer is required because of traffic, practice turning, stopping and backing up with one hand and turn it to the left for a left turn, and turn... to learn the "feel" of the vehicle/ trailer combination before turning. When turning back, grip the bottom of your vehicle. D Slow down immediately...
Owner's Manual - Page 264

...Battery ...10-31 Checking the fluid level ...10-32 Windshield washer fluid ...10-32 Replacement of windshield wiper blades ...10-33 Brake pedal ...10-36
Checking the brake pedal free... Fuses ...10-43
Replacing a fuse
...
10-44
Main fuse and fusible link ...10-46 Installation of accessories ...10-46 Replacing bulbs ...10-47
Headlight ...Fog light (if equipped) ...Front turn signal, parking light and...
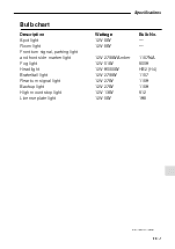
Owner's Manual - Page 309

Maintenance and service
Replacing bulbs 1 2
5
4 3
6
7
8
Q
1 2 3 4 5 6 7 8 9 Q
Wattate (12V-8W) (12V-8W)
9
HS0210
Spot light Room light Front turn signal, parking light and front side marker light Fog light Headlight High mount stop light Brake/tail light Rear turn signal light Backup light License plate light
Bulb No. - - 1157NA 9006 HB2 (H4) 912 1156 1157 1156 168
(12V...
Owner's Manual - Page 312
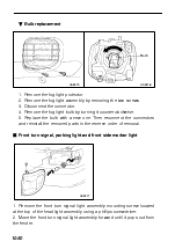
... a new one. Remove the front turn signal, parking light and front side marker light
HS0217
1. B Bulb replacement
Bulb
HS0215
HS0216
1. Disconnect the connector. 4. Then reconnect the connectors and reinstall the removed parts in the reverse order of the headlight assembly using a phillips screwdriver. 2. J Front turn signal light assembly mounting screw located at the top of removal...
Owner's Manual - Page 313
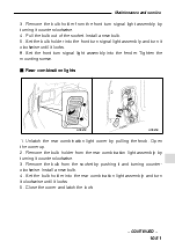
... up. 2. Set the bulb holder into the rear combination light assembly and turn it clockwise until it locks. 5. Remove the bulb holder from the socket by turning it and turning counterclockwise. Set the front turn signal light assembly into the front turn signal light assembly and turn signal light assembly by pushing it counterclockwise. 4. Set the bulb holder into...
Owner's Manual - Page 324
... light and front side marker light Fog light Headlight Brake/tail light Rear turn signal light Backup light High mount stop light License plate light Wattage 12V-8W 12V-8W 12V-27/8W Amber 12V-51W 12V-60/55W 12V-...
Similar Questions

Need Location Of Fusable Link For Turning Signal &flasher On 1999 Subaru, Forest
My flasher and turning signals work very spuratically, what is the problem and how do I fix this?
My flasher and turning signals work very spuratically, what is the problem and how do I fix this?
(Posted by kathryntaylor 9 years ago)

Where Are Screws For Turn Signals For 1999 Forester
(Posted by mgroRex 10 years ago)

How To Change The Turn Signal Flasher On A 1999 Subaru Forester
(Posted by hotemsee 10 years ago)

Where Is The Interlock Relay Located On A Subaru Forester
(Posted by RainyJe 10 years ago)

Will It Fix The Wipers Too? They Dont Work Either (the Turn Signal Relay)
(Posted by kanesd 11 years ago)