Singer 7258 Stylist Support Question
Singer 7258 Stylist Support Question
Find answers below for this question about Singer 7258 Stylist.Need a Singer 7258 Stylist manual? We have 1 online manual for this item!
Question posted by nwillis31 on November 21st, 2013
Can 7248 And 6199 Model Extension Be Used For 5400 / 5500 Model
The person who posted this question about this Singer product did not include a detailed explanation. Please use the "Request More Information" button to the right if more details would help you to answer this question.
Current Answers
Related Singer 7258 Stylist Manual Pages
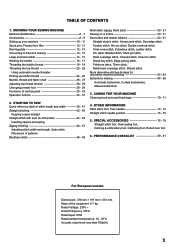
Instruction Manual - Page 3
...
5. KNOWING YOUR SEWING MACHINE Machine identification 6 - 7 Accessories 8 - 9 Setting up your machine 10 - 11 Spool pins, Presser foot lifter 12 - 13 Darning plate 12 - 13 Converting to free-arm sewing 14 - 15 Large extension table 14 - 15 Winding the bobbin 16 - 17 Threading the bobbin thread 18 - 19 Threading the top thread 20 - 23
Using automatic needle threader...
Instruction Manual - Page 6
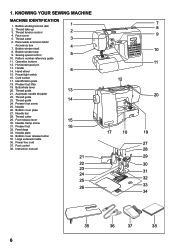
... speed control
5
10. Needle
26. Needle plate
34. Removable extension table/
Accessory box
4
7. Needle bar
28. Bobbin winding tension disk
1
2. Operation buttons
12. Hand wheel
6
15. Thread cutter
3
6. Thread take-up 3. Cord socket
17. Face cover 5. KNOWING YOUR SEWING MACHINE
MACHINE IDENTIFICATION
1. Foot release lever
15
30. Presser foot
16
32. Large...
Instruction Manual - Page 8
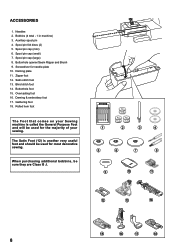
.... Spool pin cap (mini) 6. Screwdriver for the majority of your Sewing machine is another very useful foot and should be used for needle plate 10. Zipper foot 12. Buttonhole foot 15. Darning & embroidery foot 17. Rolled hem foot
The Foot that comes on your sewing. Spool pin cap (large) 8. Darning plate 11. When purchasing additional...
Instruction Manual - Page 10
...;ctrica
Foot control Rhéostat Control por pedal
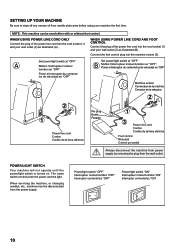
Always disconnect the machine from power supply by removing the plug from needle plate area before using your machine the first time. NOTE: This machine can be disconnected from the power supply. WHEN USING POWER LINE CORD AND FOOT CONTROL
Connect the plug of the power...
Instruction Manual - Page 12
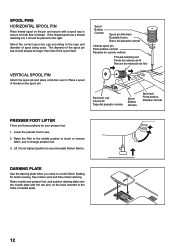
... presser foot.
1. Lower the presser foot to the type and diameter of spool being used. DARNING PLATE
Use the darning plate when you need to accommodate thicker fabrics.
Place a spool of thread...Spool pin Porte-bobine Pasador carrete
PRESSER FOOT LIFTER
There are three positions for button sewing, free motion work and free motion darning.
Raise the lifter to the middle position...
Instruction Manual - Page 14
... Pata de soporte Pied de support
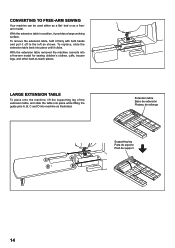
14 With the extension table removed the machine converts into place until it provides a large working surface.
CONVERTING TO FREE-ARM SEWING
Your machine can be used either as a freearm model.
To replace, slide the extension table back into a free-arm model for sewing children's clothes, cuffs, trouser legs, and other hard-to...
Instruction Manual - Page 16
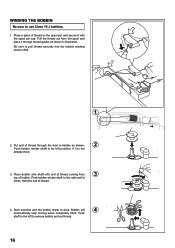
... far left to the right until it is not
already there.
3. Push bobbin winder shaft to remove bobbin and cut thread.
16 Start machine and the bobbin starts to use Class 15 J bobbins.
1. Hold the end of thread coming from the spool and place it with end of thread.
4. Place a spool of...
Instruction Manual - Page 22
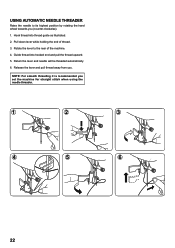
Return the lever and needle will be threaded automatically.
6. Release the lever and pull thread away from you set the machine for straight stitch when using the needle threader.
1
2
3
4
5
6
22 NOTE: For smooth threading it is recommended you .
Hook thread into hooked end and pull the thread upward.
5. Rotate the lever ...
Instruction Manual - Page 26
...the needle plate slot.
26
Always disconnect the machine from the wall-outlet.
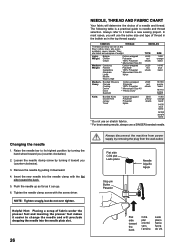
Loosen the needle clamp screw by turning the hand wheel toward you will use a SINGER branded needle. Bonded Wovens Heavy ... orange band 14/90
blue band 16/100 purple band
* Do not use on stretch fabrics. * For best sewing results, always use the same size and type of a needle and thread. Raise the needle...
Instruction Manual - Page 30
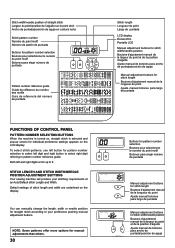
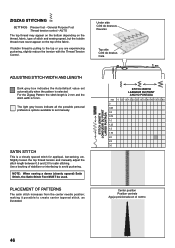
...-up to 9. To select stitch patterns, use left and right digits scroll up screen for pattern number selection to select left digit and right button to select right digit referring to pattern number reference guide. STITCH LENGTH AND STITCH WIDTH/NEEDLE POSITION ADJUSTMENT BUTTONS
Your sewing machine will produce your preference pushing manual...
Instruction Manual - Page 32
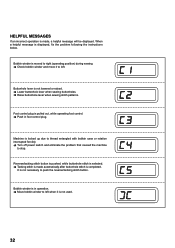
... winder is moved to right (operating position) during sewing. Check bobbin winder and move it is not used.
32
Foot control plug is pulled out, while operating... the machine
to left . Bobbin winder is in foot control plug. When a helpful message is not lowered or raised. Lower buttonhole lever when sewing buttonholes. Raise buttonhole lever when sewing stitch patterns...
Instruction Manual - Page 34
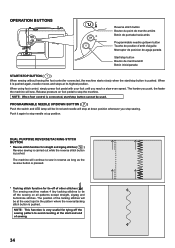
... continue to avoid raveling at the start and end of sewing.
34 NOTE: When foot control is very useful for tying off the sewing pattern to sew in the pattern where the reverse/tacking stitch button is pushed. The machine will sew.
The harder you reach a slow even speed.
PROGRAMMABLE NEEDLE UP/DOWN BUTTON ( )
Push the...
Instruction Manual - Page 36
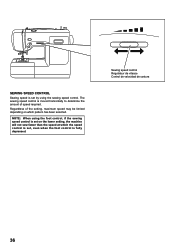
... velocidad de costura
36
Regardless of speed required. NOTE: When using the sewing speed control. SEWING SPEED CONTROL
Sewing speed is moved horizontally to determine the amount of the setting, maximum speed may be limited depending on the lower setting, the machine will not sew faster than the speed at which pattern has been selected. The...
Instruction Manual - Page 42
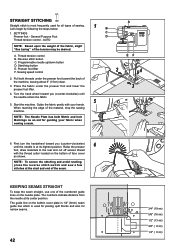
...button E. A. Start/stop the sewing machine. Pull both Metric and Inch ...sewing. Let's begin by following the steps below.
1
B
1. The guide line on the bobbin cover plate is 1/4" (6mm) seam guide line which is used for all types of the numbered guide lines on the bottom of
the machine, leaving about 6" (15cm) clear.
3. STRAIGHT STITCHING
A
Straight stitch is most frequently used...
Instruction Manual - Page 44
... soft furnishings, cover cord with the Stitch Width Control.
44
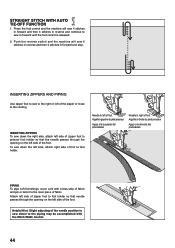
Press the foot control and the machine will sew 4 stitches in reverse and then 4 stitches in forward and stop. INSERTING ZIPPERS AND PIPING
Use zipper foot to sew to the right or left of foot Aiguille à gauche du pied presseur
Aguja a la izquierda...
Instruction Manual - Page 46
...top thread may appear on the bottom depending on the thread, fabric, type of stitch and sewing speed, but the bobbin thread must never appear on the top of stabilizer or interfacing to... the tension with the Thread Tension Control.
NOTE: When sewing a dense (closely spaced) Satin Stitch, the Satin Stitch Foot MUST be used. PLACEMENT OF PATTERNS
The satin stitch increases from the center...
Instruction Manual - Page 62
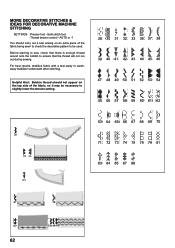
...tear-away or washaway stabilizer underneath when stitching. Helpful Hint: Bobbin thread should carry out a test sewing on the top side of the fabric being sewn to check the decorative pattern to slightly lower the...on an extra piece of the fabric, so it may be necessary to be used. Before starting to sew, check that there is enough thread wound onto the bobbin to ensure that the thread will ...
Instruction Manual - Page 70
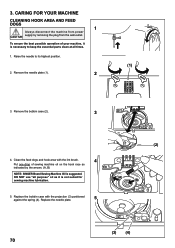
... needle plate (1).
(1)
2
3. Replace the bobbin case with the lint brush.
4
Put one drop of your machine, it is suggested. 3. DO NOT use "all times.
1. Replace the needle plate.
5
(2)
(A) (B)
(3) (4)
70 To ensure the best possible operation of sewing machine oil on the hook race as it is necessary to its highest position. 2. CARING FOR YOUR...
Instruction Manual - Page 76
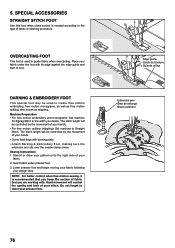
... lower your fabric. 2. Do not forget to sew. DARNING & EMBROIDERY FOOT
This special foot may ...Use this foot when close control is used to the type of fabric that you desire. Machine Preparation • For free motion embroidery and monograms: Set machine
for Zigzag Stitch in the width you are working with darning plate. • Attach Darning & Embroidery Foot, making sure the extension...
Instruction Manual - Page 84
... for examination, repair, electrical or mechanical adjustment." 4. "Use this sewing machine is used by pulling on disposal, this sewing machine if it has a damaged cord or plug, if it has been dropped
or damaged, or dropped into any object into water.
FOOT CONTROL (USA & Canada only)
Use Yamamoto Electric, Model YC-485 EC with any way.
If in...
Similar Questions

I Get E7 Error Message On My Singer Model 7258 Sewing Machine. There Is No Refe
Error message E7 is up on my Singer Stylist model 7258 sewing machine. It is not working at all. I t...
Error message E7 is up on my Singer Stylist model 7258 sewing machine. It is not working at all. I t...
(Posted by ebellamybellamy9 5 years ago)

Bought A Used Singer 5500, Needle Position Not Working. I Was Wondering If I Can
find a repair manual to fix it as there are no repair services in the area?
find a repair manual to fix it as there are no repair services in the area?
(Posted by enolaclark 8 years ago)

Is A Special Foot Required To Free Form Stitch On Singer Sewing Machine Model 55
(Posted by kopitkin 9 years ago)

How To I Fix The Timing Hook On A Fashion Mate 5400/5500
(Posted by terrijames59 10 years ago)
Will This Fit A 5400/5500 Model.how Can I Order That Model?
(Posted by nwillis31 10 years ago)