
Singer 4411 Heavy Duty Support Question
Singer 4411 Heavy Duty Support Question
Find answers below for this question about Singer 4411 Heavy Duty.Need a Singer 4411 Heavy Duty manual? We have 1 online manual for this item!
Question posted by Anonymous-144241 on September 26th, 2014
The Bobbin Shuttle Came Out And I Can Not Get It In Correct. Manual No Help
The person who posted this question about this Singer product did not include a detailed explanation. Please use the "Request More Information" button to the right if more details would help you to answer this question.
Current Answers
Related Singer 4411 Heavy Duty Manual Pages
Instruction Manual - Page 2
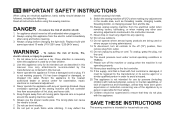
...openings blocked. DANGER - WARNING - Do not allow to avoid a hazard. 20. Use this
manual. Always unplug sewing machine from the electrical outlet when removing covers, lubricating, or when making any opening. 12. EN..., changing needle, threading bobbin, or changing presser foot, and the like. 10.
Switch the sewing machine off ("O") position, then remove plug from outlet. 15.
Instruction Manual - Page 6
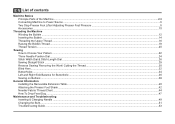
... Power Source ...6 Two Step Presser Foot Lifter/ Adjusting Presser Foot Pressure 8 Accessories ...10
Threading the Machine Winding the Bobbin ...12 Inserting the Bobbin ...14 Threading the Upper Thread ...16 Raising the Bobbin Thread ...18 Thread Tension...20
Sewing How to Choose Your Pattern ...22 Three Needle Position Dial...24 Stitch Width Dial & Stitch Length Dial...
Instruction Manual - Page 9
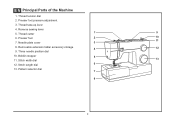
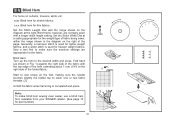
Reverse sewing lever
5. Three needle position dial
10. Pattern selector dial 7
8
2 Needle plate cover
3
8. Stitch length dial
6
13. Thread take-up lever
4. Presser foot
2
10
11
7. Bobbin stopper
5
11. Presser foot pressure adjustment
3. Stitch width dial
13
12. Removable extension table/ accessory storage
4
12
9. EN Principal Parts of the Machine
1. ...
Instruction Manual - Page 11
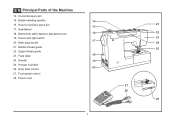
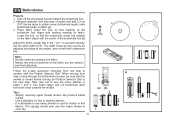
... 28. Drop feed control
27. Presser foot lifter 20
26. Power cord
4
21 22 23 24 25
27 28
26 EN Principal Parts of the Machine
14. Bobbin thread guide
22. Handwheel
18. Handle
19
25. Upper thread guide
23. Power and light switch 17
20. Face plate
18
24...
Instruction Manual - Page 13
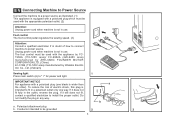
... which must be used with the appropriate polarized outlet. (2)
Attention: Unplug power cord when machine is not in any way.
Polarized attachment plug
b. The foot control must be used with...Foot control The foot control pedal regulates the sewing speed. (3)
Attention: Consult a qualified electrician if in use . Unplug power cord when machine is intended to fit in the outlet, reverse...
Instruction Manual - Page 15
....
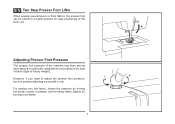
8 EN Two Step Presser Foot Lifter
When sewing several layers or thick fabrics, the presser foot can be raised to a higher position for heavy fabric, tighten by turning the screw counter clockwise,... Foot Pressure
The presser foot pressure of fabric (light-or-heavy weight). However, if you need to the type of the machine has been pre-set and requires no particular readjustment according to...
Instruction Manual - Page 17
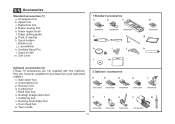
Seam ripper/ brush f. Bobbin (3x) j. Auxiliary Spool Pin l. Hemmer foot q. Gathering foot u. Twin needle
2 Optional accessories
n
o
...Satin stitch foot o. Cording foot r. Buttonhole foot d. L-screwdriver k. they are not supplied with this machine; Overcasting foot p. Even Feed foot w. Blind hem foot s. EN Accessories
Standard accessories (1) a. Darning/ embroidery foot ...
Instruction Manual - Page 19
... to the left (10) and remove.
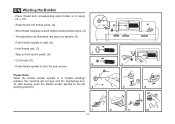
Wind thread clockwise around bobbin winder tension discs. (4)
- Please Note:
When the bobbin winder spindle is in "bobbin winding"
position, the machine will not sew and the handwheel turn. Push bobbin spindle to spool pin. (1/2)
- Hold thread end. (7) 1
- EN Winding the Bobbin
- Place thread and corresponding spool holder on to right. (6)
-
Instruction Manual - Page 21
.... (C)
Attention:
1
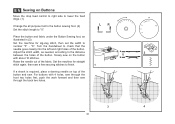
Turn power switch to off ("O") before inserting or removing
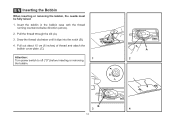
the bobbin. Insert the bobbin in the bobbin case with the thread running counterclockwise direction (arrow).
2. Pull the thread through the slit (A).
3. B 3
14
A 2
C
4
EN Inserting the Bobbin
When inserting or removing the bobbin, the needle must be fully raised.
1. Draw the thread clockwise until it...
Instruction Manual - Page 23
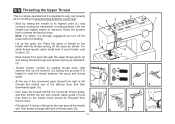
...- Thread tension module by not doing so several sewing problems could result.
- At the top of this movement pass thread from ...right to left channel. (5) During this process it is helpful to hold the thread between the spool and thread guide.
-... Thread
This is a simple operation but it is important to carry out correctly as by leading thread down to the needle which should be threaded from...
Instruction Manual - Page 25
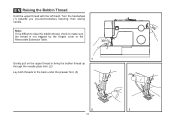
..., then raising needle. Note: If it is difficult to raise the bobbin thread, check to make sure the thread is not trapped by the hinged cover or the Removable Extension Table.
1 Gently pull on the upper thread to bring the bobbin thread up through the needle plate hole. (2) Lay both threads to...
Instruction Manual - Page 27
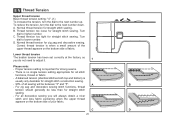
... number up. Thread tension too loose for straight stitch sewing. Turn
dial to higher number.
B. A
B
- C.
Lower thread tension
The bobbin tension has been set correctly at the factory, so you will be less than for straight stitch construction sewing.
- 90% of fabric. For all decorative sewing you do not need to adjust it.
1
Please note...
Instruction Manual - Page 29
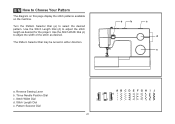
... pattern. a
b
c d e
a. Stitch Length Dial e.
Stitch Width Dial d.
Reverse Sewing Lever b. Three Needle Position Dial c. Turn the Pattern Selector Dial (e) to adjust the width...Length Dial (d) to Choose Your Pattern
The diagram on this page display the stitch patterns available on the machine.
Pattern Selector Dial
ABCDE FGH I J
3
4
2
1
22 The Pattern Selector Dial may be ...
Instruction Manual - Page 31
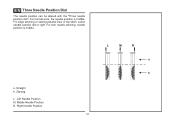
... needle position dial". For twin needle stitching, needle position is middle. Left Needle Position M. Right Needle Position
24
L
M
R
a b Middle Needle Position R. For edge stitching or sewing parallel lines of top stitch, select needle position left or right. Straight b. Zig-zag L.
For normal work, the needle position is middle.
Instruction Manual - Page 35
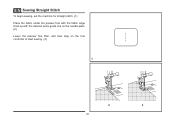
EN Sewing Straight Stitch
To begin sewing, set the machine for straight stitch. (1) Place the fabric under the presser foot with the fabric edge lined up with the desired seam guide line on the needle plate. (2) Lower the presser foot lifter, and then step on the foot controller to start sewing. (3)
1
2
3
28
Instruction Manual - Page 37
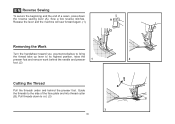
..., press down to the side of the face plate and into thread cutter (B).
Guide the threads to cut. (3)
30
B 3 A
Release the lever and the machine will sew forward again. (1)
Removing the Work
Turn the handwheel toward you (counterclockwise) to bring
the thread take up lever to its highest position, raise the
presser...
Instruction Manual - Page 39
..., and a wider stitch is completed and press.
2 Note: To make sure the machine settings are normally sewn
with a longer stitch length setting.
Sew a test first to make blind hem sewing even easier, use a blind hem foot, available from your SINGER retailer. (See page... hem extending about 7 mm (1/4") to the
right side of the folded fabric.
1
Start to sew slowly on the right of the
page.
Instruction Manual - Page 41
... the heavy thread or cord. (A)
34
M (a) (b) Adjust the Stitch Length Dial in the " " to sew too many stitches in steps 1 and 3. Measure diameter and thickness of the buttonhole foot (b).
mark buttonhole length on the fabric you are using to obtain correct buttonhole length; Take care not to set stitch density. Use a stabilizer for...
Instruction Manual - Page 45
... needle out of the button. Turn the handwheel to the distance between the holes of the button and sew. Set the machine for straight
a
2
ba b
stitch again, then sew a few securing stitches to number "3" - Slowly sew on Buttons
Move the drop feed control to right side to lower the feed dogs. (1)
Change the all...
Instruction Manual - Page 60

... and pull on the fabric while sewing, let the feed dogs pull
the fabric under the foot.
1. Loosen lower thread tension as illustrated. 3. Select the correct foot.
1. Clean the hook and feed dog as described. 2. The bobbin case is caught in the hook.
53
Correction
1. The machine is damaged. Fabric has been pulled. The needle...
Similar Questions

Reverse Caused Nesting?
Works fine stitching in forward, when reverse material rolls up and stitching nests. Have new needle...
Works fine stitching in forward, when reverse material rolls up and stitching nests. Have new needle...
(Posted by dwdsad 7 years ago)

I Have A Singer 2277 Traditional Machine. The Bobbin Shuttle Fell Out.
Having trouble reinserting bobbin shuttle on model 2277 singer sewing machine.
Having trouble reinserting bobbin shuttle on model 2277 singer sewing machine.
(Posted by adeleacosta 9 years ago)

Singer 3232, The Bobbin Shuttle Came Out And I Cannot Put It Back
(Posted by antjeicl 9 years ago)

My Bobbin And Needle Will Not Catch To Thread
The needle goesdown correctly but the bobbin thread does not catch
The needle goesdown correctly but the bobbin thread does not catch
(Posted by lurunner 9 years ago)

The Stitch Is Clumping Up And Popping The Bobbin Is Making A Noise
The machine starts to sew and right after the thread pop,sound like the bobbin is making a clapping ...
The machine starts to sew and right after the thread pop,sound like the bobbin is making a clapping ...
(Posted by Justwhatilikeaccessories 9 years ago)