
Sharp CV10NH Support Question
Sharp CV10NH Support Question
Find answers below for this question about Sharp CV10NH - 10,000 BTU Portable Air Conditioner.Need a Sharp CV10NH manual? We have 1 online manual for this item!
Question posted by Choaspopopo on October 1st, 2013
How To Attach The Drain Hose On A Portable Air Conditioner
The person who posted this question about this Sharp product did not include a detailed explanation. Please use the "Request More Information" button to the right if more details would help you to answer this question.
Current Answers
Related Sharp CV10NH Manual Pages
CV-10NH Operation Manual - Page 3
...E-4 • LOCATION E-7 • INCLUDED E-7 • PART NAMES E-8 • INSTALL WINDOW PANEL E-10 • INSTALLATION AND REMOVAL OF EXHAUST HOSE .........E-14 • PRE-OPERATION CHECKS E-16 • COOL MODE E-18 • DEHUMIDIFICATION MODE E-19 ...
This manual explains the proper use of your new air conditioner.
Please read this manual carefully before using the product.
CV-10NH Operation Manual - Page 5
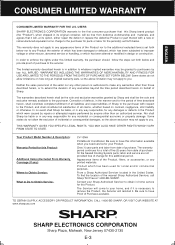
... equivalent at 1-800-BE-SHARP.
Your Product Model Number & Description:
Warranty Period for this Product. To find the location of purchase to Obtain Service:
CV-10NH
Portable Air Conditioner. Contact your home, and if it .
TO OBTAIN SUPPLY, ACCESSORY OR PRODUCT INFORMATION, CALL 1-800-BE-SHARP, OR VISIT OUR WEBSITE AT www.sharpusa.com...
CV-10NH Operation Manual - Page 6
...right.
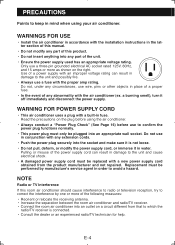
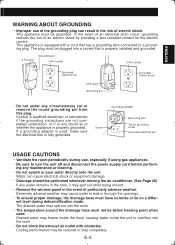
PRECAUTIONS
Points to keep in fuse. WARNINGS FOR USE
• Install the air conditioner in order to correct the interference by manufacture's service agent in accordance with the ...receiving antenna. • Increase the separation between the room air conditioner and radio/TV receiver. • Connect the room air conditioner into the socket and make sure it off immediately and ...
CV-10NH Operation Manual - Page 7
... cause electrical shock or equipment damage. • Drainage should be performed whenever moving the air conditioner. (See Page 26)
If any circumstances cut or remove the round grounding pin from this plug. Drained water may freeze inside the hose, causing water inside the unit to whether the appliance is equipped with obstacles.
This appliance...
CV-10NH Operation Manual - Page 8
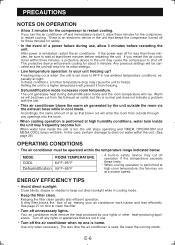
...via the exhaust hose while in use , allow three minutes for less than three minutes, be operated within the unit. (See page 26)
OPERATING CONDITIONS
• The air conditioner must remove ... tank inside the unit may cut off for the compressor to drain out water within the temperature range indicated below. Your air conditioner must be sure to wait at high room temperature, the fan...
CV-10NH Operation Manual - Page 9
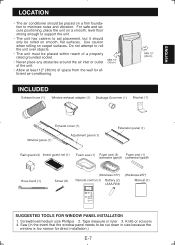
...air conditioner should only be placed on carpet surfaces. Screwdriver(medium size Phillips) 2. Tape measure or ruler 3. Do not attempt to be placed within reach of a properly rated grounded socket.
• Never place any obstacles around the air... down in size because the
window is too narrow for efficient air-conditioning. MIN.12" (30cm)
INCLUDED
MIN.12" (30cm)
SUGGESTED TOOLS...
CV-10NH Operation Manual - Page 10
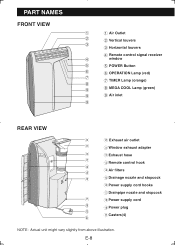
... signal receiver
4
window
5
5 POWER Button
6
6 OPERATION Lamp (red)
7 7 TIMER Lamp (orange)
8
9
8 MEGA COOL Lamp (green)
9
9 Air inlet
9
REAR VIEW
0
0 Exhaust air outlet
q
q Window exhaust adapter
w
w Exhaust hose
e
e Remote control hook
r
t
r Air filters
y
t Drainage nozzle and stopcock
y Power supply cord hooks
u Drainpipe nozzle and stopcock
u
i Power supply...
CV-10NH Operation Manual - Page 12
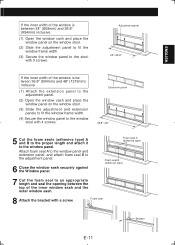
E-10
Cut
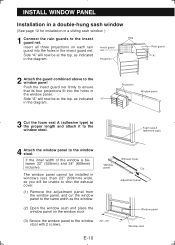
Window panel Window stool INSTALL WINDOW PANEL
Installation in a double-hung sash window
(See page 12 for installation ...guard net firmly to ensure that its four projections fit into the holes in the diagram. Foam seal A (adhesive type)
4 Attach the window panel to the window 22"~ 24" stool with 2 screws.
net
Side "A" will now be at the top, as the window...
CV-10NH Operation Manual - Page 13
... width of the window is between 36.8" (934mm) and 48" (1219mm) inclusive.
(1) Attach the extension panel to the adjustment panel.
(2) Open the window sash and place the window ... window panel to the stool with 4 screws.
Foam seal
Bracket
E-11 Attach foam seal A to the window panel and extension panel, and attach foam seal B to the window panel.
Extension panel 36.8"~48"
5 Cut...
CV-10NH Operation Manual - Page 14

... Install the window panel into the holes in the window panel. Insect guard net
Hole Projection
2 Attach the guard combined above to the insect guard net. If the inner height of the window is ... in the insect guard net. INSTALL WINDOW PANEL
Installation in a sliding sash window
(See page 10 for installation in a double-hung window.)
1 Connect the rain guards to the window panel.
The...
CV-10NH Operation Manual - Page 15

... type)
Bracket
E-13
If the inner height of the window is between the side of the window is between 36.8" (934mm) and 48" (1219mm) inclusive.
(1) Attach the extension panel to the adjustment panel.
(2) Open the window sash and place the window panel on the window frame.
(2) Slide the adjustment panel to...
CV-10NH Operation Manual - Page 16
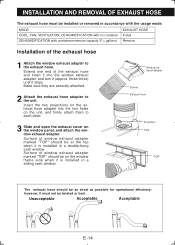
... exhaust hose
1 Attach the window exhaust adapter to the exhaust hose. INSTALLATION AND REMOVAL OF EXHAUST HOSE
The exhaust hose must not be twisted or bent. Window exhaust adapter Extend Exhaust hose
Projection Hole
"TOP"
The exhaust hose should be on the window panel, and attach the window exhaust adapter. Make sure they are securely attached.
2 Attach the exhaust hose adapter...
CV-10NH Operation Manual - Page 17
Lift up and remove the exhaust hose adapter from the unit by pushing down on the two projections.
ENGLISH
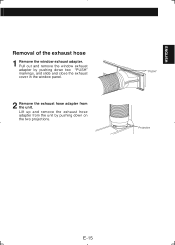
Removal of the exhaust hose
1 Remove the window exhaust adapter. Pull out and remove the window exhaust adapter by pushing down two "PUSH" markings, and slide and close the exhaust cover in the window panel.
2 Remove the exhaust hose adapter from the unit. "PUSH" Projection
E-15
CV-10NH Operation Manual - Page 18
... sure the ± and - The circuit breaker is activated, power is supplied, and the air conditioner is functioning correctly.
4 Press the RESET button until you will hear a CLICK if the circuit... pointed implement. • If you hear another CLICK. PRE-OPERATION CHECKS
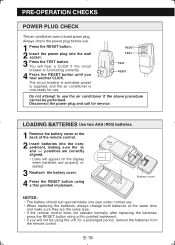
POWER PLUG CHECK
This air conditioner uses a fused power plug. LOADING BATTERIES Use two AAA (R03) batteries.
1 Remove the ...
CV-10NH Operation Manual - Page 21
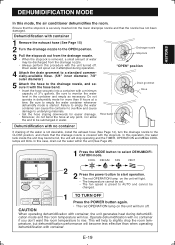
... no container if you don't want the room temperature to underlying materials.
• Set the hose sloping downwards for more than when operating dehumidification with a minimum capacity of 31/2 gallons. In this mode, the air conditioner dehumidifies the room. This will help to empty the water container whenever dehumidify...
CV-10NH Operation Manual - Page 22
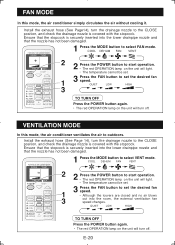
... to set the desired fan speed. FAN MODE
In this mode, the air conditioner ventilates the air to the CLOSE position, and check the drainage nozzle is securely inserted into...no air blows
3
out into the room, the external ventilation fan speed changes. Install the exhaust hose (See Page 14), turn off .
VENTILATION MODE
In this mode, the air conditioner simply circulates the air ...
CV-10NH Operation Manual - Page 24
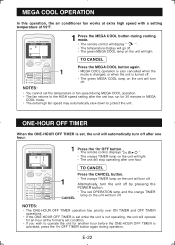
... has run for another hour before the ONE-HOUR OFF TIMER is set, the unit will turn off.
MEGA COOL OPERATION
In this operation, the air conditioner fan works at the formerly set the temperature or fan speed during MEGA COOL operation. • The fan returns to protect the unit.
CANCEL
NOTES...
CV-10NH Operation Manual - Page 28
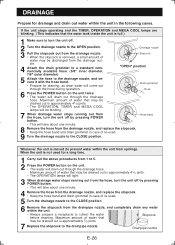
... nozzle, and replace the stopcock. • Keep the hose band and drain grommet in case of re-used .
5 Turn the drainage nozzle to the CLOSE position.
6 Remove the stopcock from the drainage nozzle.
4 Attach the drain grommet to a standard commercially available hose. (5/8" inner diameter, 7/8" outer diameter)
Stopcock
"OPEN" position
5 Attach the hose to collect the water before...
CV-10NH Operation Manual - Page 29
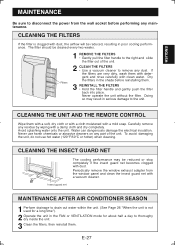
... guard net becomes clogged with dust. Carefully remove any dust. Insect guard net
MAINTENANCE AFTER AIR CONDITIONER SEASON
1 Perform drainage to drain out water within the unit. (See Page 26 "When the unit is clogged with dust, the airflow will be cleaned every two weeks. CLEANING THE FILTERS
If the filter...
CV-10NH Operation Manual - Page 30
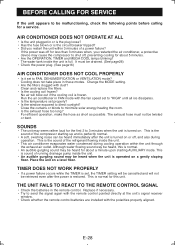
... of a power failure? Although water flowing sound way be drained. (See page26) • Check the power plug. (See page16)
AIR CONDITIONER DOES NOT COOL PROPERLY
• Is it set to FAN, DEHUMIDIFICATION...energy heating the room. • Is the exhaust hose too long? For efficient operation, make the hose as short as possible. AIR CONDITIONER DOES NOT OPERATE AT ALL
• Is the ...
Similar Questions

Replacement Window Exhaust Unit For Sharp Portable Air Conditioner Model Cv-10nh
Do you have a replacement window exhaust kit available for sharp portable air conditioner model cv-1...
Do you have a replacement window exhaust kit available for sharp portable air conditioner model cv-1...
(Posted by jnohner18 2 years ago)


How To Drain Sharp Portable Air Conditioner Cv-10ctx-s
(Posted by husjess 10 years ago)

How To Easily Drain A Portable Air Conditioner
(Posted by viwoo 10 years ago)

How Do You Easily Drain A Sharp Portable Air Conditioner, Model # Cv-10nh?
I am having issues with my Sharp air conitioner, Model # CV-10 NH. I've misplaced the manual and can...
I am having issues with my Sharp air conitioner, Model # CV-10 NH. I've misplaced the manual and can...
(Posted by kashka 13 years ago)