2005 Saturn Ion Support Question
2005 Saturn Ion Support Question
Find answers below for this question about 2005 Saturn Ion.Need a 2005 Saturn Ion manual? We have 1 online manual for this item!
Question posted by sfuHen on March 25th, 2014
How Do I Remove The Front Seat On A 2005 Saturn Ion
The person who posted this question about this Saturn automobile did not include a detailed explanation. Please use the "Request More Information" button to the right if more details would help you to answer this question.
Current Answers
Related Manual Pages
Owner's Manual - Page 1
2005 Saturn ION Owner Manual
Seats and Restraint Systems ...1-1 Front Seats ...1-2 Rear Seats ...1-9 Safety Belts ...1-10 Child Restraints ...1-30 Airbag System ...1-49 Restraint System Check ...1-59 Features and Controls ...2-1 Keys ...2-2 Doors and Locks ...2-7 Windows ...2-13 Theft-Deterrent Systems ...2-...
Owner's Manual - Page 2
...the page number where it was printed. Part No. 05ION C First Edition ii
©
2005 General Motors Corporation. If this is done, it is the Index in the vehicle. It...48207
How to Use This Manual
SATURN, the SATURN Emblem, and the name ION are registered trademarks of General Motors Corporation. GENERAL MOTORS and GM are registered trademarks of Saturn Corporation. If the vehicle is...
Owner's Manual - Page 13

... To fold the seatback flat, do the following: 1. Lift the bar under the seat to make sure it is locked into place.
3. Lift the recliner lever, located on this...
Things you put on the outboard side of the seat, fully and fold the seat forward until the seatback disengages.
1-7 Remove or secure all items before driving. Try to move the seat with your body to unlock it will go and ...
Owner's Manual - Page 32

... belt comfort for older children who have outgrown booster seats and for each outside passenger position in the rear seat. Here is one guide available for some adults. Remove the guide located on the trim behind the seatback ...: 1. There is how to fold the rear seatback. 2. See Split Folding Rear Seat on a shoulder belt, the comfort guide positions the belt away from its storage clip.
Owner's Manual - Page 35
.... It is made to severe crash in Rear Seat Passengers on their original seating positions.
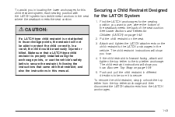
Buckle, position, and release the safety ...a moderate to fit. The extender has been designed for securing child seats. To help the safety belts reduce a person's forward movement in a... someone else use it, and use it only for the seat it , take them on page 1-60 for your retailer ...
Owner's Manual - Page 49
Attach and tighten the LATCH attachments on the seat. 3. To remove the child restraint, simply unhook the top tether from the top tether anchorage ... page 1-42. 2. Make sure that a LATCH-type child restraint is secure. Find the LATCH anchorages for the seating position you want to secure the restraint, following the instructions that restraint, and also the instructions in this manual.
...
Owner's Manual - Page 81

...safety belt clip to enter or exit the vehicle, or in any way other than as it impossible to remove the safety belt from the clip when you have vanity mirrors. This clip is covered. If so, the...we know that nothing we put on the passenger's side of the way when entering and exiting the rear seats.
Lift the cover to hold the safety belt out of the vehicle has a clip. Do not use ...
Owner's Manual - Page 94
...the shift lever.
2-28 The shift lock release is designed to take some of the pressure from being removed
unless the shift lever is in PARK (P), and
• Prevent movement of the shift lever out of ...on the parking pawl in the transaxle. Press the shift lever button before you leave the driver's seat. You may find it difficult to pull the shift lever out of Park (P)
Your vehicle ...
Owner's Manual - Page 125
... accessory or accessory bracket from working as they should. When it's ready, it is fully seated. Check with the protective cap. Always turn off electrical equipment when not in use , always...firmly until it will drain the battery. When adding electrical equipment, be blown. To remove the ashtray, lift it or keep other flammable items in while it is heating will ...
Owner's Manual - Page 131

... which may
adversely affect the performance of the system.
• Keep the path under the front seats clear of the glove box until the door can be replaced early. Tilt the glove box door... through the glove box. 1. Open the glove box and remove all articles from the air, including pollen and dust particles. The filter removes certain particles from the inside of the airflow. ...
Owner's Manual - Page 247
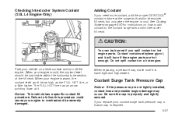
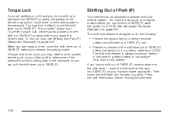
...burn if the engine parts are hot enough. When your coolant surge tank pressure cap, a Saturn cap is not tightly installed, coolant loss and possible engine damage may occur.
Do not spill...FULL HOT line, or a little higher. Be sure the cap is hand-tight and fully seated. Coolant contains ethylene glycol, and it is properly and tightly secured. Checking Intercooler System Coolant...
Owner's Manual - Page 256

...the DEX-COOL® coolant mixture to be lower. If the coolant is hand-tight and fully seated. Coolant contains ethylene glycol and it . 3. If you spill coolant on a hot engine.
1....64257;ll neck. 4. With the Intercooler System pressure cap off . {CAUTION:
You can remove the Intercooler System pressure cap when the Intercooler System, including the upper intercooler hoses, are ...
Owner's Manual - Page 260

... make a moderate brake stop , then your brakes. Also, the rear brake drums should always be removed and inspected each time the tires are rotated, inspect brake pads for wear and evenly tighten wheel nuts... Wear
Your vehicle has front disc brakes and may have built-in the proper sequence to Saturn specifications. Disc brake pads have rear drum brakes or rear disc brakes. The sound...
Owner's Manual - Page 261
..., chemicals known to the State of your braking system - for 25 days or more, remove the black, negative (−) cable from running down and you and gas that can change - for a new battery, get new approved Saturn replacement parts. Replacing Brake System Parts
The braking system on page 5-42 for your vehicle...
Owner's Manual - Page 307
...Always use cleaning agents that are petroleum based, or that are made for painted surfaces to remove foreign matter. Cleaning Exterior Lamps/Lenses
Use only lukewarm or cold water, a soft cloth ...and a car washing soap to keep it clean by hand may cause water to remove residue from your Saturn retailer. The best way to preserve your vehicle's finish if they could stain...
Owner's Manual - Page 310
... mud and debris can create a chemical fallout.
Dirt packed in the paint job causes this, Saturn will repair, at no charge to the owner, the surfaces of new vehicles damaged by this for ice and snow removal and dust control can fall upon and attack painted surfaces on the underbody parts such...
Owner's Manual - Page 330
...have high effort or excessive wear. Applying silicone grease on weatherstrips with genuine Saturn parts as needed . Do not lubricate accelerator or cruise control cables.
6-8 ... this maintenance item will make them replaced if they are working properly. Replace any folding seat hardware. Maintenance Footnotes
† The U.S. Look for any other brake parts, including drums...
Owner's Manual - Page 335
... only.
• To check the PARK (P) mechanism's holding ability: With
{CAUTION:
When you are doing this check, your Saturn retailer if service is room in front of your vehicle in NEUTRAL (N), slowly remove foot pressure from the underbody. Take care to roll. Parking Brake and Automatic Transaxle Park (P) Mechanism Check
Park on...
Owner's Manual - Page 356

... Satisfaction Procedure ...GM Mobility Reimbursement Program ...Reporting Safety Defects to Saturn ...Reporting Safety Defects to the Canadian Government ...Reporting Safety Defects ...Door (cont.) Rear Door Security Locks ...2-9 Rear Doors ...2-10 Driver Position, Safety Belt ...1-16 Seat Height Adjuster ...1-3 Driving At Night ...4-15 City ...4-19 Defensive ...4-2 Drunken ...4-2 Freeway ...4-20 ...
Owner's Manual - Page 362
...Door Security Locks ...2-9 Rear Doors ...2-10 Rear Safety Belt Comfort Guides ...1-26 Rear Seat Passengers, Safety Belts ...1-23 Rearview Mirror, Automatic Dimming with Compass and Temperature Display... Removing the Flat Tire and Installing the Spare Tire ...5-77 Removing the Spare Tire and Tools ...5-74 Replacement Bulbs ...5-55 Reporting Safety Defects Canadian Government ...7-8 Saturn ...7-8...
Similar Questions


