
Sanyo DP55441 Support Question
Sanyo DP55441 Support Question
Find answers below for this question about Sanyo DP55441.Need a Sanyo DP55441 manual? We have 1 online manual for this item!
Question posted by raine1294 on August 27th, 2013
After You Watch It For Awhile, It Will Get Dimmer Then Cut Off. Why?
You can't tell it's getting dimmer/darker until it cuts off and you churn it back on. It is so bright. Almost as if it has a Sleep Timer on but it doesn't!
Current Answers
Related Sanyo DP55441 Manual Pages
Owners Manual - Page 3

... point of your product. Do not install near water. Protect the power cord from the apparatus.
11. If an outside antenna is connected to the television equipment, be taken to provide some protection against voltage surges and built up
can reduce the service life of cable entry as to keep from...
Owners Manual - Page 4

... to operate the unit. ENERGY STAR® USER INFORMATION
ENERGY STAR User Information Statement: the factory default settings of the FCC Rules. To ensure your television is encouraged to try to correct the interference by turning the equipment off and on the screen. This equipment generates, uses and can cause permanent...
Owners Manual - Page 5

... AND UNINSTALLING STAND 5
INSTALLATION 6 POSITIONING THE LCD HDTV 6 WALL MOUNTING (OPTIONAL 6
GETTING STARTED 7 PReCAUTIONS 7 GETTING STARTED-CONTROLS AND JACKS 8 REMOTE CONTROL OPERATION 9 GETTING STARTED-CONNECTIONS.....10 POWER CONNECTION 11 INITIAL SETUP 11 INITIAL CHANNEL SCAN 11 GETTING STARTED-POWER CONNECTION/CHANNEL SEARCH..11
ADVANCED AV CONNECTIONS........... 12 ADVANCED...
Owners Manual - Page 6

... holes with screw driver.
3 12 4
5 Installing Stand (55")
1 Place the LCD TV on a flat surface place where
2 Secure the stand to the TV with 4 screws.
SAFETY NOTE
For correct installing, mounting...it ) which is strong enough to support the weight of the LCD TV Stand, it on a flat surface with soft materials (such as a blanket) for
protecting the display screen.
3 12 4
...
Owners Manual - Page 7

... (min.); 16mm (max.)
Wall
• (60mm)
6 Wall mounting kit shall be able to a wall mounting kit. English
INSTALLATION POSITIONING THE LCD HDTV
Always use a firm-flat surface when positioning your HDTV to secure it to sustain at least 3 times of your HDTV.
NOTE: 1.
Owners Manual - Page 8

.... (the size of battery is AAA). Match the "+" and "-" signs on -screen MENU to Search for off -air signals from a direct Cable TV connection. English
GETTING STARTED
1 Install batteries in the Remote. OR
b.
Owners Manual - Page 9

English
V DEO 1 NPUT
GETTING STARTED-CONTROLS AND JACKS
Input / OK button
LEFT-SIDE PANEL BACK-SIDE PANEL
Y
PC INPUT
PC AUDIO
INPUT
Pb
Pr
Pb
L
Pr
R
L...DIGITAL ANTENNA INPUT, PAGE 7 -
A digital AV interface that accepts uncompressed video signals for updating the television's firmware and accessing JPEG files.
8
Connect a RF antenna or Analog Cable system to this terminal...
Owners Manual - Page 10

..., WaterGlass, Zoom1, Full and Zoom2. Press to switch to select digital channel D6.
RESET Button -
SLEEP Button- SPORTS Button-
Press to select an option from the menu.
1-- Press to execute Channel Scan ...turned off or when a power failure occurs. AUDIO Button- Press this button to set Off Timer function among "Off", "CC Display" and "Muted=On". Example: Press 6 then OK button...
Owners Manual - Page 11

... AUDIO cable to set Green, Blue, and Red video jacks asVIDEO2 or VIDEO3(YPbPr) on the HDTV and to your digital device as shown. English
GETTING STARTED-CONNECTIONS
3 Analog Signal Connections -
Owners Manual - Page 12
... Scan to highlight
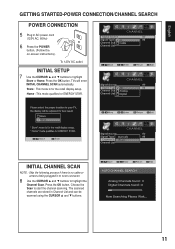
Store or Home. Press the OK button.
INITIAL setup 7 Use the CURSOR ▲ and ▼ buttons to start the channel scanning. English
GETTING STARTED-POWER CONNECTION/CHANNEL SEARCH
POWER CONNECTION
5 Plug in Channel List and can be scanned using the CURSOR ▲ and ▼ buttons.
11
Move
OK...
Owners Manual - Page 18

... ▼buttons to select the options you want to adjust and press the OK button. ON-SCREEN MENU OPERATION (CONTINUED)
English
PARENT ADJUSTMENT
This SANYO television is correct, it
will automatically return to the PARENT menu. Press the OK button.
2 Use the 0 - 9 buttons to enter "NEW PIN" (the new password you...
Owners Manual - Page 20

... setting.
Press the OK button.
2 Use the CURSOR ▲ and ▼ buttons to select
the Brightness, Contrast, Saturation, Hue or Sharpness. Press the OK button.
3 Use the CURSOR ▲ and &#... are not select the
User mode. • User mode (Picture Mode) will allow to adjust brightness,
contrast,saturation,hue and sharpness function by user. • Use the CURSOR ▲ and &#...
Owners Manual - Page 22

... zoom choices.
NOTE:
• This item will be boosted or reduced depending on the room brightness.
1 Press the MENU button on the remote control to display the Main menu.
2 Use... choose
from 20 Seconds, 30 Seconds, 40 Seconds, 50 Seconds or 60 Seconds. LIGHT SENSOR OPERATION
Picture brightness will not need noise reduction. Press the OK button.
4 Use the CURSOR ◄ and ► buttons...
Owners Manual - Page 24

...control to display the Main menu.
2 Use the CURSOR◄ and ► buttons to select
minutes.
Sleep- DIGITAL CLOSED-CAPTION OPERATION
Digital CC- Press the OK button.
4 Use the CURSOR ▲ and &#...will appear in the squared and blank region.
23
Press the OK button. turn on TV at your panel.
1 Press the MENU button on the remote control to display the Main menu.
2 Use the ...
Owners Manual - Page 29

... picture on a full screen
• Press the PIX SHAPE button on the remote control to change settings.
7, 11, 15 - 16
9, 23 9, 21
Poor Picture/ Sound (watching Analog)
"No Signal" message appears on the remote control.
28
No picture, sound (Digital Picture)
• Check the antenna / external connections.
• There may be...
Owners Manual - Page 30
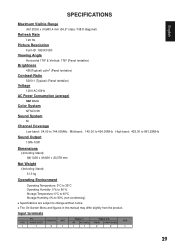
....6" class /138.8 diagonal)
Refresh Rate
120 Hz
Picture Resolution
Full HD 1920X1080
Viewing Angle
Horizontal 178° & Vertical: 178° (Panel tentative)
Brightness
450(Typical) cd/m2 (Panel tentative)
Contrast Ratio
5000:1 (Typical) (Panel tentative)
Voltage
120V AC 60Hz
AC Power Consumption (average)
342 Watts
Color System
NTSC3.58
Sound System
M
Channel Coverage
Low...
Similar Questions

Sanyo 27 Inch And 32 Inch Tv Set
What retailers in Northern Virginia sell Sanyo 27 in flat screen television set? What retailers in N...
What retailers in Northern Virginia sell Sanyo 27 in flat screen television set? What retailers in N...
(Posted by bbriston 9 years ago)

Can I Connect My Care Sara Hydrophone To My Sanyo Dp46840 Flat Panel Tv
(Posted by freespirittonya 9 years ago)
Can I Connect My Care Sara Hydrophone To My Sanyo Dp46840 Flat Panel Tv And How
(Posted by freespirittonya 9 years ago)

Sanyo Dp55441 How Do I Get Hdmi Channel To Be Default Channel On Start Up
(Posted by joycndsgu 10 years ago)

Sanyo Tv Model Dp55441 How Do You Get To Menu Without Remote
(Posted by whwpunkpa 10 years ago)