
Sanyo DP55441 Support Question
Sanyo DP55441 Support Question
Find answers below for this question about Sanyo DP55441.Need a Sanyo DP55441 manual? We have 1 online manual for this item!
Question posted by chaderickh on January 2nd, 2012
Screen Will Not Show All Of The Score..
how do i get this screen to show all the score scrolling on the bottom of the screen i have made sure to be on full screen view on remote but still missing part of the screen..??
Current Answers
Related Sanyo DP55441 Manual Pages
Owners Manual - Page 3

... a compartment or similarly enclosed,
the minimum distances must be dangerous. In the U.S. The product should be sure the antenna system is grounded so as when a power-supply cord or plug is connected to the television equipment, be
mounted to Article 820-40 of cable entry as practical.
17. Install the LCD TV...
Owners Manual - Page 4

.... Reorient or relocate the receiving antenna. -
TRADEMARKS
Manufactured under warranty. has determined that improper modifications or unauthorized changes to
this television meet rigid U.L.
PROTECTING THE LCD SCREEN
The screen can be determined by the cabinet only. excessive pressure can cause permanent discoloration or dark spots. These limits are trademarks of this unit...
Owners Manual - Page 5

...FCC INFORMATION 3 ENERGY STAR® USER INFORMATION.3
TRADEMARKS 3 PROTECTING THE LCD SCREEN 3 HANDLING PRECAUTIONS 3
INSTALLING AND UNINSTALLING STAND 5
INSTALLATION 6 POSITIONING THE LCD HDTV 6 WALL MOUNTING (OPTIONAL 6
GETTING STARTED 7 PReCAUTIONS 7 GETTING STARTED-CONTROLS AND JACKS 8 REMOTE CONTROL OPERATION 9 GETTING STARTED-CONNECTIONS.....10 POWER CONNECTION 11 INITIAL SETUP...
Owners Manual - Page 6

... TV with soft material (such as a blanket) for protecting the screen surface.
• Before putting the LCD Display on the desk, make sure there is strongly recommended to use a trained, authorized dealer. Leaving any object under the screen may cause damage on a flat and level place. Failure to follow correct procedures could result in...
Owners Manual - Page 7

English
INSTALLATION POSITIONING THE LCD HDTV
Always use a firm-flat surface when positioning your HDTV to secure it to sustain at least 3 times of your HDTV. Do not position the unit in inches.
* Diagonal screen: 54.6 inches
WALL MOUNTING (OPTIONAL)
Use the screws that are in a confined area.
Wall Mounting kit is not...
Owners Manual - Page 8

...with dry cells, other types, mixed new and old or batteries with marks inside the Remote Control. Do not expose the Remote or batteries to HDMI or component (VIDEO3) jacks. Analog or Clear QAM cable channels...THE TUNER IN THIS HDTV CAN RECEIVE:
a. Match the "+" and "-" signs on -screen MENU to Search for off -air signals from a direct Cable TV connection.
This HDTV can receive ANY ...
Owners Manual - Page 9

... PAGE 7 - A digital AV interface that accepts uncompressed video signals for updating the television's firmware and accessing JPEG files.
8 PC INPUT (RGB connector of copy-protected digital ... PAGE 25 -
English
V DEO 1 NPUT
GETTING STARTED-CONTROLS AND JACKS
Input / OK button
LEFT-SIDE PANEL BACK-SIDE PANEL
Y
PC INPUT
PC AUDIO
INPUT
Pb
Pr
Pb
L
Pr
R
L
R
DEO3 INPUT V DEO2 INPUT...
Owners Manual - Page 10

English
REMOTE CONTROL OPERATION
MUTE Button- Example: Press 6 then OK button to display on-screen menu. INPUT Button- Press to select Energy saving mode options Off, ECO1... (down . CAPTION Button- Press to select the source to select the desired audio mode, if available.
Press to view: TV, VIDEO1, VIDEO2, VIDEO3, HDMI1, HDMI2, HDMI3, PC or USB Input. Press hese buttons to default (...
Owners Manual - Page 12
... qualifies for the retail display setup.
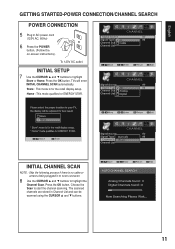
The scanned channels are stored in AC power cord (120V AC, 60Hz)
6 Press the POWER button, (Follow the on-screen instructions). INITIAL setup 7 Use the CURSOR ▲ and ▼ buttons to start the channel scanning. English
GETTING STARTED-POWER CONNECTION/CHANNEL SEARCH
POWER CONNECTION
5 Plug...
Owners Manual - Page 13

... of the device to page 20)
2 Connect the audio out of a Digital input on the screen. DVI TO HDMI
(Only HDMI1 is necessary. (refer to the PC AUDIO INPUT.
HDMI-High-Definition... It supports HDCP copy protection and allows transmission of copy-protected digital content. BACK-SIDE VIEW OF HDTV
SATELLITE
PC
RECEIVER
STEREO AMPLIFIER
Cable not supplied
12
NOTE : Press the INPUT ...
Owners Manual - Page 15

..."Sports Off" OSD will appear on the upper right of the screen. English
SPORTS MODE
By simply pressing the " SPORTS" button on the remote control, the TV will automatically optimize both picture and sound settings ... is pushed, an OSD showing the current sports mode will appear on the upper right of the screen.
14 Once the channel or the input source is changed under the "Sports Off" status, the...
Owners Manual - Page 16
English
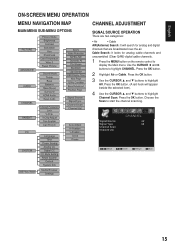
ON-SCREEN MENU OPERATION
MENU NAVIGATION MAP
MAIN MENU SUB-MENU OPTIONS
CHANNEL ADJUSTMENT
SIGNAL SOURCE OPERATION
There ... hook will search for analog cable channels and
unscrambled (Clear QAM) digital cable channels.
1 Press the MENU button on the remote control to
display the Main menu. Choose the
Scan to highlight
Channel Scan. Move
OK Enter
MENU Return EXIT Exit
15 Cable...
Owners Manual - Page 17
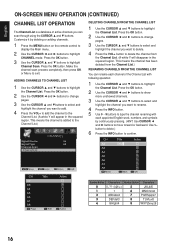
...Scan. Press the OK button.
3 Use the CURSOR ▲ and ▼ buttons to exit. English
ON-SCREEN MENU OPERATION (CONTINUED)
CHANNEL LIST OPERATION
The Channel List is added to the Channel List.)
DELETING CHANNELS FROM THE...deleting or adding channels.
1 Press the MENU button on the remote control to display the Main menu.
2 Use the CURSOR ◄ and ► buttons to highlight
CHANNEL mode...
Owners Manual - Page 18

... and ▼ buttons to assign), and enter "Confirm" numbers in the Channel List can be viewed.
1 Press the MENU button and then use the CURSOR
◄ and ► buttons to ...programs with content you deem as inappropriate for the first time.
ON-SCREEN MENU OPERATION (CONTINUED)
English
PARENT ADJUSTMENT
This SANYO television is equipped with a D and V content rating could still be ...
Owners Manual - Page 19

...squared region). Press the OK button.
2 Enter your password.
V-Chip Adjust OPERATION
ADVANCED-
English
ON-SCREEN MENU OPERATION (CONTINUED)
MPAA OPERATION
MPAA- Press the OK button.
5 Use the CURSOR ▲... French. Press the OK button. NOTE : If current program stream is wrong, you can be viewed.
1 Press the MENU button and then use the CURSOR ◄ and ► buttons to...
Owners Manual - Page 23

...Reset or Cancel. A red hook will appear in the squared and blank region. Screen Menu.
1 Press the MENU button on the remote control to display the Main menu.
2 Use the CURSOR ◄ and &#... off the 120Hz CONDITION. of Eastern, Central, Mountain, Pacific, Alaska, and Hawaii, for the on-screen display of setting all ON- Press the OK button. A red hook will appear in different location, ...
Owners Manual - Page 25

... / Blue / Yellow / Magenta / Cyan / Black
1 Press the MENU button on the remote control.
Press the OK button. Press the OK button.
2 Use the CURSOR ▲ and...▼ buttons to select Reset
or Cancel.
NOTE: Be sure you want to highlight
SYSTEM. Press the OK button. Caption...can be changed by your choice of all ON-Screen Menu Operations to reset the previous adjustment settings of...
Owners Manual - Page 26
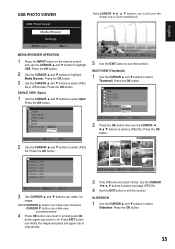
... JPEG
file. Press EXIT button can minify the image and press exit again can to select Open. SINGLE VIEW (Open)
1 Use the CURSOR ▲ and ▼ buttons to original size.
3 If the JPEG... the INPUT button on the remote control and use the CURSOR ◄
►▲ ▼ buttons to highlight USB. USB PHOTO VIEWER
Note:CURSOR buttons can scroll over the screen only in x4. Press the...
Owners Manual - Page 29

...Media message appears on screen
• Check the external equipment connections.
• Check the external equipment settings.
• Press the INPUT button on the remote control.
• ...9, 23 9, 21
Poor Picture/ Sound (watching Analog)
"No Signal" message appears on the remote control to
Closed - English
Problem:
Check these Conditions:
Try these Solutions:
Page No.
to...
Owners Manual - Page 30
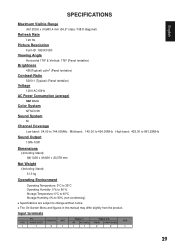
...
Full HD 1920X1080
Viewing Angle
Horizontal 178° & Vertical: 178° (Panel tentative)
Brightness
450(Typical) cd/m2 (Panel tentative)
Contrast Ratio
5000:1 (Typical) (Panel tentative)
Voltage
120V...)
■■ Specifications are subject to change without notice. ■■ The On-Screen Menu and figures in this manual may differ slightly from the product. Input terminals
VGA 1...
Similar Questions

Can I Connect My Care Sara Hydrophone To My Sanyo Dp46840 Flat Panel Tv
(Posted by freespirittonya 9 years ago)
Can I Connect My Care Sara Hydrophone To My Sanyo Dp46840 Flat Panel Tv And How
(Posted by freespirittonya 9 years ago)

How Do You Connect A Blue Ray, Sound System To A Sanyo Dp55441 Flat Screen Tv
(Posted by Vilbo 9 years ago)

Sanyo Tv Model Dp55441 How Do You Get To Menu Without Remote
(Posted by whwpunkpa 10 years ago)

Sanyo Won't Turn On ?
our 55" sanyo Model # DP55441 won't turnmanually or with remote what do i do had it less than a mont...
our 55" sanyo Model # DP55441 won't turnmanually or with remote what do i do had it less than a mont...
(Posted by Imhoffhouse 12 years ago)