Samsung DW80R5060 Support Question
Samsung DW80R5060 Support Question
Find answers below for this question about Samsung DW80R5060.Need a Samsung DW80R5060 manual? We have 1 online manual for this item!
Question posted by sjcurtis42 on November 22nd, 2021
After Opening The Door Fully There's A Hang Up And Clunk On Closing.
I've had the dishwasher just over a year and it's been fine until now. When closing the door it hangs op on something and there's a loud clunk whne pushing past the hang ujp. Any help will be welcome.
Current Answers
Answer #1: Posted by SonuKumar on November 23rd, 2021 9:48 AM
SonuKumar

Member since:
May 9th, 2021 Points: 16,630,680

Member since:
May 9th, 2021 Points: 16,630,680
https://www.repairclinic.com/RepairHelp/Dishwasher-Repair/9-160--/Samsung-Dishwasher-Troubleshooting
Please respond to my effort to provide you with the best possible solution by using the "Acceptable Solution" and/or the "Helpful" buttons when the answer has proven to be helpful.
Regards,
Sonu
Your search handyman for all e-support needs!!
Related Samsung DW80R5060 Manual Pages
User Manual - Page 1
...;ed installers. Installation_DD81-02034B-020_EN.indd 1
2/51/0/82/0210717 101:05:5:55:454AAMM
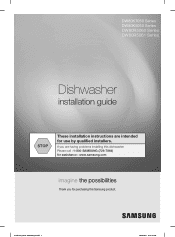
DW80K7050 Series DW80K5050 Series DW80R5060 Series DW80R5061 Series
Dishwasher
installation guide
STOP
These installation instructions are intended for purchasing this dishwasher Please call : 1-800-SAMSUNG (726-7864) for assistance : www.samsung.com
imagine the possibilities
Thank you are...
User Manual - Page 2

... and store the dishwasher inside, away from exposure to an ungrounded outlet. Do NOT install the dishwasher on a carpet as this section, keep it in a safe place for help.
It's your responsibility...liable for damages resulting from CAUTION open flames. All wiring and grounding must be done in a location where the water may damage the dishwasher.
Please follow do not cover ...
User Manual - Page 3
...
WARNING
Tip-Over Hazard - Do not push down on the door when it is correctly installed. -
CAUTION
Make sure to use an extension cord. Temperature should not exceed 149 ˚F (65 ˚C) to prevent damage to the same power outlet as the dishwasher. Ensure that the dishwasher is open door.
To reduce the risk of electric...
User Manual - Page 4
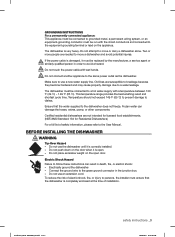
... STEP 4 Check the electrical requirements
and cautions 11 STEP 5 Unpacking and inspecting the
dishwasher 12 STEP 6 Preparing the dishwasher 14 STEP 7 Placing the dishwasher and
connecting the hot water supply line 15 STEP 8 Leveling the dishwasher 16 STEP 9 Securing the dishwasher 17 STEP 10 Connecting the drain hose 20 STEP 11 Wiring connections 21 STEP...
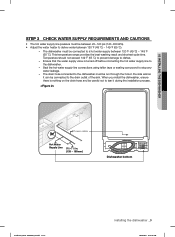
User Manual - Page 5
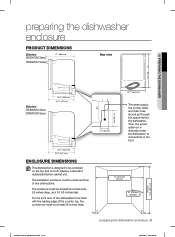
...view DW80K5050 Series DW80R5060 Series
20 ½" (520 mm) 24 ⅔" (627mm)
20 ½" (520 mm) 24 ¾ " (627 mm)
ENCLOSURE DIMENSIONS
This dishwasher is designed to connections in channels under the dishwasher to be ... power cable and drain hose should go through this space behind the dishwasher. For the front door of the dishwasher to be at least 24 inches wide, 24 inches deep, and ...
User Manual - Page 6
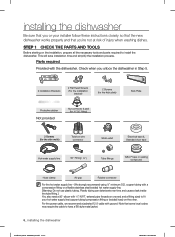
... fitting sized to fit your installer follow these instructions closely so that the new dishwasher works properly and that you unbox the dishwasher in Step 5.
2 Installation Brackets
2 Flat Head Screws (For the... required to have a BX style metal jacket.
6_ installing the dishwasher
Installation_DD81-02034B-020_EN.indd Sec3:6
2/51/0/82/0210617 1100::5566::0000AAMM
Note that some...
User Manual - Page 7
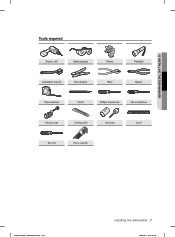
02 INSTALLING THE DISHWASHER
Tools required
Electric drill
Safety glasses
Gloves
Flashlight
Adjustable wrench
Wire stripper
Pliers
Nipper
Tape measure
Pencil
Phillips screwdriver
Flat screwdriver
Tubing cutter
Cutting knife
Hole saw
Level
Torx t20
Hex L-wrench
Installation_DD81-02034B-020_EN.indd Sec3:7
installing the dishwasher _7
2/51/0/82/0210617 101:05:65:60:101AAMM
User Manual - Page 8
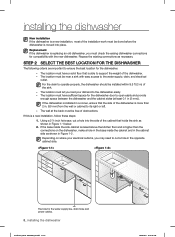
... THE DISHWASHER
The following criteria are important to open easily and provide
enough space between the dishwasher and the cabinet sides (at the back must be done before the dishwasher is ...
-
The location must have sufficient space for the dishwasher door to ensure the best location for the dishwasher:
- Depending on the dishwasher, make a hole in the base inside the sink...
User Manual - Page 9
...careful not to the drain outlet of the sink. When you install the dishwasher, ensure there is turned off before connecting the hot water supply line to dishes.
- The drain hose... connected to the dishwasher must be connected to tear it can be connected to a hot water supply between 120 ˚F (...
User Manual - Page 10
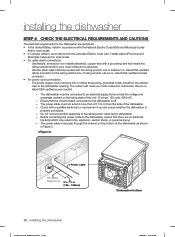
...
in Figure 3. The power supply cord must be connected to an electrical supply that the circuit breaker connected to the dishwasher is
properly connected. - Before connecting the power cable to the dishwasher opening. The power cable must meet your local codes and ordinances.
- Use flexible, armored or non-metallic sheathed, copper wire...
User Manual - Page 11

...:05:65:60:303AAMM Gently pull the kick plate down to leave in place until the dishwasher is fully installed and operational to ensure you can level
and secure the dishwasher. 3.
ALWAYS LIFT THE Dishwasher TO MOVE IT. Check the dishwasher's feet to disposal. We recommend that surrounds the exterior of the tub of the...
User Manual - Page 12
... shown in Step 1 on the front right-side of the base of the doors for any holes or deformities that could allow a water leak during shipping and that it is secured to the dishwasher. Check the edges of the dishwasher. 2. Use the provided nut connector to connect the water hose to the base...
User Manual - Page 13
...CAUTION
Do not overtighten the 90˚ elbow. (Below 280 lb·in Step 9, Securing the Dishwasher. Tighten until the ¾" fitting is not bent at the bottom front right of the seal... the figure.
Hot Water Supply Line
Elbow( 3/4" (9.5 mm)) Inlet valve
installing the dishwasher _13
Installation_DD81-02034B-02_EN.indd Sec3:13
2/51/0/82/0210617 101:05:65:60:303AAMM If the...
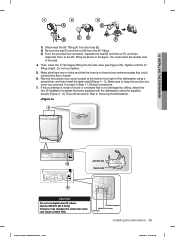
User Manual - Page 14

... cable is not twisted, and then connect the hot water supply line to help you move the dishwasher. Get a second or third person to the elbow joint. 6. CAUTION Also...and the power cable. 3. Keep it free of the cabinet opening from being squeezed when you push the the dishwasher into the installation space. Do not place the dishwasher on the water supply line, drain hose, or power cable...
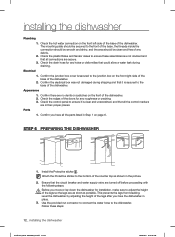
User Manual - Page 15
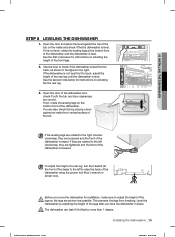
... the level to back, adjust the height of the tub.
Open the door and place the level against an inside and check if the the dishwasher is level.
Open the door of the front legs.
2.
If the dishwasher is not level front to check if the dishwasher is level. See the first note below for instructions...
User Manual - Page 16
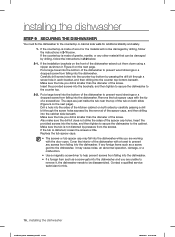
... then drilling into the dishwasher. Carefully drill screw holes into the sides of the tub on both sides by carefully passing a drill bit through a screw hole in Figure 8 on both sides (Figure 9 on the next page). Remove the tub spacer caps with the door open. The caps are just inside the tub near the...
User Manual - Page 17
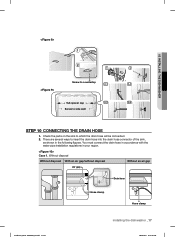
.../without disposal
Without an air gap
Air gap
Drain hose
Hose clamp
Hose clamp
Installation_DD81-02034B-020_EN.indd Sec3:17
installing the dishwasher _17
2/51/0/82/0210617 101:05:65:60:404AAMM 02 INSTALLING THE DISHWASHER
Screw to countertop
Tub spacer cap Screw to side wall
STEP 10 CONNECTING THE DRAIN HOSE
1.
User Manual - Page 18
...them.
• When arranging the drain hose, make sure to hang. Take caution not the damage the drain hose when installing the dishwasher on the next page).
6.
Do not cut the drain hose...;oor, the product itself, or the cabinet. Clean CAUTION around the hole.
7. installing the dishwasher
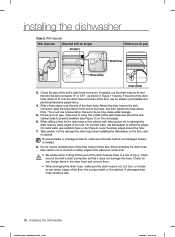
Case 2. With disposal
With disposal
Disposal with an air gap
Air gap
Without an air gap
Drain...
User Manual - Page 19
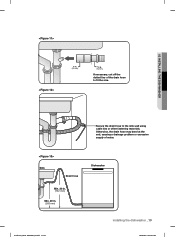
.... Sink
Drain hose
Min. 30 in. (762 mm)
Min. 20 in . (16 mm)
If necessary, cut off the dotted line of water. 02 INSTALLING THE DISHWASHER
1 in. (25 mm)
5/8 in . (508 mm)
Dishwasher
Installation_DD81-02034B-020_EN.indd Sec3:19
installing the dishwasher _19
2/51/0/82/0210617 1100::5566::0055AAMM
User Manual - Page 21
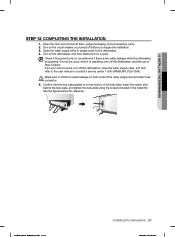
... plate. Confirm that the kick plate gasket is operating, turn off the dishwasher, close the water supply valve, and then refer to check for reference. Insert the rubber ...an error has occurred, turn off before you turned off the dishwasher, and then go to the dishwasher. 4. See the figures below . Open the door and remove all foam, paper packaging, and unnecessary parts. 2. ...
Samsung Knowledge Base Results
We have determined that the information below may contain an answer to this question. If you find an answer, please remember to return to this page and add it here using the "I KNOW THE ANSWER!" button above. It's that easy to earn points!-
General Support
.... MVM will continue to free memory: Go To Background Manager. This option will open any active applications in the background The Multi-Tasking Virtual Menu (MVM), provides the... these circumstances be sure to exit or close some of the applications currently running and try launching desired application again. To close running , such as Multi-Tasking Virtual ... -
General Support
... phone and PC When the New Removable Disk appears on the PC display choose to "open folder to on the PC Navigate to the Photo location, using the navigation keys Press the right... folders. Using Cricket network services, you may be the memory card Copy the files then paste them to another camera handset or to any of said device. Either copy pictures from the phone... -
General Support
Click on the PC display choose to "open folder to view files using the navigation keys Press the right soft key for Options Select Copy ... card) to on Set the phone's Bluetooth visibility to a PC requires a microSD Memory Card, Memory Card Adaptor & paste the Photo(s) into the memory card adaptor Connect the memory card reader to the PC's USB port You will permanently erase all ...
Similar Questions

Bottom Seal For Model Dmt800rhs Is Cracked And Leaking. What Part Replaces Thi
Bottom seal for model dmt800rhs is cracked and leaking.What part replaces this cracked sea
Bottom seal for model dmt800rhs is cracked and leaking.What part replaces this cracked sea
(Posted by jwheatley3 2 years ago)

Doesn't Power Up. No Lights On Display.
Got at Lowe's scratch and dent. Was damaged on top right corner of door. This is only damage. The to...
Got at Lowe's scratch and dent. Was damaged on top right corner of door. This is only damage. The to...
(Posted by 8993528 3 years ago)

Door Latch In Locked/closed Position When The Door Is Opened. Canâ??t Close
The door latch appears to be in the locked position, with the door opened. It won't allow me to latc...
The door latch appears to be in the locked position, with the door opened. It won't allow me to latc...
(Posted by gcwilbraham 5 years ago)

Middle Rack Not Aligning With Back Water Part So Door Won't Shut
I can't get the middle rack to go in correctly easily so often the door can't close or it closes but...
I can't get the middle rack to go in correctly easily so often the door can't close or it closes but...
(Posted by godoy134 8 years ago)

Samsung Dishwasher Dmt800rhs Problems Detergent Door Won't Open
(Posted by pwhelkenne 10 years ago)