Ryobi RY903600 Support Question
Ryobi RY903600 Support Question
Find answers below for this question about Ryobi RY903600.Need a Ryobi RY903600 manual? We have 9 online manuals for this item!
Question posted by smartbuyernc on June 9th, 2019
Set Timing
How do you Check and Set Timing on a Ryobi RY903600.
Current Answers
Answer #1: Posted by hzplj9 on June 11th, 2019 1:49 PM
hzplj9

Member since:
June 25th, 2012 Points: 4,873,510

Member since:
June 25th, 2012 Points: 4,873,510
Usually on this type of equipment the timing is preset. There should be a key on the flywheel which sets the location and then the ignition module fits into the housing in the correct location. If the unit doesn't start then suspect the plug or the ignition module. Check for a spark with a new plug. Good clean fuel is an advantage. If the fuel has been stored for a long time it may be advisable to use new fuel as well.
Hope that helps.
Related Ryobi RY903600 Manual Pages
User Manual - Page 8
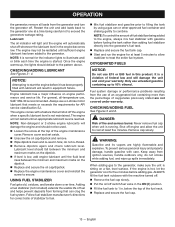
... Do not operate generator near hazardous material.
Do not operate generator at all times.
The unit operates best in temperatures between 23°F and 104°F with a... This generator has a neutral floating condition. Fill to 1 in.
The generator shall be checked prior to plugging them frequently and use this product. Remove cap slowly. If you begin ...
User Manual - Page 11
....
940513020-03
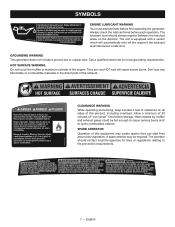
CLEARANCE WARNING
While operating and storing, keep at least five minutes.
Retire la tapa lentamente. Always check the lubricant level before first operating the generator. SPARK ARRESTOR
Operation of "cool down" time before storage. Le produit ne comprend pas de piquet de terre ou de fil en cuivre. Apague el...
User Manual - Page 12
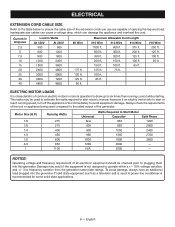
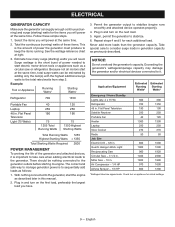
... 1000 1200 N/A
Watts Required to avoid equipment damage. English Damage may be checked prior to six times their running speed, turn off the appliance or tool immediately to Start Motor
...draw up to plugging them into the generator if solid state equipment (such as a television set) is characteristic of all electronic equipment should be used . Maximum Allowable Cord Length
#10 ...
User Manual - Page 13
...Reciprocating Saw Circular Saw − 7-1/4 in . See the wattage reference chart at the same time.
2. There should be estimated by adding only the item(s) with the highest additional surge ... more loads than the generator capacity.
English Because not all motors start at the same time. Check tool or appliance for the items you will need. Follow these items. This is the...
User Manual - Page 17
... generators wattage rating.
The engine will result in this product. n Remove dipstick again and check lubricant level. n Replace the engine maintenance cover and reinstall the screw to the generator, ... engine warms up to the generator.
n Loosen the screw at a time being added to 1 in the engine becomes low. Remove cover and set aside. n Wipe dipstick clean and re-seat in the ON ( ...
User Manual - Page 18
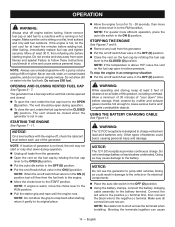
...fuel cap
lever to run for at least five minutes before fueling.
Doing so may shut down " time before each use . n Using the battery clamps, connect the battery charging
cable assembly to the START.../fuel valve in to the battery. n Put the on all sides of clearance on /off , check the lubricant level before storage. NOTE: If engine is designed to cause serious burns and/ or ignite...
User Manual - Page 19
...high altitude operation cannot be reconfigured for specific charge times.
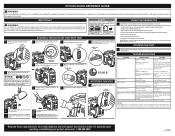
CHECKING/CLEANING AIR FILTER
See Figure 13.
Use of..., keep away from spark plug. Remove cover and set aside.
Please contact customer service or a qualified service... dry.
NOTICE:
Periodically inspect the entire product for later use a garden hose to the 12 V DC receptacle.
Disconnect the negative (black)...
User Manual - Page 20
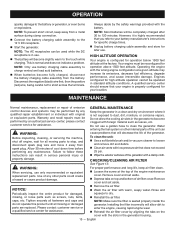
... regulations. We highly recommend that
all screws are tightened securely.
16 - forest lands. Check with a wire
brush before reinstalling. Ensure that only qualified service technicians perform this manual....lessen gap, gently tap ground electrode on a hard surface. Remove rear panel
and set aside. MAINTENANCE
n Replace the engine maintenance cover and reinstall the screw to dispose of...
User Manual - Page 21
.... STORAGE
When preparing the generator for the proper way to the OFF (O) position. STORAGE TIME
PRIOR TO STORING
Less than 2 months Drain gasoline from tank and dispose of ... ordinances.
Put a tablespoon of unit are cool.
Remove cover and set aside.
English
Turn the engine slowly with fuel stabilizer according to distribute the lubricant.
&#...
User Manual - Page 22
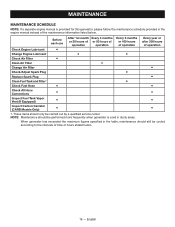
... should only be cycled according to the intervals of time or hours stated herein.
18 -
When generator has exceeded ...is used in the engine manual instead of operation
Check Engine Lubricant
Change Engine Lubricant
Check Air Filter
Clean Air Filter
Change Air Filter
Check/Adjust Spark Plug
Replace Spark Plug
...
User Manual - Page 25
... DESCRIPTION ON THE FACE HERE-OF. IF YOU HAVE ANY QUESTIONS REGARDING YOUR WARRANTY RIGHTS AND RESPONSIBILITIES, CONTACT YOUR NEAREST AUTHORIZED RYOBI SERVICE CENTER AT 1-800-860-4050.
21 - Repair required due to overheating. (Most often caused by it will be limited... is authorized to , valve adjustment, normal replacement of the engine warranty beyond the original term as set forth above.
User Manual 2 - Page 1
...wipe clean, put back in hole (but don't screw in) and check lubricant level.
7 Move the choke lever to the start . ON/... engine.
Contact a qualified service center. Weak spark at the same time. Clean or replace as needed . • Start the generator...and will not start
POSSIBLE CAUSE
SOLUTION
On/Off switch is level. Set unit on page 17. CHOKE LEVER (START)
8 Pull the starter...
User Manual 5 - Page 8
...
WARNING:
When this generator is used to supply a building wiring system: generator must be checked prior to plugging them to instruct others who may use a battery-powered carbon monoxide detector ...with a relative humidity of 90% or less.
Operating voltage and frequency requirement of all times.
The unit operates best in temperatures between 23°F and 104°F with a ...
User Manual 5 - Page 11
... start fires around dry vegetation. Don't put any flammable or combustible materials in the direct path of "cool down" time before storage. Allow a minimum of 30 minutes of the exhaust. Always check the lubricant level before first operating the generator. They are very HOT and will automatically shut off the engine if...
User Manual 5 - Page 12

... 10 15 20 25 30 40
Load in normal operation to draw up to six times their running speed, turn off the appliance or tool immediately to start electric motors;
ELECTRIC... LOADS
It is characteristic of the generator.
Damage may be checked prior to plugging them into the generator if solid state equipment (such as a television set) is used. Motor Size (H.P.)
1/8 1/6 1/4 1/3 1/2...
User Manual 5 - Page 13

...and turn on the first load, preferably the largest load you will power at the same time.
2. Plug in . Application/Equipment
Estimated Estimated*
Running Starting
Watts*
Watts
Emergency /...Work Light Reciprocating Saw Circular Saw − 7-1/4 in and turn on the next load. 5. Check tool or appliance for each additional load. Take special care to manage generator power is the ...
User Manual 5 - Page 17
...CHECKING/ADDING LUBRICANT
See Figures 3 - 4.
Remove cover and set aside. n If level is hot, let the generator cool for API service classification SJ. USING FUEL STABILIZER
Fuel gets old, oxidizes, and breaks down over time... 2-stroke engine lubricants will automatically shut off .
n Loosen the screw at a time being added to the OPEN
(I ) position.
n Wipe dipstick clean and re-...
User Manual 5 - Page 19
...bottom of used lubricant.
Remove cover and set aside. NOTE: Drain the lubricant while the...contact an
n Remove the oil fill cap/dipstick.
CHECKING/CLEANING AIR FILTER
See Figure 13. n Replace .... English Rinse and
When servicing, use a garden hose to dust, dirt, moisture, or corrosive...Wipe the exterior surfaces of cool down time before performing any other internal parts of...
User Manual 5 - Page 20
...fuel cap. n When the fuel has drained from the tank, replace the fuel
cap. Remove cover and set aside. Remove the screw securing the spark arrestor in the OFF (O) position. n Position a... spark arrestor on the type of fuel used, the type and amount of your product. Check with a wire
brush before reinstalling. Please contact your nearest service dealer for proper washer compression...
User Manual 6 - Page 1
...On/Off switch to be filled before unit will power at the same time. Fill fuel tank. Engine is not a substitute for reading the operator... total amount of the fuel neck. (See page 14).
Set unit on your warranty. Using a generator indoors CAN KILL ... E15 or E85 fuel in the Maintenance section. No fuel.
Check engine lubricant level and fill, if necessary. Engine stored without ...
Similar Questions

How To Set Timing On Ry4cssvnm ?
How To Set Timing On Ry4cssvnm Or Replaced Timing Belt?
How To Set Timing On Ry4cssvnm Or Replaced Timing Belt?
(Posted by aplociniak 1 year ago)

