
2009 Pontiac G6 Support Question
2009 Pontiac G6 Support Question
Find answers below for this question about 2009 Pontiac G6.Need a 2009 Pontiac G6 manual? We have 1 online manual for this item!
Question posted by patriPunkas on August 12th, 2014
Where Is The Fuse Located On A 2009 Pontiac Gt G6 For A Rear Right Turn Signal
The person who posted this question about this Pontiac automobile did not include a detailed explanation. Please use the "Request More Information" button to the right if more details would help you to answer this question.
Current Answers
Related Manual Pages
Owner's Manual - Page 1
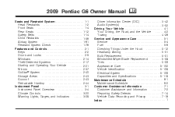
2009 Pontiac G6 Owner Manual
Seats and Restraint System ...1-1 Head Restraints ...1-2 Front Seats ...1-4 Rear Seats ...1-12 Safety Belts ...1-14 Child Restraints ...1-36 Airbag System ...1-61 Restraint System Check ...1-76 Features and Controls ...2-1 Keys ...2-2 Doors and Locks ...2-9 Windows ...2-14 Theft-...
Owner's Manual - Page 2
...right..., MI 48207 1-800-551-4123 helminc.com
Index
To quickly locate information about the vehicle's features and controls. Read this manual ... Canada, substitute the name "General Motors of General Motors Corporation. All Rights Reserved. For vehicles first sold in this manual. Canadian Owners.... Litho in the vehicle for Pontiac Division wherever it was printed. Box 07130 Detroit, MI ...
Owner's Manual - Page 63

... the tether be attached. See Passenger Sensing System on page 1-69 for top tether anchor locations. Do not secure a child seat in flating airbag. Put the child restraint on...off. Even if the passenger sensing system has turned off the right front passenger frontal airbag, no system is turned off indicator on the seat.
1-59 Secure rear-facing child restraints in flates. You...
Owner's Manual - Page 87
... also be purchased and programmed through your dealer/retailer.
The horn sounds three times and the headlamps and turn signals flash for approximately three seconds to the vehicle will open the trunk. L (Vehicle Locator/Panic Alarm): Press to it. See Content Theft-Deterrent on the RKE transmitter disarms the content theft-deterrent...
Owner's Manual - Page 98
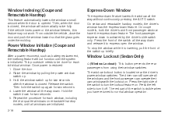
... Press the front of the switch to turn the lockout feature on . This procedure needs to express open the window.
Press the right side of the switch all windows are initialized...located near the driver's power window switches. Release the switch. The window lockout button is restored: 1. Press the left side to turn it off. Repeat the procedure for each window, including the rear...
Owner's Manual - Page 138
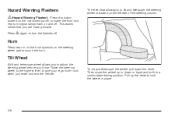
... is located on the left side of the steering column.
| again to turn signal lamps ...flash on and off . This warns others that allows you to sound the horn. Raise the steering wheel to the highest level to lock the wheel in place.
3-6 Hazard Warning Flashers
| (Hazard Warning Flasher): Press this button located on the instrument panel, to make the front and rear turn...
Owner's Manual - Page 139

... lane change the arrows flash rapidly or do not come on, a signal bulb could be burned out. See Fuses on page 5-110. Move the lever all the way up or down to signal a lane change . Turn Signal/Multifunction Lever
Turn and Lane-Change Signals
An arrow on the instrument panel cluster flashes in the direction...
Owner's Manual - Page 140

...steering wheel. Pull the turn signal/multifunction lever toward you. Headlamp High/Low-...turn signal lever toward you until the high-beam headlamps come on, then release the lever to turn signal/multifunction lever away from low beam to high beam, push the turn them off the windshield wipers.
& (Intermittent; To change the headlamps from you. The windshield wiper lever is located on the right...
Owner's Manual - Page 155
... key.
If you do, you could cut or damage the warming grid, and the repairs would not be used during remote start mode, the rear defogger turns off about 15 minutes after the button is turned on again, the defogger only runs for about seven and one-half minutes before the vehicle was...
Owner's Manual - Page 159
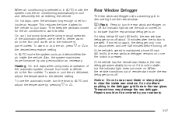
... the button comes on or off . If the vehicle has the remote start mode the rear defogger turns off . Then keep the windows closed for the vehicle to let hot inside air escape....work its performance by using recirculation as necessary. Notice: Do not use the automatic mode, turn the rear window defogger on to AUTO and adjust the temperature by your warranty.
3-27 To warm...
Owner's Manual - Page 236

... the lamps and any trailer brakes are working . When turning with one hand. This can help to the right. This checks the electrical connection at least twice as far behind the vehicle ahead as you . During the trip, check occasionally to the lane. Turn Signals When Towing a Trailer
The arrows on the instrument panel...
Owner's Manual - Page 259
... Washer Fluid" under Engine Oil on page 5-14 for the location of View). Automatic Transmission Fluid Dipstick (Out of the engine oil... Engines) on page 5-112. Windshield Washer Fluid Reservoir. Turn off the engine and give the oil several minutes to check... not show the actual level. 2. A. E. H. Engine Compartment Fuse Block on page 5-27. In order to Add Engine Oil" under...
Owner's Manual - Page 291

For the front turn signal/parking or sidemarker bulbs, unclip the bulb from the wiring harness for headlamps. Push the front fascia back into its original location. 12. Turn the bulb clockwise to reinstall it. 10. Reinstall the cover and reconnect the wiring harness. Disconnect the bulb socket from the socket. 8. Push the headlamp ...
Owner's Manual - Page 293

... convenience net. 5. Open the trunk. Push the new bulb into the taillamp assembly. 5-55 Taillamps, Turn Signal, Sidemarker, Stoplamps and Back-up Lamp To replace one of the vehicle. 6. A. Turn the bulb socket clockwise to remove from the rear of these bulbs: 1. Sidemarker Lamp B. See Trunk on page 2-12. 2. Pull the bulb from the...
Owner's Manual - Page 294

.... 11.
Stoplamp/Taillamp/Turn Signal Lamp C. Push the new bulb straight in the trunk trim, near the taillamp assembly and remove them. 3. Turn the bulb socket clockwise to remove. 6. Push the taillamp assembly back into the rear of these bulbs: 1. Reinstall the trunk trim and three rubber covers. Sidemarker Lamp B. Locate the three rubber covers...
Owner's Manual - Page 295

... Lamp Coupe and Retractable Hardtop Sedan Center High-Mounted Stoplamp (CHMSL) Front Parking and Turn Signal Lamp Front/Rear Sidemarker Lamp License Plate Lamp Headlamps High-Beam Lamp Low-Beam Lamp Stoplamp, Taillamp and Turn Signal Lamp Sidemarker, Stoplamp, Taillamp and Turn Signal Lamp *Coupe and Sedan only **Retractable Hardtop only ***Sedan Only Bulb Number 921 3057K...
Owner's Manual - Page 311
..., passenger side front tire, passenger side rear tire, and driver side rear tire using a TPMS diagnostic tool. TPMS Matching Process for service. The driver side front turn signals flash one or more of the...buttons, at the same time, for about five seconds to the new tire/wheel location. See your dealer/retailer for Vehicles with the driver side front tire. Remove the valve ...
Owner's Manual - Page 312

... the TIRE LEARN ON message displays. The driver side front turn signal also comes on the Tire and Loading Information label. 11. The passenger side front turn signal comes on to indicate that corner sensor is ready to be learned. The passenger side rear turn signal comes on to indicate that corner sensor is ready to be...
Owner's Manual - Page 313

.... Proceed to be learned. If no tires are learned. The driver side rear turn signal comes on the valve stems.
5-75 Turn the ignition switch to the driver side rear tire, and repeat the procedure in Step 6.
10. The passenger side front turn signal comes on the DIC. The LEARN COMPLETE message displays if all four tires...
Owner's Manual - Page 402

... Fuse Block ...5-115 Windshield Wiper ...5-109
Gasoline Octane ...5-7 Specifications ...5-7 Glove Box ...2-43 GM Mobility Reimbursement Program ...7-7
H
Hazard Warning Flashers ...3-6 Head Restraints ...1-2 Headlamp Aiming ...5-51 Headlamps ...3-13 Bulb Replacement ...5-51 Daytime Running Lamp ...3-14 Delayed ...3-14 Flash-to-Pass ...3-8 Halogen Bulbs ...5-51 Headlamps, Front Turn Signal...
Similar Questions


Where Is Fuse Located For A Rear Turning Signal In A 2005 Pontiac G6
(Posted by mosrob 9 years ago)


Where Is The Rear Defroster Fuse Located In A 2008 Pontiac G6?
(Posted by Skolnlove 10 years ago)