Polk Audio 80F/X-RT Support Question
Polk Audio 80F/X-RT Support Question
Find answers below for this question about Polk Audio 80F/X-RT.Need a Polk Audio 80F/X-RT manual? We have 3 online manuals for this item!
Question posted by Jrandolph1983 on July 12th, 2017
Aiming 80 F/x-rt
I have a 5.1 setup. 4 in ceiling 80f/x-rt speakers. Not sure how to orient them for aiming the tweeters. The speakers are labeled clearly but my question is this. Do I need to rotate the speakers to aim the tweeters toward the central seating position or do I install all speakers rotates the same
Current Answers
Related Polk Audio 80F/X-RT Manual Pages
DIY In-Ceiling and In-Wall Installation Guide - Page 1

Installing Your In-Wall or In-Ceiling Speakers
DIY In-Ceiling and In-Wall Installation Guide - Page 2
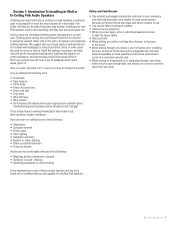
... in a crawl space, attic or unfinished basement be sure
to light the space safely. • Take your new Polk Audio in-ceiling or in-wall speakers is by step. If you answered yes to any ... Code Review
• Use material and speaker cabling that conforms to your community and state building codes-your retailer or home center service personal will need to cut or slice in some wall papers...
DIY In-Ceiling and In-Wall Installation Guide - Page 4

... require running cables to complete the project. Section 2: Polk Audio In-Wall and In-Ceiling Speaker Installation Guide
Materials and Preparation Before cutting into your walls to install your new Polk Audio speakers, gather up all basic speaker applications you will need a minimum of 2 conductors, thus the term cable is used here instead of "wire...
DIY In-Ceiling and In-Wall Installation Guide - Page 5

... adjust the volume to locate structural members inside the walls and ceiling. Also check that run of a typical volume control:
Use a stud finder to the speakers. In home theater installations the cable lengths for the speakers. From amplifier to Volume control
Volume control
Speakers
Planning Your Cable Routes NOTE: In a stereo installation the cable...
DIY In-Ceiling and In-Wall Installation Guide - Page 6

... the wire probe, choose another speaker location. If you feel no obstructions, now you feel " for any obstructions.
Be sure to check the locations for all the speakers, if you discover that one ...where you have determined the locations for your Polk speakers tape the supplied templates to place the others. Once you want to the wall or ceiling.
Then: Drill a small 1/2" hole in the...
DIY In-Ceiling and In-Wall Installation Guide - Page 7

... saw through a water pipe.
Hot and cold water pipe
Installing the speaker cables: A few rules, some restrictions on the market and you may... with studs: studs support your roof and partition off the various rooms in speakers even more "feel" making it easy to impress your supplies:
1) Speakers 2) Speaker cable 3) Cleaning material 4) Tools 5) Wall plates 6) Connectors
Cutting Sheet Rock...
DIY In-Ceiling and In-Wall Installation Guide - Page 8

... be LESS then 40% the width of the stud Notches must be sure to keep your speaker cables and the photo to the right show the wrong way to run your drilled holes... with alternating current or AC lines: The national code restricts the use of the stud
speaker cables
WRONG! DIY CI Tutorial 8 speaker cables
AC wiring
Studs in load bearing walls have these restrictions:
Holes must NOT exceed ...
DIY In-Ceiling and In-Wall Installation Guide - Page 9

When running speaker cables separate them from AC wiring and when When bending the speaker cables use a gentle or gradual arch: crossing the AC wires cross them at 90 degrees:
Wrong
speaker cables
AC wiring
RIGHT
speaker cables AC wiring
Correct
DIY CI Tutorial 9
DIY In-Ceiling and In-Wall Installation Guide - Page 10

... your stud finder determine which way the joists or structural members above your ceiling run cabling between floors to some ceiling speakers:
Wrong
ceiling joist
And when using tie wraps or staples be careful to not "over... the house up! Then notch out a small section of the drywall on the wall and ceiling as shown:
Much
Better
top
plate
Leave a bit of room, these studs that his music...
DIY In-Ceiling and In-Wall Installation Guide - Page 11

... "paper-clip" on the end of electrical tape as shown to create a cable channel: Thread the pull tape from your speaker opening back through the wall/ceiling notch,attach the cable and pull over to the opening . D I Y C I T u t o r i a... tape. Carefully drill through the top plate as shown:
ceiling joist
top plate
wall stud
Thread the cable through the top plate (use the fish-tape if needed).
DIY In-Ceiling and In-Wall Installation Guide - Page 12
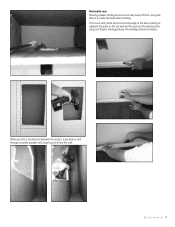
... the base molding to separate the paint on the dry wall and the paint on the molding then using the speaker hole to utilize the base board molding. Horizontal runs Running speaker cabling across a room may seem difficult-one good idea is possible to drill through using a stiff putty blade gently pry...
DIY In-Ceiling and In-Wall Installation Guide - Page 13

..., if needed notch the studs:
Now you can install the cable:
Replace the molding, and touch up with paint, now you have the speaker cables in the walls and the holes cut for your speakers into the hole with approximately 1/8" wiggle room-this leaves enough space to "straighten" the speaker to the walls and ceiling...
DIY In-Ceiling and In-Wall Installation Guide - Page 14
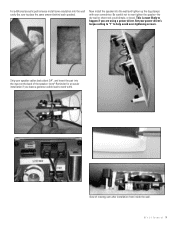
... insert the pair into the input on the back of rotating cam after installation from inside the wall. This is most likely to place the same amount behind each speaker). For additional acoustic performance install some insulation into the wall cavity (be sure to happen if you leave a generous cable lead to help...
DIY In-Ceiling and In-Wall Installation Guide - Page 15

The simple install goes like your speakers:
D I Y C I T u t o r i a l 15 Finally install the grill:
Terminate the speaker cable to the binding post inserts and install like this:
For a professional look we recommend terminating the cables near the receiver or amplifier with a wall ...
DIY In-Ceiling and In-Wall Installation Guide - Page 16

Here are the steps:
1. Clean the wall and ceiling area, remove any loose debris.
2. Be sure to match the existing surfaces. Feather edges out to overlap the remaining wall and ceiling by at least 2 1/4" in each direction.
3. Repeat steps 3 & 4 if necessary to hear your good buddy Jack Daniels over patch. Congratulations, you go.
7. Paint...
Vanishing In-Ceiling Manual - Page 2

..., Maryland 21215, USA-Phone: +1 410 358-3600. Refer all warnings. 4. WARNING: To reduce the risk of your speakers. Read these instructions. 3. Always use your country. Sanding and smoothing the wall or ceiling surface will need: • Pencil for marking the location of any heat sources such as vases, should be placed on the...
Vanishing In-Ceiling Manual - Page 3

....
A "Solid" image is clearly marked on the serial number label on the back of paint, wait approximately 1 minute, rotate the grille 90°, and apply the next thin coat. Left/Right Orientation: F/X® surround loudspeakers have a left/right orientation, and each application of the magnet for installation on speaker placement go to the ceiling color you face...
Vanishing In-Ceiling Manual - Page 4

...C. Product Depth D. Overall Dimensions B. Mounting Depth
(using 1/2" drywall)
80f/x-ls 11 1/8" (282.6mm) 9 3/8" (238.1mm) 5 1/8" (130.2mm) 4 5/8" (117.5mm)
80f/x-rt 11 1/8" (282.6mm) 9 3/8" (238.1mm) 4 3/4" (120.7mm) 4 1/4" (108mm)
Specifiations
For complete Vanishing Series specifications, visit www.polkaudio.com
620-rt 9 5/8" (244.5mm) 8 3/16" (208mm) 4 1/4" (108mm) 3 3/4" (95.3mm)
A
B
CD...
80FX Mounting Template - Page 1

... PAS TROP LES VIS! 7) Installez la grille.
CAUTION: DO NOT
OVER-TIGHTEN SCREWS!
7) Install grille.
1) Determinez ('emplacement.
HBP2134 Follow these steps while installing the 80F/v-R-r & 80F/x®-Ls Etapes a suivre pour installer le 80F/v-RT et 80F/x--Ls
1) Determine speaker location. Use RED for
the positive (+) wire and BLACK
for the negative (-) wire.
6) Position the...
Similar Questions

My Polk Woodbourne Speaker Has No Power
I bought the Polk Woodbourne speaker model # AM611903424 back in 2015 new.. I used it a handful of t...
I bought the Polk Woodbourne speaker model # AM611903424 back in 2015 new.. I used it a handful of t...
(Posted by Cjenkerson5850 3 years ago)

Speaker Won’t Charge
The red light never turns off when I charge the speaker and then I can't turn the speaker on or do a...
The red light never turns off when I charge the speaker and then I can't turn the speaker on or do a...
(Posted by Kurylo4 6 years ago)

My Unit Connects Via Bluetooth But Will Not Play Over Speaker.
Sometimes I touch the power insert and the speaker will come on. But that no longer works
Sometimes I touch the power insert and the speaker will come on. But that no longer works
(Posted by bittnergregg 7 years ago)
Speaker Sound
Speaker turn on with no sound and it connects but no sound
Speaker turn on with no sound and it connects but no sound
(Posted by o272v 7 years ago)

Why The Buttons On My Speaker Doesn't Work? I Can Only Manage Volume From My Ph
my speaker is always on and keep making the noise of self shutting off but it do
my speaker is always on and keep making the noise of self shutting off but it do
(Posted by mblake70s 7 years ago)