Pioneer AVIC-X930BT Support Question
Pioneer AVIC-X930BT Support Question
Find answers below for this question about Pioneer AVIC-X930BT.Need a Pioneer AVIC-X930BT manual? We have 2 online manuals for this item!
Question posted by fcupnor on June 21st, 2014
Avic-930bt Password Wont Let Me Put In
The person who posted this question about this Pioneer product did not include a detailed explanation. Please use the "Request More Information" button to the right if more details would help you to answer this question.
Current Answers
Related Pioneer AVIC-X930BT Manual Pages
Owner's Manual - Page 1
Operation Manual
MULTIMEDIA AV NAVIGATION RECEIVER
AVIC-Z130BT AVIC-X930BT AVIC-X9310BT
Notice to your vehicle's parking brake and depending on your Authorized Pioneer Electronics retailer or call us at (800) 421-1404. Be sure to ...
Owner's Manual - Page 2
...) 24 Operating the on each menu 23 Shortcut Menu 23
- Before removing the vehicle
battery 11 - Z130BT) 16 - Inserting an SD memory card (for AVIC-X930BT and
AVIC-X9310BT) 16 Inserting and ejecting an SD memory
card 16 - Switching the map orientation 28 - Important
The screens shown in a safe place for future reference...
Owner's Manual - Page 8
...? 202 Handling large errors 203
- When positioning by GPS is impossible 203
- Ambient conditions for AV source (other
than iPod) 186 - AVCHD recorded discs 208
8 En
- Aha Radio 218 Using the LCD screen correctly 218 - Maintaining the LCD screen 218 - Setting the password 189 - Route search specifications 206
Handling and care of...
Owner's Manual - Page 9
...-purpose AV equipment.
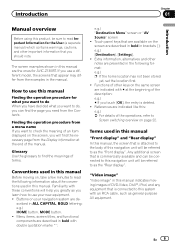
Menu items, screen titles, and functional components are presented in this manual indicates moving on the same screen
are the ones for AVIC-Z130BT. Familiarity with an RCA cable, such as the "Rear display". If you need from the Contents. scribed in ALL CAPITAL, BOLD lettering: e.g.) HOME button...
Owner's Manual - Page 12

Chapter
02 Basic operation
Checking part names and functions
This chapter gives information about the names of the parts and the main features using the buttons.
1
2
34
5
67
AVIC-Z130BT (with the LCD panel closed)
8
9 AVIC-Z130BT (with the LCD panel open)
12 En
Owner's Manual - Page 13
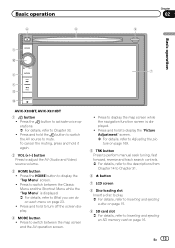
... switch between the Classic Menu and the Shortcut Menu while the "Top Menu" is displayed.
! Press to Chapter 33. ! Basic operation
6
8
Chapter
02
9
Basic operation
3 a
7 4
5 b
c
AVIC-X930BT, AVIC-X9310BT
1 button !
Owner's Manual - Page 14
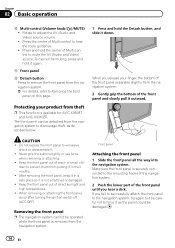
... the mounting hooks of the navigation system.
2 Push the lower part of Multi-control to force it . !
Make sure the front panel is available for AVIC-X930BT and AVIC-X9310BT.
Owner's Manual - Page 15

... will automatically return to adjust the angle. Inserting and ejecting a disc
Inserting a disc (for AVIC-Z130BT only.
This may cause malfunction. ! CAUTION ! Do not operate this navigation system until
the...Basic operation
Chapter
02
Basic operation
Adjusting the LCD panel angle
p This function is available for AVIC-Z130BT)
WARNING !
Do not open . Do not place a glass or a can on the...
Owner's Manual - Page 16
... removed.
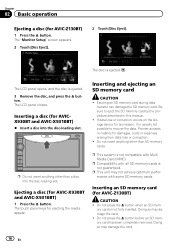
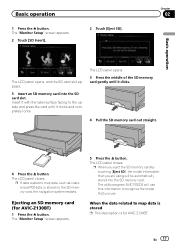
Inserting and ejecting an SD memory card
CAUTION ! Pioneer accepts no liability for AVIC-X930BT and AVIC-X9310BT)
1 Press the h button. Do not insert anything other than a disc into... opens, and the disc is not compatible with Multi Media Card (MMC). The touch panel keys for AVIC-Z130BT)
CAUTION ! p Compatibility with some SD memory cards. The "Monitor Setup" screen appears.
2 ...
Owner's Manual - Page 17
... it with the label surface facing to map data, such as customized POI data, is for AVIC-Z130BT)
1 Press the h button. p If data related to the upside and press the card... Setup" screen appears. 2 Touch [SD Insert].
2 Touch [Eject SD]. The LCD panel closes.
The utility program AVIC FEEDS will be automatically stored into the SD card slot. The LCD panel opens. 3 Press the middle of the SD...
Owner's Manual - Page 18
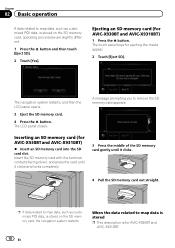
...SD memory card (for ejecting the media appear.
2 Touch [Eject SD].
The touch panel keys for AVIC-X930BT and AVIC-X9310BT)
1 Press the h button. p If data related to map data, such as customized POI data...
If data related to map data, such as customized POI data, is for AVIC-X930BT and AVIC-X9310BT)
% Insert an SD memory card into the SD card slot. Inserting an SD memory card (for...
Owner's Manual - Page 40
... operations, refer to Setting a route to Screen switching overview on page 22.
4 Touch [AVIC FEEDS]. Chapter
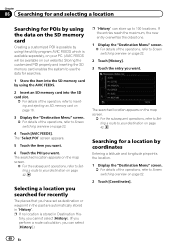
06 Searching for and selecting a location
Searching for POIs by using the data on... you searched for searches.
1 Store the item into the SD memory card by using the utility program AVIC FEEDS which is stored in "History". tory, you cannot select [History]. (If you perform a route...
Owner's Manual - Page 49

... export the "Favorites" data to an SD memory card for editing by using the utility program AVIC FEEDS which is available separately, on page 22.
2 Touch [Favorites]. Importing favorite locations
You ... is overwritten with new data.
1 Insert an SD memory card into the SD memory card by using the AVIC FEEDS. The "Favorites" screen appears.
4 Touch . The data you selected is deleted. # If you...
Owner's Manual - Page 51

... is always taken into consideration when checking your current route, the system will require that a separately sold Traffic tuner (ND-TMC10) be sorted.
played on AVIC-X930BT or AVICX9310BT will detect it and ask you if you select other traffic information in [Traffic Settings], the information can check real-time traffic information...
Owner's Manual - Page 70
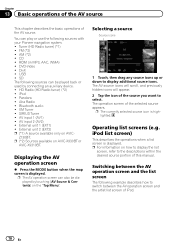
...AV input 1 (AV1) ! AV input 2 (AV2) ! p (*2) Sources available on AVIC- p The AV operation screen can also be played back or used by touching [AV ...list screen of this manual.
USB ! Bluetooth audio ! External unit 2 (EXT2) p (*1) A source available only on AVIC-X930BT or
AVIC-X9310BT. ROM (in MP3, AAC, WMA) ! Z130BT. The operation screen of the AV source. p For information on ...
Owner's Manual - Page 189
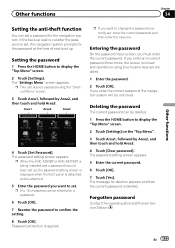
... and hold Area3.
4 Touch [Clear password]. p When the AVIC-X930BT or AVIC-X9310BT is being installed and a password has not been set up .
p If you want to change the password currently set, enter the current password and then enter the new one. Entering the password
On the password input screen, you enter the correct password, the navigation system will be...
Owner's Manual - Page 228
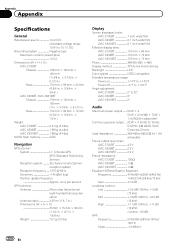
....) Nose 170 mm × 96 mm × 12 mm (6-3/4 in. × 3-3/4 in. × 1/2 in.)
Weight: AVIC-Z130BT 2.27 kg (5.0 lbs) AVIC-X930BT 1.98 kg (4.4 lbs) AVIC-X9310BT 1.98 kg (4.4 lbs)
NAND flash memory 4 GB
Navigation
GPS receiver: System L1, C/Acode GPS SPS (Standard Positioning Service) Reception system .......... 32-channel multi-channel reception system Reception frequency .... 1 575...
Instruction Manual - Page 2
... before installation 20 To avoid electromagnetic interference 20 Before installing 20
- Fastening the front panel 23 Installing the GPS antenna 24
- Installation on the dashboard or rear shelf) 25 Installing the microphone 26 - AVIC-Z130BT 6 - AVIC-X930BT, AVIC-X9310BT 6 Connecting the system 8 Connecting the power cord (1) 10 Connecting the power cord (2) 12 When connecting to...
Instruction Manual - Page 6
Section
02 Connecting the system
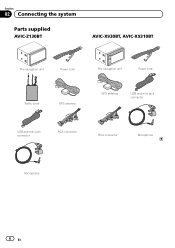
Parts supplied
AVIC-Z130BT
AVIC-X930BT, AVIC-X9310BT
The navigation unit
Power cord
The navigation unit
Power cord
Traffic tuner
GPS antenna
GPS antenna
USB and mini-jack connector
USB and mini-jack connector
RCA connector
RCA connector
Microphone
Microphone
6 En
Instruction Manual - Page 9
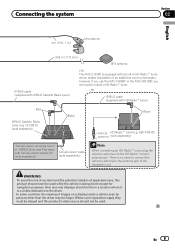
...
English
4 m (13 ft. 1 in.)
Microphone
3.55 m (11 ft. 8 in.)
GPS antenna
IP-BUS cable (supplied with SIRIUS Satellite Radio tuner)
(*5) The AVIC-Z130BT is equipped with HD Radio™ tuner)
Blue
SIRIUS Satellite Radio tuner (e.g. However, if you use the AVIC-X930BT or the AVIC-X9310BT, you will need to connect the vehicle's antenna to...


