
Pfaff synchromatic 1215 Support Question
Pfaff synchromatic 1215 Support Question
Find answers below for this question about Pfaff synchromatic 1215.Need a Pfaff synchromatic 1215 manual? We have 1 online manual for this item!
Question posted by Anonymous-113929 on June 14th, 2013
What Free Motion Quilting Foot Do I Need To Buy?
The person who posted this question about this Pfaff product did not include a detailed explanation. Please use the "Request More Information" button to the right if more details would help you to answer this question.
Current Answers
Related Pfaff synchromatic 1215 Manual Pages
Owner's Manual - Page 2

...Buttonholing Carrying case cover Carrying handle Cleaning Dual feed Electrical connection Foot control Foot control receptacle Light bulb Machine feed Master selector dial Needle Needle position Oiling Overlock seam Presser bar lifter Reverse sewing Sewing feet Sewing mechanism Slot-threading Special accessories Special sewing feet Stitch program chart Straight stitch Thread cutter Thread tensions...
Owner's Manual - Page 4

... a> Be careful when sewing that your sewing machine
1 Take-up lever 2 Thread retainer stud 3 Eraser button 4 Utility-stitch buttons 5 Spool pins 6 Bobbin winder 7 Balance wheel 8 Stop motion knob 9 Master selector dial 10 Needle position and buttonhole
knob 11 Master switch 1 2 Accessories drawer 13 Free arm 14 Free arm cover (enclosing
sewing hook) 1 5 Sewing foot 16 Sewing foot holder 17 Needle...
Owner's Manual - Page 5
A
II
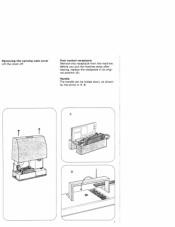
) Foot control receptacle Remove this receptacle from the machine, Before you put the machine away after sewing, replace the receptacle in ill.
Handle The handle can be folded down, as shown by the arrow in its origi nal position (A). B. Removing the carrying case cover Lift the cover off.
Owner's Manual - Page 7
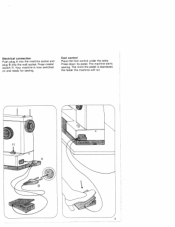
Electrical connection Push plug A into the machine socket and plug B into the wall socket. The machine starts sewing. Press master switch 11. The more the pedal is now switched
on and ready for sewing. Press down its pedal. Foot control Place the foot contro[ under the table.
Your machine is depressed,
the faster the machine will run.
3
Owner's Manual - Page 8
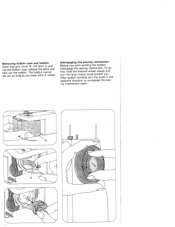
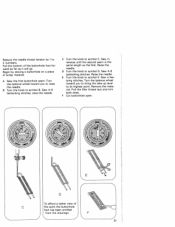
... wheel steady and turn the knob in the opposite direction to re-engage the sew ing mechanism again. The bobbin cannot fall out as long as you . Lift... After bobbin winding turn the stop motion knob toward you keep latch A raised. Disengaging the sewing mechanism Before you start winding the bobbin, disengage the sewing mechanism. Removing bobbin case and bobbin Open free arm cover 14.
Owner's Manual - Page 11
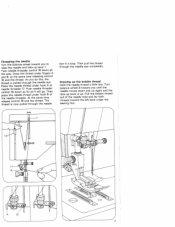
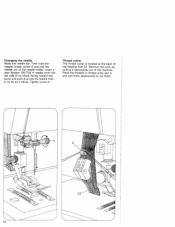
... control 18 and the thread. Turn balance wheel 8 toward the left back under hook B of needle threader 17.
Then place the needle thread under the sewing foot.
7 Then pull the thread through the needle eye completely.
Owner's Manual - Page 13

... in the needle hole.
cp
A
4
N
7 )
D D = The feed dog is pressed,
the machine sews backwards (for embroidering, darning, etc.). ciD = Central (normal) needle position
= Right needle position
= Left needle position
Reverse sewing and dropping the feed dog Reverse-feed control 20 has the following
positions: A = Normal position B = As long as the control is dropped...
Owner's Manual - Page 15
... raised. (Before you
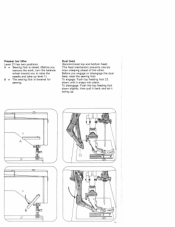
remove the work, turn the balance wheel toward you engage or disengage the dual feed, raise the sewing foot. Presser bar lifter Lever 21 has two positions: A = Sewing foot is lowered for sewing. Before you to raise the needle and take-up .
11
Dual feed (Synchronized top and bottom feed) This feed...
Owner's Manual - Page 16
... the needle, loosen screw A and pull the needle out of the needle holder. Thread cutter
The thread cutter is located at the back of the machine. Place the threads in thread cuter slot A and pull them downwards to cut them. Insert a new System 130/705 H needle (with the flat side of...
Owner's Manual - Page 17
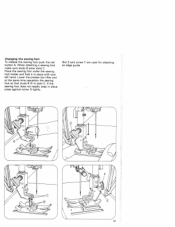
... not readily snap in slots C. Lower the presser bar lifter and at the same time reposition the sewing foot so that studs B fit in place, press against screw D lightly. Changing the sewing foot
To release the sewing foot push the red button A. Place the sewing foot under the sewing foot holder and hold it in place with your left hand.
Owner's Manual - Page 20
... 800c
98-694 866-00
4
98-694 859-00
98-694 861 -00
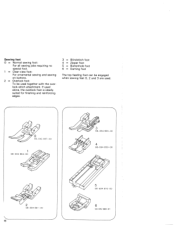
700 98-690 4 93-042 960-91 Sewing feet
o = Normal sewing foot:
For all sewing jobs requiring no special foot. 1 = Clear-view foot: For ornamental sewing and sewing on buttons.
2 = Overlock foot: To be engaged when sewing feet 0, 2 and 3 are used together with the overlock-stitch attachment.
Owner's Manual - Page 21

... for inserting zippers concealed so
as to the right or left , respectively. Special sewing feet Zipper (and edge stitching) foot Attach the foot offset to resemble a seam. The needle hole in its central position. Left edge of the zip per foot moves along the zipper chain on the right or left .
Bottom illustration: Push...
Owner's Manual - Page 22

...lowered position.
Press overlock button D (top ill.).
The overlock seam is sewn with the machine set as
it will go and tighten screw B. Push the attachment up as far as ...turn the master selector dial to 4 (bottom ilL). Leave the foot in the needle holder (bot tom ill.). Overlock setting Attach overlock foot A (top ill.). Important: The overlock-stitch attachment must only ...
Owner's Manual - Page 23

... finishing
it toward the rear (ill. At the end of the two dots in range 8 the machine sews
an edge-finishing seam with an edge-thread effect. at 3. The range 8 setting is turned to... release the thread
from the thread puller. Overlock seam The overlock stitch is used for sewing along edge
guide E (top ill.). Remove the work by pulling it with an edge thread effect. ...
Owner's Manual - Page 24

... ill.), pull it taut, and clamp it in the illustration (bottom left). Restore this set ting at the beginning of each buttonhole. B
j Sewing buttonholes Attach the buttonhole foot. As you sew, arrow I moves along scale J. Turn knob 10 to -. Turn the knob clockwise only.
This serves to gether closely. The stitches must be...
Owner's Manual - Page 25
...up lever to its highest point. Remove the mate rial. Begin by 1 to raise the needle. Sew 4-6
bartacking stitches. Pull the filler thread taut and trim
both ends. Turn the balance wheel toward... knob to symbol B. Reduce the needle thread tension by sewing a buttonhole on a piece of the buttonhole foot for ward as far as the first. Sew in reverse until the second seam is the same length as...
Owner's Manual - Page 26

Attaching the work support Turn over the foot control receptacle and push it over the free arm as far as it will go.
22
Owner's Manual - Page 27

Cleaning and oiling Take out the screws of the sewing hook and the feed dog with
a soft brush. Do not oil the machine because it is put a drop of oil into the hook raceway now and
then.
23 Insert the... it toward A and pull it out. Remove the bobbin case. All you have to do is main tenance-free. Open cover 14. Changing the light bulb Push the light bulb up
and turn it toward B.
Owner's Manual - Page 29
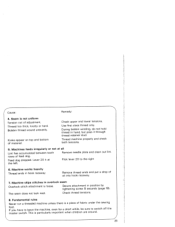
... material.
Check thread tensions.
8. off
the
25
Lever 20 it through thread retainer stud. Machine skips stitches in position by tightening screw B securely (page 18). Feed dog dropped.
Use first... Check upper and lower tensions. rows of fabric under the sewing
foot. This
the machine, is loose. Bobbin thread wound unevenly. If you have to switch children are ...
Owner's Manual - Page 30

... snap-on feet. for fine cording needle size 70)
For sewing fringes and for free-arm models - or 2.5-mm needle gauge) Cording foot. 7 grooves (twin needle with round needle hole for basting Edge stitching and quilting
Straight-stitch foot
Needle plate with 1.4-. 1.6- To attach a conventional sewing foot. They can be obtained from your Pfaff dealer. Special accessories...
Similar Questions

Free Motion Quilting Setting
quilt foot sits up high when sewing. Not just above material
quilt foot sits up high when sewing. Not just above material
(Posted by Anonymous-169060 2 years ago)

On/off Switch
Looking for a on/off light switch one in one out for a PFAFF synchromatic 1215 sewing machine.
Looking for a on/off light switch one in one out for a PFAFF synchromatic 1215 sewing machine.
(Posted by meljag 7 years ago)

Does The Hobbymatic Have Capability For Free Motion Quilting?
(Posted by pamlewis1230 8 years ago)

Which Size Or Part # Do I Need To Order A New Belt For My Pfaff 1215 Synchromati
What is the correct belt size and/or part # for my Pfaff synchromatic 1215?
What is the correct belt size and/or part # for my Pfaff synchromatic 1215?
(Posted by nekonewport 9 years ago)
I Need A Service Manul For Pfaff 1215 Can I Get It ?
my pfaff 1215 is jamed i clenad near the boben & still jamed
my pfaff 1215 is jamed i clenad near the boben & still jamed
(Posted by agoldberger 9 years ago)