
Pfaff hobbylock 783 Support Question
Pfaff hobbylock 783 Support Question
Find answers below for this question about Pfaff hobbylock 783.Need a Pfaff hobbylock 783 manual? We have 1 online manual for this item!
Question posted by Janicedgomes on December 20th, 2013
Tension
Please advise me as to the best tension I should have as my machine has suddenly started being very "loopy" so it is obviously too loose.
Current Answers
Related Pfaff hobbylock 783 Manual Pages
Owner's Manual - Page 2

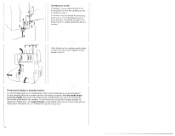
B) When leaving the machine, changing parts or accessories, the machine must be adjusted by anyone but an authorized Pfaff agent. Notes on safety
A) Owing to the up and down movement of the light bulb is 15 watts.
0) The drive belt must take sufficient care to avoid injury and observe the sewing area continuously while...
Owner's Manual - Page 3

...
.
. Inserting the lint box
Seam allowance Sewing test
V
V
V
Points to observe during sewing
Securing the seam
Axial blocking of the sewing machine
Electrical connection
Master switch and sewing light
Foot control . . Specifications
Contents of the cardboard box Notes on threaded machine .
Correcting the thread tensions
Thread chart for 3-thread overedge seam
Setting the...
Owner's Manual - Page 5
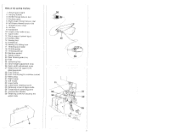
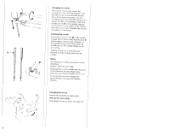
Parts of the sewing machine
Thread spool stand 2 Carrying handle 3 Needle thread tension dial 4 Housing cover 5 Right looper thread tension dial 6 Left looper thread tension dial 7 Thread tension cover 8 Lint box 9 Handwheel 10 Looper cover with recess 11 Upper knife 12 Work support (swiveLtype) 13 Needle plate 14 Sewing foot 15 Needle bar 16 Sewing foot lifting lever 17...
Owner's Manual - Page 6

... Then connect the mains plug to a power source. Switching off .
4 Machine and sewing tight are switched on the foot control
Switching the machine ON and OFF
Power and sewing light are switched off : Press switch again.
Machine and sewing tight
are switched on a special sewing table. Connecting the foot control: Insert the plug of the control in...
Owner's Manual - Page 7
... the needle and the upper knife, the user
must take sufficient care to the up and down , the faster the machine will sew. B) When leaving the machine, changing parts or accessories, the machine must never be adjusted by the switch on the foot
control
Position Position 4
Half speed Full speed
Notes on safety A) Owing...
Owner's Manual - Page 9
... the carrying handle
The machine must be threaded correctly First pull the respective threads through their corresponding guides (Figs B
and C)
Fhen thread the tensions in the following sequence:... threading. Opening and closing looper cover and work support
Push looper cover fully to the machine behind the looper cover This diagram shows the different threading paths by different colors (see ...
Owner's Manual - Page 10
Threading the right looper: thread the rtt looper in sequence 1 to Band tiull opproximately 10 cm (4) of thread through the looper eye (the thread path s murked red) Important In order to obtdln perfect sewing results the thread must be pulled between the tension disco when threading the te nsmns
8
Owner's Manual - Page 12
... 18 and of the thread guide behind the thread retainer
After threading the machine, push handle 2 down, and close work support 12 and looper cover 10
Thread spool change on threaded machine Cut the threads close to the right needle (6). At point 5 the ...needle eyes. The looper threads can be pulled behind the carrying handle is shoiiri from the blue tension (1) up to the thread spool.
Owner's Manual - Page 13
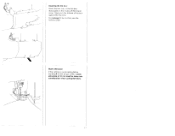
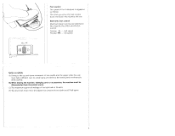
Inserting the lint box:
Insert the two tubs of the lint box
downwards in the recess of the looper
_\
cover Then push the bottom of the box
against the machine
For removal of the lint box, use the reverse order
/
/
Seam allowance
If the cutting is guided along below marking N on the looper cover, a seam allowance of 16 mm must be taken into consideration when cutting the fabric.
11
Owner's Manual - Page 14
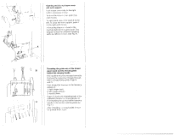
... your right hand in the illustration
5thN
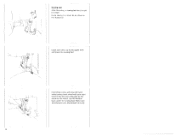
Insert test fabric up to the upper knife and lower the sewing foot. Lay the threads back under the sewing foot.
Sewing test
After threading a sewing test test should he made
Raise sewing foot lever 16, as shown in the direction indicated by the arrow on the wheel.
Owner's Manual - Page 15
Points to observe during sewing Place the fabric completely under the sewing foot when starting to sew (Also after the machine has been rethreaded) Sew the first stitches slowly Since the fdbric is fed automatically, do not pull or push the fabric Use your hand for guiding only
Sew approxirriately 5 cm beyond the end of the seam and use a scissors to cut the thread chain.
13
Owner's Manual - Page 16
... the seam just sewn without cutting the thread chain
Blocking the upper knife
Sewing very thick fabrics and workpieces with different thicknesses:
On this machine, all kinds of fabric from extremely thin to extremely thick can be processed Plheni sewing extremely thick fabrics or wonkpieces with different thicknesses the screw of the upper...
Owner's Manual - Page 17
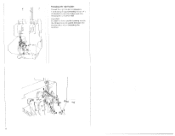
... 7 (see Hustration below>
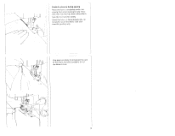
Make the correct adjustment after examination of the interlocking of the individual thread tensions
Needle
t/
i
Top side
i•'
Wj\ Setting the standard thread tension N
Heverse side
The thread tension to be set depends on the left shows a correct seam)
Page 16 lists examples for correction of threads (the Hustrator on...
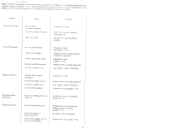
Owner's Manual - Page 18
... increased When turned iii ( > direction it is decreased
The needle thread A is too loose (blue thread tcniori)
The right looper thread C is too loose (red thread tension) or the left looper thread D too tight (yellow thread tension>.
0
C
The left looper thread 0 is too loose (yellow thread tension) or the right looper thread C too tight (red thread...
Owner's Manual - Page 20

...with adjusting knob 2b The scale on the seam width adjustment knob ranges from 3 to re aillust the thread tension. L
\ N,
1
kf[J)
Disengaging the upper knife
Remove lint bn 8 Open work support 12 arid looper... cover 10 If necessary, loosen screw '38 for blocking the upper knife, see page 14
Sew a test sewn
Note, Atler adjusting the seam width, it forwards until pin A engages in the ...
Owner's Manual - Page 23
... edge, Fig. 1
flat edge, Fig. 2
Red thread tension, right looper Yellow thread tension loft limper Blue thread tension, needle thread
upprox. "N"
Note:
Rolled hems can also be sewn with two bulk threads and one bulk thread and two polyester threads 120- 140
Preparation of the sewing machine:
I right looper, red patti 2 left looper, yellow patti...
Owner's Manual - Page 24
... in change tool in the
direction of
the needle needle up
change tool from the accessories
(see page 18 plug Lower the
sewing toot [urn the hand wheel in such of the needle shank
hole M of the needle a way that flat side K ...
bar is at its highest position Use the
needle change tool from the needle
Notes:
ihe following machines.
Changing the needle
Pull out the ii ii.
Owner's Manual - Page 27

...arrow) and remove it
Use the brush provided with the pins in retainers A of the sewing light is situated
Removing the light bulb: Push the light bulb upwards and turn it ...accessories to remove dust and lint from between the tensions. )
) /
I
'
H
/
(
Changing the hght bulb: Pull out the mains plug. Cleaning the thread tensions: Pull thread tension cover 7 with both hands to the right Close...
Owner's Manual - Page 29
... tight
Incorrect setting of differential teed. 1 hreid has caught doe In incur reef threading
Reduce thread tension (espe cially for easy operation. and
e made peratiori
Sewing problems of thread tensto rs. iese machines have been veliped for light materials) (pages 15, 161 Re-adjust differential feed. Needle not fully inserted Incur reef needle...
Owner's Manual - Page 31

...
. no. 90) 4
315 x 280 x 330 mm
.
approx 80 kg
29 Specifications;
Sewing foot height Needle system Number of cardboard box
1 umiachune with motor 1 foot control 1 instruction manual/gu000ltee certificate 1 lint box 1 thread spool stand 4 thread spool stand bars 1 thread guide 1 machine cover
1300 1 ches'inin
3 5 mn
1 5 inn
Hinged
Manual
5 mm
130/705...
Similar Questions

Why Is The Needle Holder Keeps On Dropping
the needle holder keeps on dropping down
the needle holder keeps on dropping down
(Posted by annefajarda 11 months ago)

Do You Know Where Ican Buy The Feed Dog For The 783
The feed dog on my 783 has broken and it seemsot be differentfrom other hobbylocks.Is there somewher...
The feed dog on my 783 has broken and it seemsot be differentfrom other hobbylocks.Is there somewher...
(Posted by herloom 6 years ago)
My Passport 2.0 Machine Has Been Away To The Supplier Gur Sewing Machines In Bir
My machine has just come back from the suppliers, GUR sewing machines in Birmingha, after being chec...
My machine has just come back from the suppliers, GUR sewing machines in Birmingha, after being chec...
(Posted by normaaitken13 6 years ago)

Pfaff 259 Sewing Machine Won't Run With Foot Petal
I have a pfaff 259. When I push on the foot petal the motor runs but the machine itself doesn't run....
I have a pfaff 259. When I push on the foot petal the motor runs but the machine itself doesn't run....
(Posted by Aemazing 8 years ago)

I Thread The Hobbylock 783 But My Thread Will Not Overlock What Am I Doing Wrong
(Posted by george623 10 years ago)