
Pfaff hobby 1042 Support Question
Pfaff hobby 1042 Support Question
Find answers below for this question about Pfaff hobby 1042.Need a Pfaff hobby 1042 manual? We have 1 online manual for this item!
Question posted by Lynnc28075 on June 25th, 2015
There Is No Pattern A On Pattern Adjustment Button
The person who posted this question about this Pfaff product did not include a detailed explanation. Please use the "Request More Information" button to the right if more details would help you to answer this question.
Current Answers
Answer #1: Posted by TechSupport101 on June 26th, 2015 7:39 AM
TechSupport101

Member since:
May 24th, 2013 Points: 12,171,305

Member since:
May 24th, 2013 Points: 12,171,305
Hey - With this model you are to use the Stitch pattern adjustment switch. See page 39 & 41 of the Owners' Manual here amongst others.
Related Pfaff hobby 1042 Manual Pages
Owner's Manual - Page 2

.../EN 60335-2-28 and UL1594
IMPORTANT SAFETY INSTRUCTIONS
When using and before cleaning.
• Always unplug before using this sewing machine only for examination, repair, electrical or mechanical adjustment.
• Never operate the sewing machine with same type rated 15 Watt. Use only attachments recommended by or near children or inÀrm person.
•...
Owner's Manual - Page 3
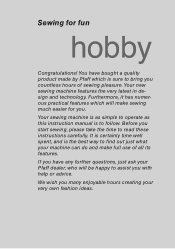
.... You have any further questions, just ask your machine can do and make sewing much easier for fun
hobby
Congratulations! It is certainly time well spent, and is to find out just what your Pfaff dealer, who will make full use of sewing pleasure. Your sewing machine is as simple to operate as this instruction manual...
Owner's Manual - Page 5
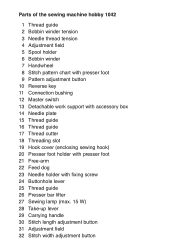
Parts of the sewing machine hobby 1042
1 Thread guide 2 Bobbin winder tension 3 Needle thread tension 4 Adjustment field 5 Spool holder 6 Bobbin winder 7 Handwheel 8 Stitch pattern chart with presser foot 9 Pattern adjustment button 10 Reverse key 11 Connection bushing 12 Master switch 13 Detachable work support with accessory box 14 Needle plate 15 Thread guide 16 Thread guide ...
Owner's Manual - Page 7

Parts of the sewing machine hobby 1022 and 1032
1 Thread guide 2 Bobbin winder tension 3 Needle thread tension 4 Adjustment field 5 Spool holder 6 Bobbin winder 7 Handwheel 8 Stitch pattern chart with presser foot 9 Pattern adjustment button 10 Reverse key 11 Connection bushing 12 Master switch 13 Detachable work support with accessory box 14 Needle plate 15 Thread guide 16 Thread guide ...
Owner's Manual - Page 9

... the machine One step buttonhole Open overlock stitch Overlock stitches
P Patchwork quilt Practical sewing Presser bar lifter
Q Quilt and patchwork foot
R Repairing tears Reverse sewing Richelieu Roll hemming RufÁer
62 35-37
32 32
51 25 17
58
43 24 50 46 56
Stitch density
23
Stitch length adjustment button
23
Stitch width adjustment button...
Owner's Manual - Page 10
...linen
For all straight stitch and lockstitch work up to 4 mm
For all sewing and topstitch work requiring a left
Application
Standard buttonhole for e.g. Also for fun
hobby 1022 -
G
Blindstitch
For invisible hem attachment
H
Shell-edging stitch
For ...anywhere between 0 and 4 mm with the aid of the stitch length adjustment button (30). linen Sewing for stretch fabrics. hobby -
Owner's Manual - Page 11

...sewing on elastic band, darning tears and patches
F
Elastic blind stitch
For invisible hem attachment and simultaneous
serging. Stitch chart
For these programs the stitch length can be set anywhere between 0 and 4 mm with the aid of the stitch length adjustment button...
H
Shell-edging stitch
For decorative hems on sports-
Also for e.g. hobby - Sewing for fun
hobby 1032 -
Owner's Manual - Page 12

... appliqué
E
Elastic stitch
F
Elastic blind stitch
serging. Sewing for fun
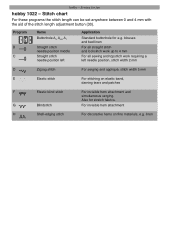
hobby 1042 - Stitch chart
For these programs the stitch length can be set anywhere between 0 and 4 mm with the aid of the stitch length adjustment button (30). blouses and bed linen
B
Straight stitch,
For all sewing and topstitch work up to
needle position middle
to...
Owner's Manual - Page 25
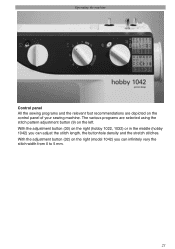
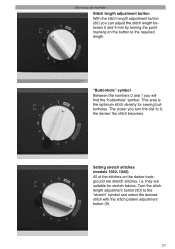
... With the adjustment button (32) on the right (hobby 1022, 1032) or in the middle (hobby 1042) you can adjust the stitch length, the buttonhole density and the stretch stitches. The various programs are depicted on the left. Operating the machine
Control panel All the sewing programs and the relevant foot recommendations are selected using the stitch pattern adjustment button (9) on...
Owner's Manual - Page 26

Turn the stitch pattern adjustment button until the required letter appears in the adjustment Àeld (4).
Using the stitch pattern adjustment button (9) you can sew with your machine are illustrated in the stitch pattern chart (8). Note: For embroidering use the clear view foot.
22 Setting fancy stitches (model 1042 only) Using the stitch pattern adjustment button (9) select the fancy ...
Owner's Manual - Page 27
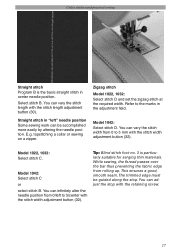
... suitable for sewing buttonholes. Turn the stitch length adjustment button (30) to the "stretch" symbol and select the desired stitch with the stitch pattern adjustment button (9).
23
Setting stretch stitches (models 1032, 1042) All of the stitches on the button to the required length. Operating the machine Stitch length adjustment button With the stitch length adjustment button (30) you...
Owner's Manual - Page 28

Reverse sewing The machine sews in the adjustment Àeld (31). The required width appears in reverse only as long as the reverse sewing key (10) is pressed.
24 Operating the machine Stitch width adjustment button (model 1042) With the stitch width adjustment button (32) you can inÀnitely adjust the width from 0 to 5 mm.
Owner's Manual - Page 31
...).
You can vary the stitch length with the stitch width adjustment button (32). This ensures a good, smooth seam. You can vary the stitch width from rolling up.
topstitching a collar or sewing on a zipper. Model 1042: Select stitch C or select stitch B. You can adjust the stop . While sewing, the thread passes over the bar thus preventing the...
Owner's Manual - Page 33

... button will be lowered (c.f.
Model 1042 Select stitch D and set the stitch width adjustment button (32) at "4".
• Turn the handwheel towards you and position the button so the needle enters the left hand column on this page.
• Remove the match and pull the fabric and the button apart.
• Wrap the shank with the sewing...
Owner's Manual - Page 38
... front.
• Clamp the threads to the left and right of protrusion B.
• Slide the buttonhole runner as far forwards as possible and sew the buttonhole as it will go.
• Position the pattern adjustment dial at A1 and sew the Àrst buttonhole seam in the desired length.
• Select setting A4/2 and...
Owner's Manual - Page 39

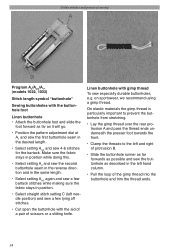
Utility stitches and practical sewing 1 step buttonhole (model 1042) For the 1 step buttonhole, the size of the buttonhole. • Select the buttonhole pattern A by placing the button in the button holder of the buttonhole foot. Set the machine: Stitch A Stitch length at "buttonhole" symbol • Place the button on the fabric and mark the upper and lower point...
Owner's Manual - Page 41

...; In order to the underside of the fabric. Then return the stitch pattern adjustment button to "A".
• The machine is now ready to sew the next buttonhole.
• Once you have completed sewing all the buttonholes, push the buttonhole lever (24) upward as far as it will go.
• By pulling the bobbin thread, bring the...
Owner's Manual - Page 54
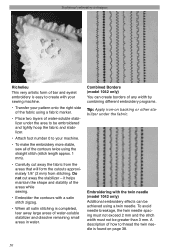
...1042 only) Additional embroidery effects can create borders of any width by combining different embroidery programs. Tip: Apply iron-on page 38.
50
Traditional embroidery techniques
Richelieu This very artistic form of bar and eyelet embroidery is easy to create with your sewing machine.
• Transfer your machine...foot number 0 to your pattern onto the right side of the fabric using a...
Owner's Manual - Page 55
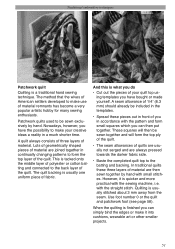
... traditional hand sewing technique. When the quilting is what you do
• Cut out the pieces of material remnants has become a very popular artistic hobby for many sewing enthusiasts. In ... changing patterns to make it is tacked onto the middle layer of polyester or cotton batting and connected to be sewn together and will then be sewn exclusively by hand with the sewing machine, ...
Owner's Manual - Page 61

... the required width.
Model 1042: Select stitch D with a thread of a different color.
57 This produces what is overstitched along the folded edge with the pattern adjustment button (9) and then the zigzag stitch in the foot so it leads through one of a contrasting color. Pull the two fabric layers taut during sewing. Appliqués can also...
Similar Questions

Edge Guide - Pfaff Select 1540 Sewing Machine
How does the Edge Guide work for the Pfaff Select 1540 sewing machine?
How does the Edge Guide work for the Pfaff Select 1540 sewing machine?
(Posted by jesjames 1 year ago)

I'm Trying To Make A Button Hole, The Sewing Machine Is Not Advancing The Fabric
(Posted by paulinegp22 3 years ago)
Pfaff 259 Sewing Machine Won't Run With Foot Petal
I have a pfaff 259. When I push on the foot petal the motor runs but the machine itself doesn't run....
I have a pfaff 259. When I push on the foot petal the motor runs but the machine itself doesn't run....
(Posted by Aemazing 8 years ago)

Trying To Price A Used Pfaff Hobby 1042. What Was The Original Cost?
(Posted by dimplesohio 8 years ago)

Hobby 1032 Pfaff Sewing Machine Instructions
Can I order the instruction book for the Hobby 1032 Pfaff Sewing Machine Instructions ? If so, how m...
Can I order the instruction book for the Hobby 1032 Pfaff Sewing Machine Instructions ? If so, how m...
(Posted by raylindab 10 years ago)