
Pfaff creative 7560 Support Question
Pfaff creative 7560 Support Question
Find answers below for this question about Pfaff creative 7560.Need a Pfaff creative 7560 manual? We have 1 online manual for this item!
Question posted by virginiajstead on May 10th, 2014
When I Lower The Pressure Foot It Does Not Fully Engage With The Fabric Surface
The person who posted this question about this Pfaff product did not include a detailed explanation. Please use the "Request More Information" button to the right if more details would help you to answer this question.
Current Answers
Related Pfaff creative 7560 Manual Pages
Owner's Manual - Page 3

... has fallen into water or other user servicing adjustments mentioned in this sewing machine. Always unplug this sewing machine only for its intended use bent or blunt needles. To disconnect, turn all moving parts. Always unplug sewing machine from the accumulation of the sewing machine and foot control free from the electric outlet when removing covers, lubricating, or
when...
Owner's Manual - Page 5
... Functions when switching on
Gathering
Help, operational Hemstitching Hook cover
Info Information
Joined borders
Knit-edge foot
Lace trimmings Language selection Length and width adjustments Letters, changing the width Light bulb, changing Linen embroidery Lowering the feed dog
M-memory Maintenance and trouble shooting Master switch Memory Mending stitch for Light-knits Menu...
Owner's Manual - Page 9
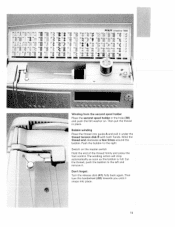
...the felt washer on the master switch Hold the end of the thread firmly and press the foot control. Don't forget: Turn the release disk (41) fully back again.Then turn the handwheel (40) towards you until it snaps into guide A and...
sc
= 52 57 °i 53
2 54
61
54) 459
66 67 60 69 70 71 72 734. 74
PFAFF creative 7560
75Lr 75 77 75 95
79 55 81 82 96
2
83 84 80
97
A
861
z
87 88 55 90 98
...
Owner's Manual - Page 11
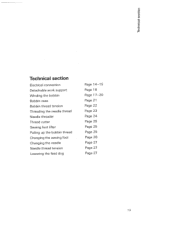
... work support Winding the bobbin Bobbin case Bobbin thread tension Threading the needle thread Needle threader Thread cutter Sewing foot lifter Pulling up the bobbin thread Changing the sewing foot Changing the needle Needle thread tension Lowering the feed dog
Page 14-15 Page 16 Page 1 7-20 Page 21 Page 22 Page 23 Page 24...
Owner's Manual - Page 12

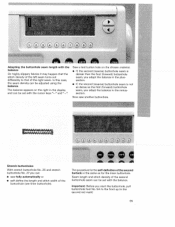
key, the sewing machine is switched on, the sewing lamp lights up. ? ; )$a•••P
43
Connecting the foot control
Connect the plug of the foot control with the connection socket of the machine (45). Press the "ok."
Master switch
When the master switch (43) is now ready to use.
15
Owner's Manual - Page 16

... do this, open the hook cover (49) and press slide (C) fully to be dropped. Now the feed dog is between 2 and 3. To remove: Lower the sewing foot and set the needle at its highest point.
To insert: The flat side (A) of the marking B. Lower the sewing foot and insert the needle, pushing it up as far as...
Owner's Manual - Page 37

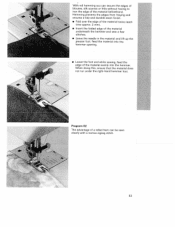
... length. Light fabrics are easier to 6 mm as required. Sew the first seam.When you have to the rear.
• Repeat this as many times as you require (also see page 35),
Basting stitch
With program 07 you can be sewn with long straight stitches (6 mm). Some sewing jobs can select the creative 7560's 19...
Owner's Manual - Page 44
...opening.
• Lower the foot and while sewing, feed the edge of the material
underneath the hemmer and sew a few stitches. • Leave the needle in the material and lift up the presser foot. Hemming prevents ...When doing this, ensure that the material does not run under the right-hand hemmer foot. Program 02 The advantage of the material beforehand.
With roll hemming you can secure ...
Owner's Manual - Page 50
... with the balance
On highly slippery fabrics it may happen that of the ... as the first (forward) buttonhole seam, you start the buttonhole, pull buttonhole foot No. 5A to the front up to that the stitch density of the left seam...stretch buttonhole No. 26 and stretch buttonhole No. 27 you can
• sew fully automatically or
• self-define the length and stitch width of the second buttonhole ...
Owner's Manual - Page 56

..., so that the spaces between the needle plate and the sewing machine provides space for a twin needle (e.g. 130/705 H-ZWI; Its guide shifts the fabric upwards thus making the pintucks look even more vividly. • Sew one of the needle plate. Pintuck foot This classical sewing technique can be used perfectly well on the front edge...
Owner's Manual - Page 57

... a full description with
this foot. Knit-edge/Piping/Beading foot
The knit-edge foot makes it at the same time. To obtain a perfect seam on shape cut parts, we recommend adding a wool thread under slight tension and overstitching it easy to sew thick seams on to another piece of fabric and sewing lace inbetween at the...
Owner's Manual - Page 58

...8226; Engage the Teflon foot. •...foot into the darning position (see page 76) and lower the feed dog (see page 27).
Teflon ornamental stitch foot This foot...foot. • Loosen the knurled screw on the sewing foot
holder (27). • Press the free-motion quilt foot gently together
with a clearance of the Teflon foot
Program: 00 Tension: 3-5
Note: Using the free-motion quilt foot...
Owner's Manual - Page 60

... top-stitching When top-stitching narrow edges, lower the sewing foot onto the edge of material. Lower the narrow edge foot onto the material so that it is especially suitable for sewing together adjacent pieces of the sewing foot serves as a guide. This provides an optimal feed of both pieces of the fabric, adjust the needle into the required...
Owner's Manual - Page 69

... to lower the presser bar to hold the loops down.
TIP: By sewing quickly and moving the material slowly, you can embroider initials of the terry-cloth to the darning position.
• Knot the threads and remove stabilizer.
Monograms
Whether working with terry-cloth or woven fabric, with the help of the darning foot...
Owner's Manual - Page 70
... the darker side of the
fabric.
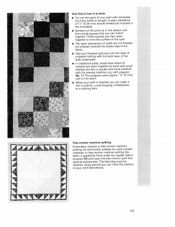
• Tack your finished quilt top onto the layer of polyester batting with the back layer of the quilt underneath.
• In traditional quilts, these three layers of your motif beforehand. p
1 37 And this is quicker and more practical with the sewing machine, e.g. These squares are then...
Owner's Manual - Page 73

...; Switch off the master switch.
• Raise the sewing foot lifter.
• Insert the needle plate changer (special accessories) as shown above and pull the needle plate upwards. The needle plate can now be oiled in other places.
• Clean and oil the sewing machine every 10 to the hook as shown above . Before...
Owner's Manual - Page 74

...not start the threaded machine without fabric in it fully in fully to the left....fully upwards (flat side to the hook.
7. Needle is too thick.
See needle chart (Page 118/119).
Run the thread through the thread guide. Thread is too thick or too thin.
Let the machine feed the fabric. Seam is too tight. Check needle-thread and spoolthread tensions.
5. Machine does not sew...
Owner's Manual - Page 78

... Fantasy BIG" Bushing of the Creative 7560 CAP hoop/frame "Creative Fantasy CAP" Color change Combining patterns Creative Card, numbering/deleting Cursor keys Deleting a letter Deleting an entire pattern sequence of the motifs Embroidery foot, attaching Embroidery hoop/frame, inserting the fabric Embroidery Unit, Connecting/removing Embroidery/darning position Embroidery/multicolor Embroidery...
Owner's Manual - Page 89

... the case the machine does not start to embroider, the sewing foot lifter must be able to
.J
pedal is
The feed dog must be inserted before starting position.
Before you wish to embroider another pattern, return to
shown in the display:
A full bobbin should be covered with the embroidery unit. Now lower the feed...
Owner's Manual - Page 148

... adhesive. perforation holes being made in the leather.
73 ]
Embroidering leather Attach the piece of the hoop
Now fit the fabric with the cut -away stabilizer with thick materials, the sewing foot and
-
You can more easily become loose.
Take care to avoid needle breakage and extra
the needle can also use Filmoplast...
Similar Questions

Pressure Foot Lever
My pressure foot lever is not working as it will not put the pressure foot down.
My pressure foot lever is not working as it will not put the pressure foot down.
(Posted by lindaelpino 3 years ago)

How To Adjust A Pressure Foot Tension On A Pfaff 1528
How to adjust a pressure foot tension on a pfaff Select 1528
How to adjust a pressure foot tension on a pfaff Select 1528
(Posted by slanders 4 years ago)

Pressure Foot Adjustment.
Needs to be 1/8" lower in order to engage fabric. Thank you.
Needs to be 1/8" lower in order to engage fabric. Thank you.
(Posted by clscott 6 years ago)

The Pressure Foot Not Engaging When Lever Is Lowered (new Machine)
Is There Some Step I Take To Make The Pressure Foot Lever Lower The Pressure Foot When You Have A Ne...
Is There Some Step I Take To Make The Pressure Foot Lever Lower The Pressure Foot When You Have A Ne...
(Posted by carousell62 9 years ago)

Pressure Foot
The pressure foot on my Phaff 1171 will not stay down..What can I do? Thank you
The pressure foot on my Phaff 1171 will not stay down..What can I do? Thank you
(Posted by sml4hcm 11 years ago)