
NordicTrack T 6.5 S Treadmill Support Question
NordicTrack T 6.5 S Treadmill Support Question
Find answers below for this question about NordicTrack T 6.5 S Treadmill.Need a NordicTrack T 6.5 S Treadmill manual? We have 1 online manual for this item!
Question posted by chevychick68765 on October 21st, 2017
Incline Stuck In Up Position
my incline is stuck in the most upwards position on my nordic track T6.5s. Help!
Current Answers
Answer #1: Posted by waelsaidani1 on November 9th, 2017 7:18 PM
waelsaidani1

Member since:
May 12th, 2013 Points: 19,501,797

Member since:
May 12th, 2013 Points: 19,501,797
Hello to solve this problem please refer here: https://www.treadmilldoctor.com/incline-motor-problems
Related NordicTrack T 6.5 S Treadmill Manual Pages
English Manual - Page 1
CAUTION
Read all precautions and instructions in the space above for future reference. Or call 1-800-TO-BE-FIT (1-800-862-3348) Mon.-Fri. 6 a.m.-6 p.m. MT Please do not contact the store. Save this equipment. Serial Number Decal
ACTIVATE YOUR WARRANTY
To register your product ...
English Manual - Page 2

... MOVE THE TREADMILL 26 MAINTENANCE AND TROUBLESHOOTING 27 EXERCISE GUIDELINES 30 PART LIST 31 EXPLODED DRAWING 32 ORDERING REPLACEMENT PARTS Back Cover LIMITED WARRANTY Back Cover
WARNING DECAL PLACEMENT
This drawing shows the locations of this manual and request a free replacement decal. If a decal is a registered trademark of ICON Health & Fitness, Inc.
2 Apply...
English Manual - Page 3

.... Never move the walking belt while the power is intended for low-power devices such as described in a fall and serious injury.
15. Wear appropriate exercise clothes while using the treadmill.
19. Never use only. To avoid overloading the circuit, do not plug other electrical devices, except for home use the...
English Manual - Page 4
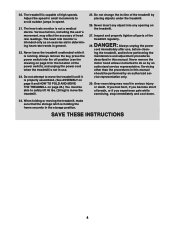
... Never leave the treadmill unattended while it is capable of heart rate readings. Do not change the incline of the power switch), and unplug the power cord when the treadmill is not in ...objects under the treadmill.
26.
Never remove the
motor hood unless instructed to avoid sudden jumps in the storage position.
The heart rate monitor is intended only as an exercise aid in determining...
English Manual - Page 14

... the brackets on the Frame (56) with four #8 x 1/2" Screws (1).
12
27
36
1
1
1
13. Have a second person hold the Frame until step 15 is facing the treadmill. Make sure that the "This side toward belt" sticker (B) is completed. 12. Attach the Latch Crossbar to the upright...
English Manual - Page 15
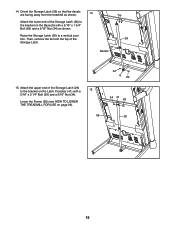
...) to the bracket on the Latch Crossbar (41) with a 5/16" x 2 1/4" Bolt (63) and a 5/16" Nut (34).
Lower the Frame (56) (see HOW TO LOWER THE TREADMILL FOR USE on the Base (6) with a 5/16" x 1 3/4" Bolt (62) and a 5/16" Nut (34) as shown.
14
Attach the lower end of the Storage Latch (26...
English Manual - Page 17

... an adapter, contact a qualified electrician to users. Grounding Pin Surge
Suppressor
Plug in the Power Cord
The treadmill must also be damaged by sudden voltage changes in damage to indicate whether it will not fit an outlet, have a UL suppressed voltage rating of 400 volts or less and a minimum surge dissipation of...
English Manual - Page 18

...console's sound system while you can download personalized workouts, create your own workouts, track your wireless network through an effective exercise session. In addition, the console features a selection of plastic on the console, ... mode, see page 19. As you can change the speed and incline of the treadmill with the touch of the walking belt, and center the walking belt if necessary (see...
English Manual - Page 19

... cord and press the power switch into the reset position. After a
moment, the displays
will begin to its lowest setting. if the key is displayed in the display. Next, press either the Incline decrease button or the lowest numbered incline button to set the treadmill to move at the left.
2. Select the manual mode...
English Manual - Page 20

... also show the elapsed time, the distance that
Track
represents 1/4
mile (400 m). Next, remove the key from the console.
Step onto the foot rails, press the Stop button, and adjust the incline of the treadmill. Measure your pace, and the incline of the treadmill to the storage position. avoid moving your progress with your heart rate...
English Manual - Page 21

... time, press the Stop button. Hold the handrails and begin to the first speed and incline settings of the workout begins, the treadmill will automatically adjust to start the workout.
Insert the key into segments. Start the workout.... programmed for the next segment.
3. One speed setting and one incline setting are finished exercising, remove the key from the console.
English Manual - Page 22

...as the manual mode (see the instructions included with SSID broadcast enabled (hidden networks are finished exercising, remove the
key from your progress with a USB port and an internet connection. A moment ... your schedule, press the Map, Train, or Lose Wt. Follow your schedule, first press the Track button. HOW TO USE A SET-A-GOAL WORKOUT
HOW TO USE AN IFIT WORKOUT
1. Start the ...
English Manual - Page 23

...more information about the iFit mode, go to the speed and incline settings for the first segment of the workout. Select the ... that the treadmill has been used.
The distance display will show the total number of miles (or kilometers) that keeps track of the ..., the console will show a map of the trail you are finished exercising, remove the key from the console and press one of the race....
English Manual - Page 24

... function normally when you plug in the power cord, press the power switch into the reset position, and insert the key into the console or when you remove the key, the displays will...kilometers, select METRIC.
DEMO-The console features a display demo mode, designed to be used if the treadmill is connected, you may also select the following screens:
UNITS-To change the unit of your iFit ...
English Manual - Page 25

... 1;
If you exercise, plug a 3.5 mm male to the same firmness level. The treadmill features a cushioning system that the cushions on the left and right sides of the treadmill are using a ... other personal audio player.
for less firmness, turn a cushion to place the treadmill in the storage position (see your personal audio player or press the volume increase and decrease buttons on...
English Manual - Page 26

... in the storage position. HOW TO LOWER THE TREADMILL FOR USE
1. Press on the upper end of the treadmill frame with your hands, press the storage latch with your back straight. HOW TO FOLD AND MOVE THE TREADMILL
HOW TO FOLD THE TREADMILL
HOW TO MOVE THE TREADMILL
To avoid damaging the treadmill, adjust the incline to the...
English Manual - Page 27

..., wait for a few seconds. c. Check the power switch located on
a. Make sure that the power cord is plugged into the off position and unplug the power cord. d. If the treadmill still will not run, please see the front cover of this manual.
c. Remove the key from the console
SYMPTOM: The power does...
English Manual - Page 28

... that meets all of the walking belt 2 to 3 in. (5 to 7 cm) off the walking platform. Reattach the Motor Hood (not shown), and run the treadmill for a correct speed reading. b
2-3 in . (3 mm). The treadmill will recalibrate the incline system.
Make sure that the walking belt needs more lubricant, see the front cover of the...
English Manual - Page 30

...-Start with 5 to find your everyday life.
30 never hold your "training zone." Cooling Down-Finish with 5 to prevent post-exercise problems.
EXERCISE FREQUENCY
To maintain or improve your muscles and helps to 10 minutes of time. Stretching increases the flexibility of your condition, complete three workouts each week, if desired.
Burning Fat...
English Manual - Page 31
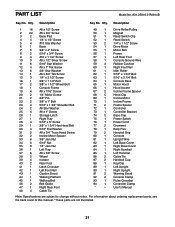
... Washer
25
4
#8 x 1" Screw
26
1
Storage Latch
27
1
Right Tray
28
4
5/16" x 3" Screw
29
1
3/8" x 1 3/4" Hex Head Bolt
30
4
5/16" Flat Washer
31
5
#8 x 3/4" Truss Head Screw
32
2
Incline Motor Spacer
33
6
3/8" Jam Nut
34
6
5/16" Nut
35
8
1/4" Jam Nut
36
1
Left Tray
37
6
#8 x 5/8" Screw
38
2
Wheel
39
4
Isolator
40
2
Rear Foot
41
1
Latch...
Similar Questions

Oil Appeared On Floor After Initial Assembly And Start Up. Shipping Issue ?
Additional oil present on shop floor after being in the off position overnight. Container carton was...
Additional oil present on shop floor after being in the off position overnight. Container carton was...
(Posted by jimfarnsworth 7 months ago)

Clunk When Raising Track
New T6.5S makes loud clunk when raising track to positions no. 2 and No. 8.
New T6.5S makes loud clunk when raising track to positions no. 2 and No. 8.
(Posted by jimcarrier 3 years ago)

Picture Exercise Instructions For Using The Nordic Track E8200
HiI need the original exercise instructions for using the Nordic track E8200 the exercises are on PI...
HiI need the original exercise instructions for using the Nordic track E8200 the exercises are on PI...
(Posted by hitechaluminium 8 years ago)

Nordic Track Exercise Bike Console Problem
I have a Noridic Track GX2.0 Exercise Bicycle. The console has begun flickering, which is getting wo...
I have a Noridic Track GX2.0 Exercise Bicycle. The console has begun flickering, which is getting wo...
(Posted by GELewis 9 years ago)

Nordic Track Incline Trainer X5
My NT incline trainer x5 will not reset after being unplugged. the motor runs as it is trying to res...
My NT incline trainer x5 will not reset after being unplugged. the motor runs as it is trying to res...
(Posted by Mblaut1 10 years ago)