2011 Nissan Altima Support Question
2011 Nissan Altima Support Question
Find answers below for this question about 2011 Nissan Altima.Need a 2011 Nissan Altima manual? We have 1 online manual for this item!
Question posted by teNANCY on January 13th, 2014
Why Remove Rear Seat Cushion To Remove 2010 Altima Parcel Shelf
The person who posted this question about this Nissan automobile did not include a detailed explanation. Please use the "Request More Information" button to the right if more details would help you to answer this question.
Current Answers
Related Manual Pages
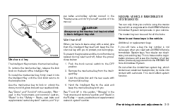
Owner's Manual - Page 2
...'s Manual carefully. Modification could distract you understand the operation and maintenance of your seat belts and appropriate child restraint systems. Preteen children should not be modified. A ...questions, they will ensure familiarity with the extensive resources available to you in the rear seat. ● ALWAYS provide information about the proper use your vehicle so that could...
Owner's Manual - Page 9
... belt with pretensioner (P. 1-55) 12. LII2001
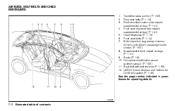
0-2 Illustrated table of contents AIR BAGS, SEAT BELTS AND CHILD RESTRAINTS
1. 2. 3.
Top tether strap anchor (P. 1-27) Rear seat belts (P. 1-14) Roof-mounted curtain side-impact supplemental air bag (P. 1-41) 4. Occupant classification sensor (pattern sensor) (P. 1-50) 11. LATCH (Lower Anchors and Tethers for CHildren) ...
Owner's Manual - Page 14
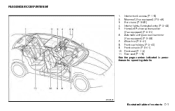
... box (P. 2-41) 8. Interior trunk access (P. 1-8) Moonroof (if so equipped) (P. 2-46) Sun visors (P. 3-28) Interior lights, illuminated entry (P. 2-49) HomeLink universal transceiver (if so equipped) (P. 2-51) 6. Rear seat (P. 1-8)
See the page number indicated in parentheses for operating details. Front...
Owner's Manual - Page 20
...Safety-Seats, seat belts and supplemental restraint system
Seats ...1-2 Front manual seat adjustment (if so equipped) ...1-2 Front power seat adjustment (if so equipped for driver's seat) ...1-4 Folding rear seat ...1-8 Head restraints...1-10 Seat belts ...1-14 Precautions on seat belt usage...1-14 Pregnant women ...1-17 Injured persons...1-17 Three-point type seat belt with retractor ...1-17 Seat...
Owner's Manual - Page 27
... accessed from sliding or shifting. To remove or reinstall the seatback release button access covers, see "Upper tether anchor/key cylinder covers" in the cargo area or on the rear parcel shelf. 2. WARNING
● Never allow anyone to ride in the "Maintenance and do-ityourself" section of the rear seat for loading and unloading, as shown...
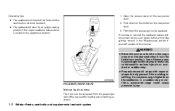
Owner's Manual - Page 44
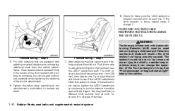
... sudden stop or collision: - Attach LATCH system compatible child restraints only at the rear of the seat cushion near the seatback. WRS0795
LATCH system lower anchor locations
- Do not secure a child... label is equipped with special anchor points that are obstructed. Feel to as seat belt webbing or seat cushion material. This system may also be secured properly. - Inspect the lower anchors ...
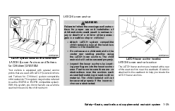
Owner's Manual - Page 46
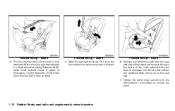
... 2 . 2. If the rear seat cushion has a flap 1 , pull the flap down to allow access to install a rear-facing child restraint using the LATCH system: 1. See "Installing top tether strap" later in the "Child Safety" and "Child Restraint" sections before installing a child restraint. Position the child restraint on the rear parcel shelf.
(if so equipped)
Rear-facing web-mounted...
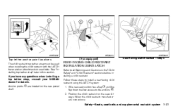
Owner's Manual - Page 47

Rear-facing - step 4 4. For child restraints that are equipped with your hand to compress the vehicle seat cushion and seatback while tightening the webbing of the anchor ...necessary, or put the restraint in all types of the child restraint with webbing-mounted attachments, remove any additional slack from the anchor attachments.
Push it forward and check to the LATCH lower anchors...
Owner's Manual - Page 50

Pull up on the shoulder belt to remove any additional slack from side to compress the vehicle seat cushion and seatback while pulling up on the seat belt. Remove any slack in the belt.
Rear-facing - step 6 6. The child restraint should not move more than 1 inch (25 mm), from the seat belt; Not all child restraints fit in...
Owner's Manual - Page 51

...)
FORWARD-FACING CHILD RESTRAINT INSTALLATION USING LATCH
Refer to the anchors 2 .
1-32 Safety-Seats, seat belts and supplemental restraint system If the rear seat cushion has a flap 1 , pull the flap down to allow access to all Warnings and ... steps 1 through 6.
After the child restraint is removed and the seat belt fully retracted, the ALR mode (child restraint mode) is canceled.
2.
Owner's Manual - Page 53
... attachment path. Push it can change the operation of vehicles.
1-34 Safety-Seats, seat belts and supplemental restraint system If the restraint is loose, repeat steps 2 through... to compress the vehicle seat cushion and seatback while tightening the webbing of the child restraint with webbing-mounted attachments, remove any slack. Also, it from side to remove any additional slack from...
Owner's Manual - Page 54

..." in this section. WRS0699
WRS0680
Forward-facing (front passenger seat) - step 1 Refer to the tether anchor point (rear seat installation only).
Follow these steps to install a forward-facing child restraint using the vehicle seat belt in the rear seats or in the front passenger seat: 1. Route the seat belt tongue through the child restraint and insert it should...
Owner's Manual - Page 55
...-facing - step 6 6.
Remove any slack.
1-36 Safety-Seats, seat belts and supplemental restraint system press downward and rearward firmly in the center of the child restraint with your knee to Emergency Locking Retractor (ELR) mode when the seat belt is fully extended. Forward-facing - step 5 5.
It reverts to compress the vehicle seat cushion and seatback while...
Owner's Manual - Page 57
To remove or reinstall the tether anchor covers, see "Upper tether anchor/key cylinder covers" in a seating position that has a lap/shoulder belt.
1-38 Safety-Seats, seat belts...child's face and neck and the lap portion of the seatback 2 . 3. BOOSTER SEATS Precautions on the rear parcel shelf 3 . Secure the tether strap to the appropriate child restraint installation procedure steps in a...
Owner's Manual - Page 59

... head restraint to reinstall the head restraint when the booster seat is removed. If you must install a booster seat in the front seat, move the seat to install a booster seat in the rear seat or in the "Child Safety", "Child Restraint" and "Booster Seats" sections before installing a child restraint. Follow these steps to the rearmost position. 2. Always follow the...
Owner's Manual - Page 73
... inflating can help save lives and reduce serious injuries. The curtain air bags are designed to cushion the impact force on the side where the vehicle is not harmful and does not indicate ..., although they may not inflate in this , the force of a higher severity side impact. Rear seat passengers should be taken not to the lower body. The side air bags and curtain air bag...
Owner's Manual - Page 138
.... To install the mechanical key, firmly insert it -yourself" section of the Intelligent Key. Lock the glove box and the rear seats with you need extra NISSAN Vehicle Immobilizer System keys. To remove the mechanical key, release the lock knob on the back of this manual. See "Doors" and "Trunk lid" in this...
Owner's Manual - Page 359
... Key™ ...8-27 Lights ...8-28 Headlights ...8-28 Front park/turn/sidemarker light ...8-29 Exterior and interior lights...8-30 Upper tether anchor/key cylinder covers ...8-36 Removing covers from rear parcel shelf ...8-37 Installing covers to rear parcel shelf...8-37
Owner's Manual - Page 396

...completely aligned with the pin.
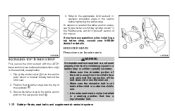
Maintenance and do-it may break. INSTALLING COVERS TO REAR PARCEL SHELF
CAUTION
Make sure that the hinge is forced into the hinge 2 . Lift ... from the hinge 2 and remove the cover. Install the top tether anchor cover or key cylinder cover as follows: 1. LDI2009
LDI2010
LDI2011
REMOVING COVERS FROM REAR PARCEL SHELF
Remove the top tether anchor cover ...
Owner's Manual - Page 442
...Shoulder belt height adjustment ...1-19 Three-point type with compact disc (CD) player ...Readiness for inspection maintenance (I/M) test ...Rear parcel shelf Refitting covers ...Removing covers... Rear power windows ...Rear seat...RearView Monitor ...Rear window and outside mirror defroster switch...Recorders Event data ...Refrigerant recommendation ...Registering your vehicle in another country...
Similar Questions

How To Remove The 2 Nuts And Pull Out The Rear Combination Light On An Altima
2008
2008
(Posted by bilukeg 9 years ago)

How Do You Add Ac Coolant In My 2010 Altima
(Posted by Anonymous-138301 9 years ago)
Is It Possible To Install Oem Navigation On 2010 Altima With Base Model Stereo
(Posted by saleePetrve 10 years ago)

Front Seat Removal Driver Side... I Lost An Earring And I Can't Find It.
Lost earring on side of seat front driver side. I saw it slide down the side and I can't locate it. ...
Lost earring on side of seat front driver side. I saw it slide down the side and I can't locate it. ...
(Posted by bstillman 10 years ago)

How Do You Remove The Center Console On A 2010 Nissan Altima
(Posted by stacsin 10 years ago)