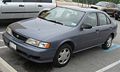
1998 Nissan Sentra Support Question
1998 Nissan Sentra Support Question
Find answers below for this question about 1998 Nissan Sentra.Need a 1998 Nissan Sentra manual? We have 1 online manual for this item!
Question posted by Mwaldeazb0 on October 13th, 2013
How To Adjust Oil In Manual Trans 98 Sentra
The person who posted this question about this Nissan automobile did not include a detailed explanation. Please use the "Request More Information" button to the right if more details would help you to answer this question.
Current Answers
Related Manual Pages
Owner's Manual - Page 46

...any light fails to ON without starting the engine. Engine oil pressure warning light
This light warns of this manual. WARNING/INDICATOR LIGHTS AND CHIMES
or Brake warning light Low ...equipped)
O/D OFF
Overdrive off indicator light (automatic transmission only) Malfunction indicator light Engine oil pressure warning light
Seat belt warning light
Low fuel warning light (if so equipped)
Checking...
Owner's Manual - Page 62
3 Pre-driving checks and adjustments
Key ...3-2 Door locks ...3-2 Manual door lock...3-2 Power door lock (if so equipped) ...3-3 Multi-remote control system (if so equipped)...3-4 Battery replacement ...3-7 Child safety rear door lock (four-door only) ...3-8 ...
Owner's Manual - Page 63

... from the vehicle.
To unlock, turn the key towards the rear.
3-2 Pre-driving checks and adjustments Record the key number and keep it towards the front of seat belts, this key can be ... when you lose your key. KEY
WARNING ● Always have the doors locked while driving.
APD0622
MANUAL DOOR LOCK
To lock the door, turn it in the event of your wallet), NOT IN THE ...
Owner's Manual - Page 73

Tighten the cap clockwise until ratcheting clicks are heard. If the fuel filler cap is a screw-on .
3-12 Pre-driving checks and adjustments To lock, close the fuel filler lid securely. Manual Fuel Filler Lid
Open the fuel filler lid by pulling the raised portion of the fuel filler lid. FUEL FILLER LID...
Owner's Manual - Page 76
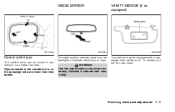
... in the outside mirror can be equipped with a passenger side vanity mirror.
Pre-driving checks and adjustments 3-15 Objects viewed in any direction for a better rear view. INSIDE MIRROR
VANITY MIRROR (if so equipped)
PD1183M
APD0612
APD1028
Manual control type
The outside mirror on the passenger side are closer than they appear.
Owner's Manual - Page 88
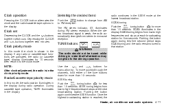
....
To move quickly through the channels, hold either of the tune buttons down for manual tuning.
Pushing the button again continues the SEEK function. Once the highest broadcasting station is... 1.5 seconds.
When the stereo broadcast signal is in the display. NOTE: After clock adjustment, the radio is weak, the radio automatically changes from AM to the clock mode. ...
Owner's Manual - Page 93

SEEK mode at the lowest broadcasting station.
NOTE: After clock adjustment, the radio is in the
FM/AM band select button
Push the button to... tuning begins from AM to high frequencies, depending on which button is pressed, and stops at each broadcasting station for manual tuning. The FM stereo indicator, ST, illuminates during this mode the clock is weak, the radio
4-16 Heater, ...
Owner's Manual - Page 98

...more than 1.5 seconds. Pushing the button again during FM stereo reception.
NOTE: After clock adjustment, the radio is shown in the display.
Clock operation
Pressing the clock button alternates the ... radio, cassette or CD functions are activated, the radio, cassette or CD display illuminates for manual tuning. When no CD or tape is loaded, the radio comes on which button is reached...
Owner's Manual - Page 110
... here should be checked periodically, e.g., each time you check engine oil. ● Check that all passengers to the ON (3) position....Adjust inside and outside mirrors. ● Fasten seat belts and ask all windows and lights are clean. ● Visually inspect tires for the steering wheel to the LOCK position. 4) Remove the key. Key positions
LOCK: Normal parking position (0) OFF: (Manual...
Owner's Manual - Page 131

...true for emergency use. Lower the vehicle slowly until they are tight.
● Do not use oil or grease on and tighten the wheel nuts finger tight. 3. WARNING ● Incorrect wheel nuts ...tighten the wheel nuts to the COLD
6-6 In case of this owner's manual. 1.
Adjust tire pressure. Wheel nut tightening torque: 72 to 87 ft-lb (98 to 118 N m) The wheel nuts must be tightened to move ....
Owner's Manual - Page 144

... Checking engine coolant level ...8-5 Changing engine coolant ...8-6 Engine oil ...8-8 Checking engine oil level ...8-8 Changing engine oil ...8-9 Changing engine oil filter ...8-10 Automatic transmission fluid (ATF) ...8-11 Temperature ...Light bulbs ...8-25 Headlights ...8-25 Headlight aiming adjustment...8-26 Bulb replacement ...8-26 Front fog light bulb replacement (if so equipped) ...8-31 Wheels and...
Owner's Manual - Page 145

...to prevent serious accidental injury to yourself or damage to the OFF or LOCK position. For a manual transmission, move the shift lever to P (Park). ● Be sure the ignition key ... can hurt the environment. Always conform to N (Neutral). This ''Do-it with used motor oil. For an automatic transmission, move the gearshift control lever to local regulations for exhaust gases. ●...
Owner's Manual - Page 160
... belt for condition and tension in accordance with the maintenance schedule found in poor condition or loose, have it -yourself
8-17 Do-it replaced or adjusted by an authorized NISSAN dealer. 2. Have the belts checked regularly for signs of this...
Owner's Manual - Page 161

....
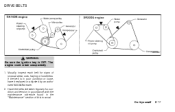
SPARK PLUG REPLACEMENT
GA16DE Engine
1.
An incorrect socket can cause damage.
8-18 Do-it is shown in the ''Technical and consumer information'' section of this manual.) Adjust the gap as necessary to give access to the high tension cables and spark plugs. 2. Make sure each new spark plug with a spark plug socket...
Owner's Manual - Page 165

...8-22 Do-it checked if the brake pedal height does not return to a lack of adjustment of this manual. With the engine off . With the brake pedal depressed, stop the engine. Keeping the.... BRAKE BOOSTER
normal, it off , press and release the brake pedal several times. To adjust apply the parking brake several times. Check the brake booster function as possible by an authorized NISSAN...
Owner's Manual - Page 169

...158
Turn signal Stop/Tail Back-up (Sentra) Back-up (200SX) License plate light Trunk lid-mounted stop light Front fog lamp Interior light Trunk light
Before adjusting the headlights, make sure all of the ... may enter the headlight body and affect the performance of the vehicle. The horizontal adjustment bolt is behind the headlight. and turn the headlight beam left,
8-26 Do-it counterclockwise to lower...
Owner's Manual - Page 189

... Intake & exhaust valve clearance - Check and adjust the valve clearance. Under severe driving conditions, ....
9-10 Maintenance Engine oil & oil filter* - Under normal driving conditions, the engine oil and oil filter should be done ...for proper attachment, leaks, cracks, chafing, abrasion, deterioration, etc. Manual & automatic transmission fluid* - Check the fluid level and visually ...
Owner's Manual - Page 211

... flasher switch ...2-15 Head restraints ...1-4 Headlight aiming adjustment ...8-26
11-2 fuel...5-14 Emission control information label...transmission ...5-6 Driving with manual transmission...5-9 Precautions when starting the engine ...5-5 Capacities...system ...8-5 Engine oil...8-8 Engine oil and oil filter recommendation ...10-5 Engine oil pressure warning light ...2-5 Engine oil viscosity ...10...
Owner's Manual - Page 212

...check/instrument panel ...2-5 Charge warning light ...2-5 Front fog light switch ...2-14 Headlight aiming adjustment ...8-26 Headlight and turn signal switch ...2-13 Headlights ...8-25 Heater Heater and air conditioner... maintenance...1-20 Under the hood and vehicle ...9-4 Malfunction indicator light ...2-8 Manual windows ...2-17 Meters and gauges...2-2 Mirror Inside mirror...3-15 Outside mirror ...
Owner's Manual - Page 213

...oil...8-8 Engine oil and oil filter recommendation ...10-5 Engine oil viscosity ...10-5 Opener lever for trunk lid...3-10 Outside mirror control ...3-14 Overdrive switch ...5-8 Overheat If your vehicle overheats ...6-10 Owner's manual order form...10-20 Owner's manual/service manual...Shifting Automatic transmission ...5-7 Manual transmission...5-9 Shoulder belt height adjustment...1-17 Spark plug ...
Similar Questions


Free Manual Nissan 1400 Sentra 1998 16v
nissan 19098 senta 1400 16 v manual
nissan 19098 senta 1400 16 v manual
(Posted by john22712 10 years ago)

How To Remove Manual Transmission Nissan Sentra 1996
(Posted by RonBshaha 10 years ago)
