
2010 Mercury Milan Support Question
2010 Mercury Milan Support Question
Find answers below for this question about 2010 Mercury Milan.Need a 2010 Mercury Milan manual? We have 8 online manuals for this item!
Question posted by cacpapas on December 18th, 2013
How To Replace A Tail Light Bulb On 2010 Mercury Milan
The person who posted this question about this Mercury automobile did not include a detailed explanation. Please use the "Request More Information" button to the right if more details would help you to answer this question.
Current Answers
Related Manual Pages
Owner's Manual - Page 1
Table of Contents
Introduction Instrument Cluster
Warning lights and chimes Gauges Message center
4 12
12 17 19
Entertainment Systems...automatic temperature control Navigation system based climate control Rear window defroster
46
46 48 51 55
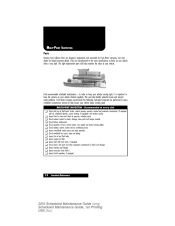
Lights
Headlamps Turn signal control Bulb replacement
56
56 60 61
Driver Controls
Windshield wiper/washer control Steering wheel adjustment Power windows ...
Owner's Manual - Page 61

... the rear dome lamp(s). Press the switches on whenever the ignition is placed in pressure. BULB REPLACEMENT Lamp assembly condensation Exterior lamps are : • Water puddle inside the lamp 61 Examples ... changes in the off state.
When normal condensation occurs, a thin film of this design. Lights
Your vehicle may take as long as 48 hours under dry weather conditions. The thin mist...
Owner's Manual - Page 62
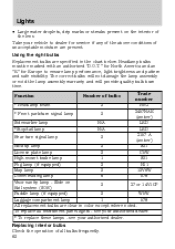
... moisture are clear in the chart below. Function * Headlamp beam * Front park/turn signal lamp Sidemarker lamp *Stop/tail lamp Rear turn signal lamp Number of all instrument panel lights - Replacing interior bulbs Check the operation of bulbs 2 2 N/A N/A 2 Trade number HB3 3457NAK (amber) LED LED 3157 A (amber) 921 C5W 921 H11 12V6W 578
Backup lamp...
Owner's Manual - Page 63
Lights
Replacing exterior bulbs Check the operation of vehicle damage and/or personal burn injuries do not start your engine with the air cleaner removed and do the following: WARNING: To reduce the risk of all the bulbs frequently. See Changing the air filter element in the Maintenance & Specifications section for more information. 2. This connector...
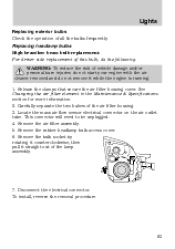
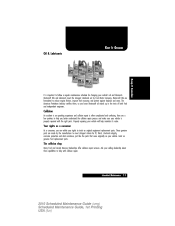
Owner's Manual - Page 64
Lights
For passenger side replacement of the lamp assembly. 5. At the wheel well, remove the press pins from the bulb socket and discard the old bulb socket.
64 Remove the bulb socket by rotating it counterclockwise, then pull it straight out of this bulb, do the following: 1. Make sure headlamp control is in the off position, then...
Owner's Manual - Page 65
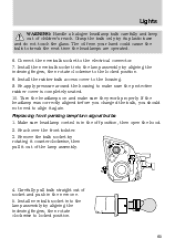
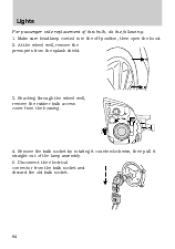
Replacing front parking lamp/turn signal bulbs 1. Make sure headlamp control is completely seated. 10. Remove the bulb socket by aligning the indexing fingers, then rotate clockwise to locked position.
65 Carefully pull bulb straight out of children's reach. The oil from your hand could cause the bulb to the electrical connector. 7. Lights
WARNING: Handle a halogen headlamp...
Owner's Manual - Page 66
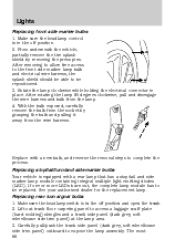
... is in place. After removing to allow free access to the front side marker lamp bulb and electrical wire harness, the splash shield should be able to be replaced. Replacing stop /tail and side marker lamp module containing integral multiple light emitting diodes (LED). From underneath the vehicle, partially remove the tire splash shield by...
Owner's Manual - Page 67
... carpeting panel. Install the bulb socket into the lamp assembly by rotating it clockwise. 7. Pull the bulb from the socket and push in the new bulb. 5. Lights
effective point to grasp the...by rotating it out of the lamp assembly. 4. Replacing backup lamp bulbs The backup lamp bulbs are located in permanent deformation. 4. Pull the bulb from the socket and push in the off position ...
Owner's Manual - Page 68
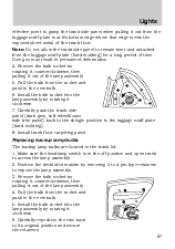
... splash shield by rotating it out of the lamp assembly. 4. Lights
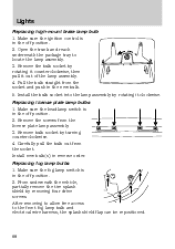
Replacing high-mount brake lamp bulb 1. Pull the bulb straight from the socket. Install new bulb(s) in the off position. 2. Install the bulb socket into the lamp assembly by removing four drive screws. Replacing license plate lamp bulbs 1. Remove the screws from the license plate lamp assembly...
Owner's Manual - Page 325
... driver airbag ...132, 134, 142, 145 indicator light ...141, 143, 147 operation ...132, 134, 142...(AWD), driving off road ...227 Ambient mood/lighting ...61 AM/FM ...29 Antifreeze (see Engine ... jumping a disabled battery ...251 maintenance-free ...283 replacement, specifications ...313 servicing ...283 Belt-Minder ...127...lock brake system (ABS) warning light ...202 fluid, checking and adding ...305 ...
Owner's Manual - Page 327
...) ...295 Gas mileage (see Fuel economy) ...299 Gauges ...17 H Hazard flashers ...235 Headlamps ...56 aiming ...59 autolamp system ...56 bulb specifications ...62 daytime running lights ...57 flash to pass ...58 high beam ...58 replacing bulbs ...63 turning on and off ...236 improving fuel economy ...299 octane rating ...296, 317 quality ...297 running out of...
Owner's Manual - Page 328
... autolock ...87 keypad ...98 locking and unlocking doors ...99 programming entry code ...98 Keys ...86, 101 positions of the ignition ...196 L Lamps autolamp system ...56 bulb replacement specifications chart ...62 daytime running light ...57 fog lamps ...57 headlamps ...56 328 headlamps, flash to pass ...58 instrument panel, dimming ...58 interior lamps ...60, 62...
Scheduled Maintenance Guide 1st Printing - Page 7
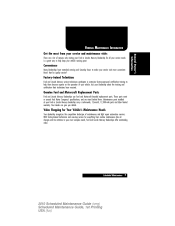
...Mercury Dealerships use Ford and Motorcraft branded replacement parts. These parts meet or exceed Ford Motor Company's specifications, and we stand behind them become experts on the operation of maintenance and light...complex needs, Ford and Lincoln Mercury Dealerships offer outstanding value. How's that for quality service? Scheduled Maintenance 7
2010 Scheduled Maintenance Guide (smg) Scheduled Maintenance Guide...
Scheduled Maintenance Guide 1st Printing - Page 8
...see your Owner's Guide). and lubricate all interior and exterior lights. and clean body and door drain holes. power steering ... for the proper lug nut torque specification.
8 Scheduled Maintenance
2010 Scheduled Maintenance Guide (smg) Scheduled Maintenance Guide, 1st Printing ... belts and seat latches for all wiper blades (replace blades as necessary). battery connections and clean if ...
Scheduled Maintenance Guide 1st Printing - Page 9
... high loading conditions can accelerate the aging process and may be replaced after 6 years due to replace your tires, please visit your Ford or Lincoln Mercury Dealership for name-brand tires and people who know your vehicle,...on the B-Pillar or edge of the driver's door. Scheduled Maintenance 9
2010 Scheduled Maintenance Guide (smg) Scheduled Maintenance Guide, 1st Printing USA (fus)
Scheduled Maintenance Guide 1st Printing - Page 10
...mileage. KEEP IT GENUINE
Batteries
The technicians at your Ford or Lincoln Mercury dealership can determine the health of Ford Motor Company engineers, and they'..., free replacement warranty and prorated-cost replacement thereafter for your vehicle and their factory-trained technicians know exactly how to proper brake system operation.
10 Scheduled Maintenance
2010 Scheduled Maintenance...
Scheduled Maintenance Guide 1st Printing - Page 11
....
These genuine parts are a few pointers to insist on original equipment replacement parts.
The collision shop
Many Ford and Lincoln Mercury Dealerships offer collision repair services. Collision
An accident is an upsetting experience and... repaired with collision repair. Scheduled Maintenance 11
2010 Scheduled Maintenance Guide (smg) Scheduled Maintenance Guide, 1st Printing USA (fus)
Scheduled Maintenance Guide 1st Printing - Page 12
...horn, exterior lamps, turn signals and hazard warning lights.
MULTI-POINT INSPECTION - Check operation of your ...performance. Inspect clutch operation, if equipped.
12 Scheduled Maintenance
2010 Scheduled Maintenance Guide (smg) Scheduled Maintenance Guide, 1st Printing ..., and warranted by Ford Motor Company. The right replacement parts will help ensure your dealer for wear and ...
Quick Reference Guide 1st Printing - Page 1

... information on .
Press repeatedly to enter CD/MP3 mode. Low Tire Pressure Warning
SOUND
Milan 2010
Use extreme caution when using the memory presets (0-9), enter in the desired radio station,... will notify you .
If the light remains on fog lamps by a long indicator chime. If the light remains on parking, instrument panel, license plate and tail lamps.
Press DIRECT and then, ...
Quick Reference Guide 1st Printing - Page 2
...insert the fuel funnel (attached to replace your vehicle has been equipped with...System (if equipped)
Easy Fuel™ 'No Cap' Fuel System
Milan 2010
Quick Reference Guide
Moon Roof (if equipped)
Your moon roof is ...moving . Roadside Assistance
Your new Mercury Milan comes with special phone and ... that illuminates a low tire pressure warning light when one -touch express opening, closing and...
Similar Questions


How Do I Replace The Tail Light Bulb In A 2010 Milan
(Posted by ktemdfor 10 years ago)


How To Change Light Bulb Headlight Driver Side
How do you change the light bulb driver side on a 2006 Milan
How do you change the light bulb driver side on a 2006 Milan
(Posted by jbarrom 11 years ago)