2001 Mercury Cougar Support Question
2001 Mercury Cougar Support Question
Find answers below for this question about 2001 Mercury Cougar.Need a 2001 Mercury Cougar manual? We have 3 online manuals for this item!
Question posted by Anonymous-91591 on December 30th, 2012
Location Of Power Seat Fuse
The person who posted this question about this Mercury automobile did not include a detailed explanation. Please use the "Request More Information" button to the right if more details would help you to answer this question.
Current Answers
Related Manual Pages
Scheduled Maintenance Guide 5th Printing - Page 8
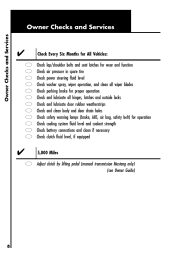
... Months for All Vehicles: Check Check Check Check Check Check Check Check Check Check Check Check lap/shoulder belts and seat latches for wear and function air pressure in spare tire power steering fluid level washer spray, wiper operation, and clean all wiper blades parking brake for proper operation and lubricate all...
Scheduled Maintenance Guide 5th Printing - Page 9
Additional Information Available on the Web To learn more . The website location is presented at the web site.
9 You'll also find important warranty information, customer assistance, technical expertise, frequently asked questions and much more about the ...
Owner Guide 2nd Printing - Page 4
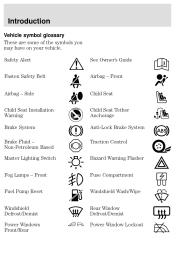
...;Lock Brake System Traction Control Hazard Warning Flasher Fuse Compartment Windshield Wash/Wipe Rear Window Defrost/Demist Power Window Lockout Side Child Seat Installation Warning Brake System Brake Fluid NonĆPetroleum Based Master Lighting Switch Fog Lamps - Front Fuel Pump Reset Windshield Defrost/Demist Power Windows Front/Rear See Owner's Guide Airbag - Safety...
Owner Guide 2nd Printing - Page 109

To lower, push the small catch in the collar around the stem and raise or lower the head restraint to the desired height. Seating and safety restraints
HEAD RESTRAINTS Adjusting the head restraints If your vehicle is equipped with adjustable head restraints, push or pull the head restraint to ...
Owner Guide 2nd Printing - Page 111

... to adjust the seat, seatback and lumbar as follows:
Seat (1) Forward and backward (2) Height of the seat. Seating and safety restraints
Power height adjustment (if equipped) The controls are located on the left front corner of the entire seat Seatback (3) Seatback inclination Lumbar support (4) Lumbar support
Adjusting the power seats (if equipped) The controls are located on the left...
Owner Guide 2nd Printing - Page 112

... area free of the closing liftgate. Make sure it locks in place. Seating and safety restraints
Closing the liftgate To avoid injury to see that the seat and seatback are latched securely in position. Folding rear seats Pull the release knob located in the path of objects that the occupants, especially taller occupants, lean...
Owner Guide 2nd Printing - Page 115

... in the buckle until you hear it snap and feel it lock. Seating and safety restraints
BELT AND RETRACTOR ASSEMBLY MUST BE REPLACED if the seat belt assembly TellĆTale Label" (if applicable, located on lap portion at outboard side of seat above anchorage point) is activated and states that the retractor assembly...
Owner Guide 2nd Printing - Page 126
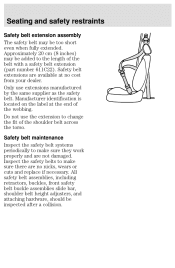
... short even when fully extended. Safety belt extensions are not damaged. Manufacturer identification is located on the label at no nicks, wears or cuts and replace if necessary. All safety...bar, shoulder belt height adjusters, and attaching hardware, should be inspected after a collision. Seating and safety restraints
Safety belt extension assembly The safety belt may be added to the ...
Owner Guide 2nd Printing - Page 129

... still reaching the pedals comfortably. • Recline your seat one or two notches from the air bag: • Move your seat to position yourself away from the upright position. Steps you... those objects to service, repair, or modify the Air Bag Supplemental Restraint System or its fuses. Seating and safety restraints
NHTSA recommends a minimum distance of at least ten (10) inches between...
Owner Guide 2nd Printing - Page 133

... SRS uses a readiness light in the instrument cluster to the Air bag readiness section in the Instrumentation chapter. Determining if the system is not required. Seating and safety restraints
The diagnostic module monitors its own internal circuits and the supplemental air bag electrical system warning (including the impact sensors), the system...
Owner Guide 2nd Printing - Page 134

... provided. Do not attempt to service, repair, or modify the air bag Supplemental Restraint System or its fuses. All occupants of the seatback. Side air bag system (if equipped) Do not use of accessory seat covers may prevent the deployment of the side air bags and increase the risk of injury in...
Owner Guide 2nd Printing - Page 136

...control and diagnostic unit as used for the front air bags. • Two crash sensors located under the outboard side of the seat, attached to do not start the vehicle until the floor area is not replaced, the ...unrepaired area will not function again. Seating and safety restraints
If the air bag has deployed, the air bag will increase the...
Owner Guide 2nd Printing - Page 146

... tether strap may not work properly if attached somewhere other than the correct tether anchor. Seating and safety restraints
Attaching child safety seats with builtĆin tether strap anchors located in the rear of the vehicle seat and attaches to the appropriate tether anchor as shown in the following positions (shown from top...
Owner Guide 2nd Printing - Page 147
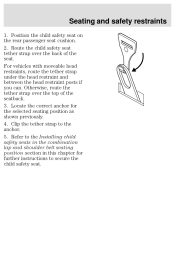
... seatback. 3. Refer to the Installing child safety seats in the combination lap and shoulder belt seating position section in this chapter for the selected seating position as shown previously. 4. Locate the correct anchor for further instructions to the anchor. 5. Position the child safety seat on the rear passenger seat cushion. 2. Clip the tether strap to secure...
Owner Guide 2nd Printing - Page 182

Check the appropriate fuses before replacing any electrical components. The power distribution box is not identified and corrected. Depending on the driver's side of the overload is located on country, the labels may have the vehicle's electrical system checked by your vehicle. Roadside emergencies
FUSES AND RELAYS If electrical components in the vehicle are not...
Owner Guide 2nd Printing - Page 183

...Power Distribution Box before reconnecting the battery or refilling fluid reservoirs.
1
D1 R7 D2 R8 R9 R10 R11
10 11 12 13 14 15 16 17 18
46
47
48
49
50
51
52
1
2
3
4
5
6
7
8
9
39
40
41
42
43
44
45
R1
R2
R3
R4
R5
R6 All fuses... are a push fit. A blown fuse can be identified by a break in the engine compartment by releasing ...
Owner Guide 2nd Printing - Page 184

Roadside emergencies
Fuses in the power distribution box (engine compartment) Fuse 1 2 3 4 5 6 7 8 9 10 11 12 13 14 15 16 17 18 39 40* 41* 42 43 44 45...yellow yellow brown brown brown brown blue blue green yellow yellow yellow yellow Description Not used Alternator Fog lamps Heated seats Not used Engine management Hazard lamps, horn, multifunction switch Not used Fuel pump Not used Day time running ...
Owner Guide 2nd Printing - Page 185

Roadside emergencies
Relays in the power distribution box (engine compartment) Relay R1 R2 R3 R4 R5 R6 R7 R8 R9 R10 R11 D1 D2 Color black ...High speed engine cooling fan Engine cooling fan Not used Daytime running lights (Canada only) Starter relay Air conditioning
Passenger compartment fuse panel To check or replace a fuse or a relay, open the fuse box by pulling down the lock release lever (1).
Owner Guide 2nd Printing - Page 187
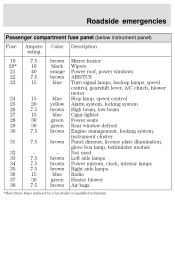
Roadside emergencies
Passenger compartment fuse panel (below instrument panel) Fuse 19 20* 21 22 23 24 25 26 27 28 29 30 31 ..., A/C clutch, blower motor Stop lamp, speed control Alarm system, locking system High beam, low beam Cigar lighter Power seats Rear window defrost Engine management, locking system, instrument cluster Panel dimmer, license plate illumination, glove box lamp, beltminder module ...
Owner Guide 2nd Printing - Page 289

..., 158 Parking lamps, replacing bulbs ...251, 253 Parts ...266 Passenger compartment fuse panel ...185 Passive antiĆtheft system (PATS) ...106 Payload ...169, 171 PCV valve ...266 Power distribution box ...183 Power door locks ...96 Power mirrors ...95 Power seats ...111 Power steering ...160, 267, 268 Power windows ...96 Reading lamps ...94 Reading lamps, replacing bulbs ...255 Rear...
Similar Questions

Need To No Sunroof Is Getting Stuck Do Not No Where The Fuse Is
(Posted by 5g1bgauna 9 years ago)

Which Fuse Powers The Seat Belt Shoulder Strap Motor?
(Posted by Anonymous-130021 10 years ago)

How To Fix The Driver Side Power Seat In A 2001 Mercury Cougar
(Posted by charea 10 years ago)

Where Is The Fuse Box For The Power Seats And The Sunroof On A 01 Mercury Cougar
(Posted by prodigy1013 11 years ago)

Where's The Air Bag Module Located??
I need to know ASAP if someone can help me, please and thank yo
I need to know ASAP if someone can help me, please and thank yo
(Posted by Tawilali52 11 years ago)