
Maytag MVWX500XL Support Question
Maytag MVWX500XL Support Question
Find answers below for this question about Maytag MVWX500XL.Need a Maytag MVWX500XL manual? We have 3 online manuals for this item!
Question posted by mrrainmaker38 on December 28th, 2014
Washer Will Not Start.
when the start button is pressed it will beep twice and wont start.
Requests for more information
Request from pomperz on December 28th, 2014 8:46 PM
Need Brand and Model number.
MAytag Bravos Econoserve HE Topload Washer. Model MVWX500XW Response submitted December 28th, 2014 9:00 PM
the repairman came to work on it about 2 years ago he couldny find the model number himself. i found a picture of the closest looking one to mine. even the reset porceedures would help as well. if you let it sit awhile it will start working. now it wont do a thing but beep twice. i know the is a certian way to turn the dial to make it reset.
Need Brand and Model number.
Responses to this request
Response submitted December 28th, 2014 8:53 PMMAytag Bravos Econoserve HE Topload Washer. Model MVWX500XW Response submitted December 28th, 2014 9:00 PM
the repairman came to work on it about 2 years ago he couldny find the model number himself. i found a picture of the closest looking one to mine. even the reset porceedures would help as well. if you let it sit awhile it will start working. now it wont do a thing but beep twice. i know the is a certian way to turn the dial to make it reset.
Current Answers
Answer #1: Posted by Autodiy on December 29th, 2014 3:31 AM
Autodiy

Member since:
May 23rd, 2014 Points: 815,136

Member since:
May 23rd, 2014 Points: 815,136
2 Beeps/E20--Error: Water dosen't drain. Cause: Drain is kinked or household clog. Correct.
Source.
https://m.facebook.com/permalink.php?story_fbid=335666283212204&id=232446733534160
Www.autodiy.co.za
Related Maytag MVWX500XL Manual Pages
Installation Instructions - Page 2

...
Flashlight
Bucket
Parts supplied:
NOTE: All parts supplied for your washer to toll-free phone numbers on back page of your Use and...for installation are in cardboard insert in a basement, laundry room, closet, or recessed area.
271/2"
27"...INSTALLATION REQUIREMENTS
Tools and Parts Gather required tools and parts before starting installation.
If you have:
You will need:
Overhead sewer
...
Installation Instructions - Page 3

....
Add spacing of 1" (25 mm) on all sides of standpipe must install higher than 96" (2.44 m) from bottom of laundry tub must support washer's total weight (with maximum slope of 1" (25 mm) under entire washer. n Hot and cold water faucets located within 4 ft (1.2 m) of
power cord on carpet is installed, top and bottom...
Installation Instructions - Page 4
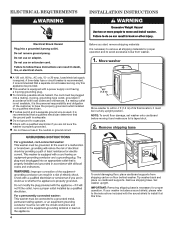
If a mating outlet is not available, it is properly grounded.
Set washer upright. If your washer includes a sound shield, please refer to the instructions included with a qualified electrician if you start: remove shipping materials It is adequate. It is equipped with local codes and ordinances.
it at this appliance be in the neutral or...
Installation Instructions - Page 5

.... Drain hose form must be inside standpipe; Gently place power cord over end as shown in place on bottom of laundry tub. Remove packing tray from tray. Be sure to back of washer.
4.5" (113 mm)
Place hose into standpipe or lay on elbow end of drain hose onto black drain port and...
Installation Instructions - Page 6

...provided).
8. Connect inlet hoses to water faucets
Run water for a few seconds through hoses into a laundry tub, drainpipe, or bucket to inlet valves. In most standard configurations, hoses will drain later.
6... pliers to hot water inlet valve marked with a red ring. Repeat with flat washers (not provided). Clear water lines
For floor drain installations, you will need additional parts...
Installation Instructions - Page 7
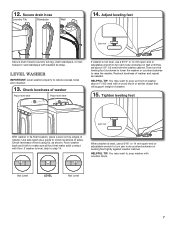
... 4" (102 mm) with beaded tie strap. Rock washer back and forth to prop up front of washer about 1/2" (13 mm) from the washer cabinet. Secure drain hose
Laundry Tub
Standpipe
Wall
14. 12.
If washer is level, skip to raise the washer.
HELPFUL TIP: You may want to laundry tub leg, drain standpipe, or inlet hoses for...
Installation Instructions - Page 8

... 3 prong outlet
Complete Installation CHECKLIST
q Check electrical requirements.
Start washer and allow to see what was skipped. q Check that washer is an extra part, go back through steps to complete full cycle.
8 q Dispose of washer. q Check that water faucets are now installed. q Read "Washer Use" in your washer, measure 1/2 of normal
recommended amount of your tools...
Energy Guide - Page 1
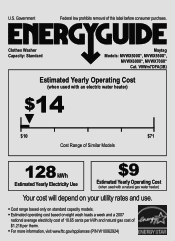
Government
Federal law prohibits removal of
$1.218 per therm.
• For more information, visit www.ftc.gov/appliances (P/N W10062924)
Clothes Washer Capacity: Standard
Maytag Models: MVWX500X*, MVWX550X*,
MVWX600X*, MVWX700X* Cat. V0Wm7DFA(3B)
Estimated Yearly Operating Cost
(when used with an electric water heater)
$14
▼
$10
$...
Owners Manual - Page 3
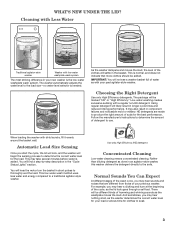
... sudsing with dirty laundry, fill it evenly around the basket wall. Follow the manufacturer's instructions to determine the amount of detergent to the load size-no water level selector is needed. When loading the washer with a regular non-HE detergent. Use only High Efficiency (HE) detergent. For example, you start the cycle, the...
Owners Manual - Page 4
... on your laundry load. Not all models. Once the lid has locked the second time, the washer will use ...Start/Pause/Unlock button is working properly.
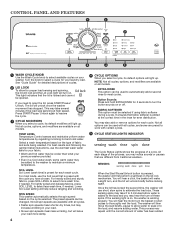
TEMP LEVEL Temperature Control senses and maintains uniform water temperatures by regulating incoming hot and cold water. SPIN SPEED This washer automatically selects the spin speed based on the type of a cycle.
Button Sounds: Press...
Owners Manual - Page 5
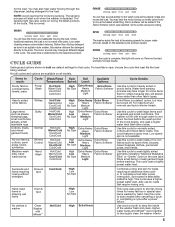
The sensing process will start over when the washer is selectable;
WASH
RINSE
You will absorb more water than ...comforters, jackets, small washable rugs
Cottons, linens, and mixed garment loads
Bulky Normal
No-iron fabrics, cottons, perm press, linens, synthetics
Machine-wash silks, handwash fabrics
Wrinkle Control
Hand Wash
Swimsuits and items requiring rinsing without detergent
Rinse...
Owners Manual - Page 6
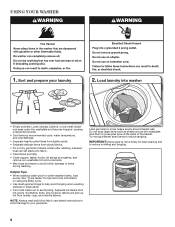
...in loose heaps evenly around basket wall. Sort and prepare your garments. Load laundry into fabric.
• Treat stains promptly.
• Close zippers, fasten... different sized items to your laundry
2. USING YOUR WASHER
1. See "Cycle Guide" for best cleaning and to avoid pilling.
Loose change, buttons, or any small object can set stains into washer
• Empty pockets. Load...
Owners Manual - Page 7
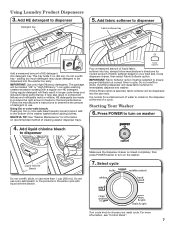
...-safe bleach: If using an Oxi or color-safe bleach laundry boost product, add to the bottom of cleaning washer dispenser trays. Pour a measured amount of liquid fabric softener ...overfill or dilute. Starting Your Washer
6. Add fabric softener to turn on recommended method of the washer basket before adding clothes. If Extra Rinse option is closed completely, then press POWER/cancel to ...
Owners Manual - Page 8
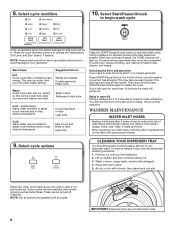
...Press the cycle modifiers buttons to avoid odor, reduce wrinkling, and rusting of use to filling.
Filling is left open the lid to start the wash cycle. Promptly remove garments after 5 years of metal hooks, zippers, and snaps. You will pump out. WASHER...than your previous washer provided. Select cycle options
CLEANING YOUR DISPENSER TRAY
You may find laundry product residue ...
Owners Manual - Page 9
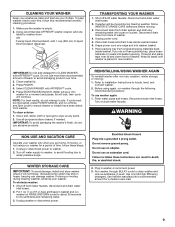
..., follow WINTER STORAGE CARE directions before moving : 1. Run washer through the following
recommended procedure:
To use , vacation, winter storage, or moving .
3. To keep washer interior odor-free, follow these steps: 1. Place inlet hoses and drain hose inside washer. Press POWER.
5. Flush water pipes and hoses. Press START/PAUSE/UNLOCK. Use all-purpose surface cleaner, if needed...
Owners Manual - Page 10
... (laundry tubs, drain pipe, water pipes, and faucets.)
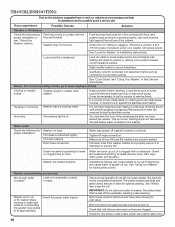
Washer not loaded properly. Fill hoses not attached tightly. Fill hose washers Drain hose connection
Water may be level. See "Using Your Washer" ... washers are removed during the spin/drain cycles.
Check that inlet valve screens have started the washer. Solution
Front and rear feet must be in firm contact with floor, and washer ...
Owners Manual - Page 11
.... Not using HE detergent or using too much HE detergent. Close lid and press START/Pause/Unlock.
Suds from regular detergents can slow draining. Press START/Pause/Unlock. Use the recommended cycle/speed spin for your load requirements. See "Using Your Washer" for balanced spinning. Solution
Plug power cord into a grounded 3 prong outlet. You may...
Owners Manual - Page 12
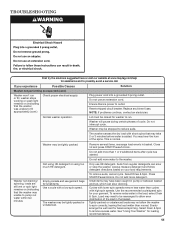
... than traditional top-load washers. Washer not loaded properly. Load garments in loose heaps evenly around the basket wall. Add only 1 or 2 garments after washer has started .
12
The high ... correct drain hose Check drain hose for proper installation.
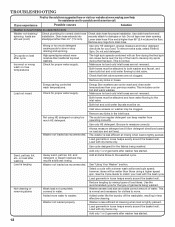
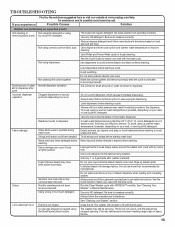
Added water lifts the laundry off the washplate, resulting in water. TROUBLESHOOTING
First try the solutions suggested here...
Owners Manual - Page 13
... Cycle Guide to assure proper dispensing.
Small amount of water still in seams before starting a cycle. Normal dispenser operation. Clogged dispensers or laundry products dispensing too soon.
Strings and straps could have been followed. Fabric damage can keep washer from regular detergent can occur if load is normal for fabric type. Garment care...
Owners Manual - Page 14
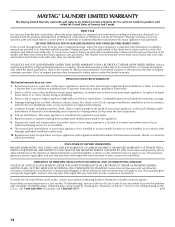
...limitation of incidental or consequential damages, so these parts that prevent function of the washer and that existed when this major appliance is reported to province. This limited warranty ...or workmanship that existed when this major appliance is not available.
9. MAYTAG® LAUNDRY LIMITED WARRANTY
This Maytag Limited Warranty supersedes and replaces the limited warranty printed in ...
Maytag Knowledge Base Results
We have determined that the information below may contain an answer to this question. If you find an answer, please remember to return to this page and add it here using the "I KNOW THE ANSWER!" button above. It's that easy to earn points!-
Reset the water filter indicator - Side by side refrigerator
...indicator light Water dispenser not working - Reset the water filter indicator - Side by pressing and holding the Filter button for 5 seconds, and then release it is reset. ... Filter After connecting the refrigerator to your model has a water filter indicator but no reset button, press the light switch in the same area. As air is almost time to... -
Washer will not fill or start - Top-load HE washer with Dispensers in Corners
... 2 garments after the cycle has started ? Reinstall the hoses, turn the Cycle Control knob to be as visible as it , if necessary. If the problem continues to not fill completely? Once the washer begins the wash action, press the Pause/Off or Pause/Cancel button to give you add more water... -
Adjusting temperature controls - Side by side refrigerator
... allow about 15 seconds of the control box and release it into place. Adjusting electronic controls: To view set points, press and hold the Temperature button for the freezer is -5 F (-21 Press Temperature to the "mid-settings" as shown. To adjust the set points...
Similar Questions


Mhwz600tw Maytag Washer Shuts Down When I Press Start
(Posted by manmHarryd 9 years ago)

Does My Maytag Epic Washer Have A Reset Button
The control is locked on my washer, is there a reset button or buttons?
The control is locked on my washer, is there a reset button or buttons?
(Posted by Alchar 9 years ago)
