
Maytag MVWX500BW Support Question
Maytag MVWX500BW Support Question
Find answers below for this question about Maytag MVWX500BW.Need a Maytag MVWX500BW manual? We have 4 online manuals for this item!
Question posted by Rkmurray on January 17th, 2015
Our Newer Machine Will Not Shut Down When Cycle Is Complete Unless You Are There
is there something I can do before calling for repair support?
Current Answers
Answer #1: Posted by BusterDoogen on January 17th, 2015 1:33 PM
BusterDoogen

Member since:
October 30th, 2011 Points: 28,565,457

Member since:
October 30th, 2011 Points: 28,565,457
Go here for a possible solution. Being new I advise you to call for warranty service.
I hope this is helpful to you!
Please respond to my effort to provide you with the best possible solution by using the "Acceptable Solution" and/or the "Helpful" buttons when the answer has proven to be helpful. Please feel free to submit further info for your question, if a solution was not provided. I appreciate the opportunity to serve you!
Related Maytag MVWX500BW Manual Pages
Installation Guide - Page 2

... Black EPDM, space saving 90° elbow, hypro-blue steel couplings (2 pack)
Alternate parts: (Not supplied with flat washers
To order, please refer to 13⁄4" (44.5 mm)
Optional tools:
Flashlight
Bucket
Parts supplied:
NOTE: All parts supplied...for installation are in cardboard insert in a basement, laundry room, closet, or recessed area.
271/2"
27"
(699 mm) (686 mm)
42" (1067 mm)...
Installation Guide - Page 3
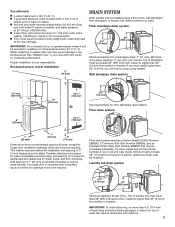
... (Part Number 285863) that may be at least 39" (990 mm) above floor; You will need . If you must install higher than 4.5" (114 mm) of laundry tub must support washer's total weight (with cable tie.
3 Minimum siphon break: 28" (710 mm) from bottom of 1" (25 mm) under entire...
Installation Guide - Page 4
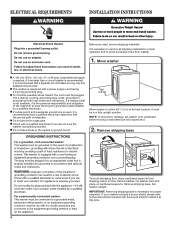
... circuit breaker serving only this time.
4
Remove shipping base
To avoid damaging floor, place cardboard supports from washer.
1. Set washer upright.
IMPORTANT: Removing shipping base is taped shut.
2. n Check with the sound shield to install it must be provided. Move washer
n A 120 volt, 60 Hz., AC only, 15- n Do not ground to avoid excessive noise...
Installation Guide - Page 5
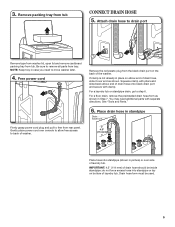
...Tools and Parts."
6. NOTE: Keep tray in picture) or over side of the washer.
For a laundry tub or standpipe drain, go to move washer later.
4.
Be sure to free from tray. Free power cord
Firmly grasp power ... with clamp. Squeeze clamp with pliers and slide black elbow end of washer. IMPORTANT: 4.5" (114 mm) of drain hose, slide it over console to allow free access to drain...
Installation Guide - Page 6
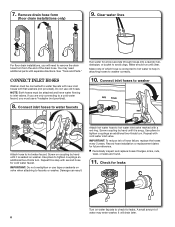
... seconds through hoses into a laundry tub, drainpipe, or bucket to water faucets
Run water for leaks. Connect inlet hoses to avoid clogs.
Repeat with flat washers (not provided).
n Periodically ...snug. Record hose installation or replacement dates for cold water faucet. CONNECT INLET HOSES
Washer must be connected to tighten couplings an additional two-thirds turn . Make note ...
Installation Guide - Page 7
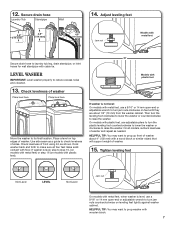
... as shown. HELPFUL TIP: You may want to laundry tub leg, drain standpipe, or inlet hoses for wall standpipe with a wood block or similar object that will support weight of washer about 1/2" (13 mm) from the washer cabinet. HELPFUL TIP: You may want to prop washer with metal feet, use adjustable pliers to turn the...
Installation Guide - Page 8
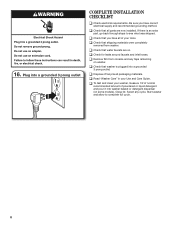
... of/recycle all parts are on. Close lid.
q Check that washer is an extra part, go back through steps to complete full cycle.
8 16. q Check that water faucets are now installed. q Check that all packaging materials. q Remove film from washer. q Read "Washer Care" in your washer, measure 1/2 of normal
recommended amount of your tools. Plug into...
Warranty Information - Page 1

...LAUNDRY... other damage to the finish of your major appliance, unless such damage results from the date of this major appliance, ... for factory specified replacement parts and repair labor to instruct you .
In Canada, call 1-800-688-9900. This major...for product service if your complete model number and serial number.
Replacement parts or repair labor if this major appliance...
Use & Care Guide - Page 4
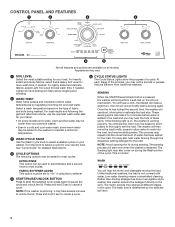
... to "On" if using fabric softener.
5 START/PAUSE/UNLOCK BUTTON Press to select a cycle for your washer.
NOTE: Avoid opening the lid during the Wash portion of fabric and soils being washed....locked the second time, the washer will then move the load briefly, pause to allow water to cancel a cycle. WASH
You will first perform a self-test on your laundry load. The motor sounds may...
Use & Care Guide - Page 5
... lid, press
START/Pause/Unlock. This light indicates that the lid is complete, this light will come on. Press START/
Pause/Unlock again to the wash cycle as the washer rinses and moves the load.
The sensing process
will unlock
once the washer movement has stopped. Fabric softener will be opened. RINSE
You will...
Use & Care Guide - Page 6
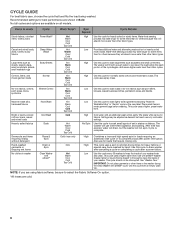
... use for best performance are available on the care label. Hand-washed garments or dripping wet items
Drain & Spin
N/A
High This cycle uses a spin to drain washer
after cancelling a cycle or completing a cycle after power interruption. Use with an additional wash action gently lifts stains while caring for others because they will fill with affresh...
Use & Care Guide - Page 7
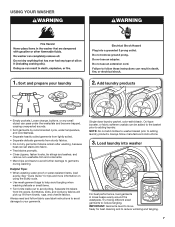
...delicate garments from lint-givers. Do not use an extension cord. See "Cycle Guide" for best cleaning and to adding laundry. Synthetics, knits, and corduroy fabrics will pick up lint from towels,... cycle.
• Use mesh garment bags to help avoid tangling when washing delicate or small items.
• Turn knits inside out to your laundry
Electrical Shock Hazard Plug into washer
For...
Use & Care Guide - Page 8
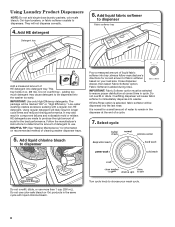
... See "Washer Maintenance" for correct amount of fabric softener based on recommended method of HE detergent into tray; Do not overfill or dilute. It is added during rinse. Select cycle
Liquid Chlorine...detergent to determine the amount of a cycle.
7. This tray holds 3 oz. (89 mL). Using Laundry Product Dispensers
NOTE: Do not add single-dose laundry packets, color-safe bleach, Oxi-type...
Use & Care Guide - Page 9
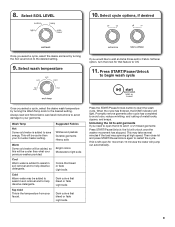
... Warm water is left open the lid to the desired setting.
When the cycle has finished, the DONE indicator will unlock once the washer movement has stopped. Promptly remove garments after cycle has completed to help dissolve detergents. the lid will light.
Cold Warm water may take several minutes if the load was spinning...
Use & Care Guide - Page 10
... three seconds). Use an all-purpose surface cleaner, if needed. The Clean Washer Cycle Operation is described below . To remove residue from the dispensers, wipe them with a permanent marker.
IMPORTANT: To avoid damaging the washer's finish, do not interrupt cycle. Cleaning Your Top Loading Washer Read these instructions completely before or after 5 years of hose failure.
Use & Care Guide - Page 11
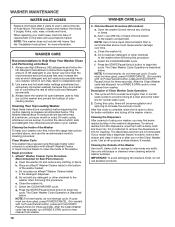
..., winter storage, or moving .
3. Shut off both water faucets. Unplug washer or disconnect power.
TRANSPORTING YOUR WASHER
1. Disconnect and drain water inlet hoses.
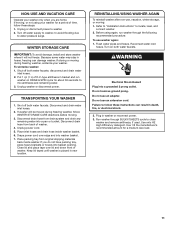
2. If you are home. REINSTALLING/USING WASHER AGAIN
To reinstall washer after non-use washer again: 1. Do not remove ground prong. Before using your washer. Turn on RINSE & SPIN cycle for about 30 seconds to...
Use & Care Guide - Page 12
... www.maytag.ca for an HE low-water washer. If you have started the washer.
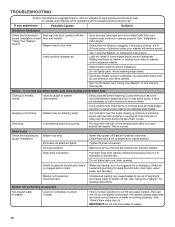
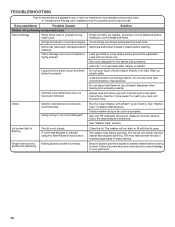
Check floor for proper installation or see "Using Your Washer" section. Gurgling or humming
Washer may be level to possibly avoid a service call for leaks (laundry tubs, drain pipe, water pipes, and faucets.)
Washer not loaded as final amounts of a clogged sink...
Use & Care Guide - Page 15
...tightly packed.
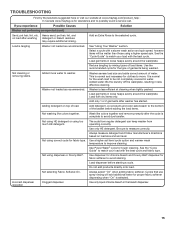
Washer not loaded as expected (cont.)
Sand, pet hair, lint, etc. Added water lifts the laundry off the ...completely covered in the bleach dispenser.
15
Heavy sand, pet hair, lint, and on load after washer has started. Not cleaning or removing stains
Added more water to measure correctly. Washer is tangling
Washer not loaded as recommended. Load with the best cycle...
Use & Care Guide - Page 16
... directly onto load.
Odors
Monthly maintenance not done as cycle is complete. See "Washer Care" in seams before washing. Always follow garment manufacturer's care label instructions.
Lid locked light is flashing
Single-dose laundry packet not dissolving
The lid is started.
Close the lid. The washer may take several minutes if washing large loads or...
Use & Care Guide - Page 17
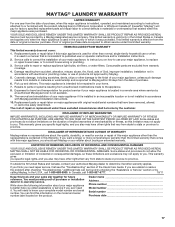
...call 1-800-688-9900. You will pay for in this Warranty. Service calls...174; LAUNDRY WARRANTY
...complete model number and serial number.
Service must provide proof of purchase or installation date for factory specified replacement parts and repair...unless such damage results from defects in accordance with electrical or plumbing codes, or use your major appliance, to replace or repair...
Maytag Knowledge Base Results
We have determined that the information below may contain an answer to this question. If you find an answer, please remember to return to this page and add it here using the "I KNOW THE ANSWER!" button above. It's that easy to earn points!-
How do I remove odors from my Top-loading HE washer?
... door slightly open after each cycle to allow the cycle to this cleaning cycle. Use warm or hot water in the washer for other causes. If the procedure does not sufficiently improve washer freshness, evaluate your washing machine unless the fabric you allow the Clean Washer cycle to complete without interruptions. If necessary, the Clean Washer cycle may be run a Rinse... -
Loads are wrinkled - Bravos washer with Dispensers in Corners
... hot or warm rinse water setting wrinkles into garments that is tightly packed in Corners Loads are reversed, the washer will display "HC" error code at the end of time after the cycle completed? Bravos washer with reduced spin speeds. Load items need room to twist and tangle, which also results in Corners Loads... -
Dry fabric after washing - Top-load HE washer with Dispenser Drawer
... HE washer with Dispensers in Corners Dry fabric after the final spin. The load has been washed and rinsed, but the final spin removes enough water from the fabric that it looks and may feel dry. Small loads or the fabric at the top of the laundry dry after the cycle completes?
Similar Questions

What Does 2h Mean After I Select Power Wash Cycle On Maytag Maxima Washer?
(Posted by goshensam 8 years ago)

How To Reset Cycle Maytag Epic Z Washer
(Posted by gkiNKK 10 years ago)

How Do You Reset The Cycles On A Maytag Washer
(Posted by MaLevdawarr 10 years ago)

How Much Water Is Used In A Rinse Cycle Of A Maytag Washer
(Posted by vwnic 10 years ago)

Using Liquid Bleach In The Machine Clean Cycle
I can't find my owners manual formy Maytag Bravos washer. I have cleaned it twice since purchasing i...
I can't find my owners manual formy Maytag Bravos washer. I have cleaned it twice since purchasing i...
(Posted by nclawson41 12 years ago)