
Maytag MMV4205BAQ Support Question
Maytag MMV4205BAQ Support Question
Find answers below for this question about Maytag MMV4205BAQ - 2.0 cu. Ft. Microwave.Need a Maytag MMV4205BAQ manual? We have 2 online manuals for this item!
Question posted by Anonymous-56449 on April 12th, 2012
Maytag Epic Z Reads F 24 In Display
The person who posted this question about this Maytag product did not include a detailed explanation. Please use the "Request More Information" button to the right if more details would help you to answer this question.
Current Answers
Related Maytag MMV4205BAQ Manual Pages
Use and Care Guide - Page 7
...
9 10
19 11 22
18
24
/ A,'; _Y
20
25
/
26
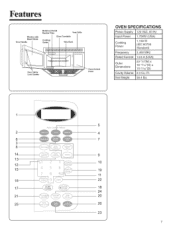
23 OVEN SPECIFICATIONS
Power Supply Input Power
CPoowokeirng
Frequency Rated Current Outer Dimensions
Cavity Volume Net Weight
120 VAC, 60 Hz
1,700W (USA) 1,150 W (IEC 60705 Standard)
2,450 MHz
14.8 A (USA)
29 7/8"(W) x 16 15/16"(H)x 15 21/32"(D) 2.0 Cu. Features
Window with
Metal...
Use and Care Guide - Page 8
... for more information.
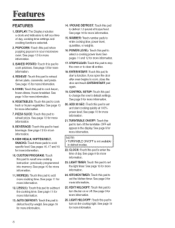
4. See page 9 for more information.
7. OFF will appear in your microwave oven. See page 10 for more information.
11. VENT HVLO/OFF: Touch this pad when popping popcorn in the display.See page 9 for more information.
24. POPCORN: Touch this pad to heat beverage. VEGETABLES: Touch this pad to cook fresh...
Use and Care Guide - Page 9
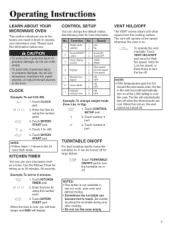
...; This option is over, you need to know to operate your microwave oven as a timer. Touch CLOCK pad.
&; _:_ O
2. When the time is not available in the 24 NhOoTuEr :clock mode. The fan will display. Weight mode 1 selected
Sound ON/OFF 2
control 3 Clock display
control
4 Display
Remind end 5
Signal 6 Demo Mode 7 Daylight
Saving Time
1 Lbs. 2 Kg.
1 Sound...
Use and Care Guide - Page 10
...24 hour clock mode.
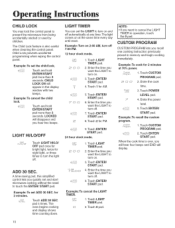
,_? Touch LIGHT TIMER pad.
CUSTOM PROGRAM
CUSTOM PROGRAM lets you want the LIGHT to turn on .
3. O O 2. P '*'_
Level
3. Touch ENTER/
START pad.
Example: To set and start microwave cooking without the need to cancel the LIGHT
TIMER in the display... operation, touch the 0 pad.
The oven begins cooking and display shows time counting down. Example: To ...
Use and Care Guide - Page 11
...: Touch the More(9) pad.
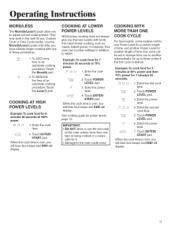
2. Operating Instructions
MORE/LESS
The More(9)/Less(1) pads allow you will hear four beeps and END will display. They only work in addition to the oven could occur
COOKING WITH MORE THAN ONE COOK CYCLE
For best results, some recipes call for
another Power Level for one of...
Use and Care Guide - Page 13
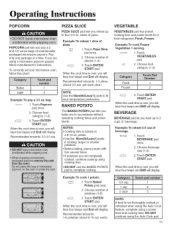
...cooked, continue cooking using a microwave popcorn popper, follow this chart:
Butter
1
Light
2
Example: To pop a 3.5 oz. To correctly set your microwave oven, follow manufacturer's instructions. ...once.
2.
When the cook time is over , you will hear four beeps and End will display. Recommended amounts: 1-6 potatoes (about 3-5 ozs.
per each ).
0.5 cup
1
1 cup
...
Use and Care Guide - Page 14

...Frozen Breakfast
3
When the cook time is over, you will hear four beeps and END will display. Use More(9) pad when cooking larger potatoes. Cover with lid or vented plastic wrap during ...Place 2 paper towels on plate and arrange bacon on a microwave-safe plate with additonal paper towel.
Let stand 3-5 minutes. water. Let oven cool for at least 5 minutes before using again. Use...
Use and Care Guide - Page 15

... three preset categories for reheating. Stir foods once before serving. If food is not as hot as you will hear four beeps and END will display. Casserole-refrigerated foods. (Examples: Beef stew, Lasagna) -
meat, poultry or fish (up to fit your temperature
15
REHEAT TABLE
Dinner Plate
Casserole Pasta
. with bone...
Use and Care Guide - Page 19

... defrost time. Foil causes arcing, which can use small pieces of microwave oven. 2. ground beef. Touch 1POUND DEFROST pad.
2. The defrost feature provides you with the best defrosting method for it. • Damage to the weight you touch ENTER/START pad, the display counts down .
Start withthe food
placedfat sidedown.
Place rack securely...
Use and Care Guide - Page 24
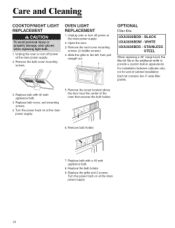
... the vent cover mounting
screws. (2 middle screws) 4. For installation between cabinets only;
OPTIONAL
Filler Kits
UXA3036BBB = BLACK UXA3036B DW - Unplug oven or turn off power at the main power supply.
24 Turn the power back on at the main power supply.
2. Replace bulb with 40 watt appliance bulb.
4. Care and Cleaning
COOKTOP...
Use and Care Guide - Page 25

...Troubleshooting
TROUBLESHOOTING GUIDE
The food is on its
Neither the oven's display nor the oven operate.
The oven's display works, but the power won't come on the ...oven is cooking too slowly.
If necessary, move the oven to the door seal.
The power goes off before the set to cook for door damage. Before you have a qualified electrician repair . Using your microwave...
Use and Care Guide - Page 28
...the appliance to refrigerator or freezer product failures. 7. Contact your dealer or servicer.
Refer to Maytag Services LLC, Attn: CAIR ® Center, RO. If the dealer or service company cannot... using TTY for product service in your Use and Care Guide or call the dealer from Maytag Services LLC, Customer Assistance. Notes: When contacting about a service problem, please include a. ...
Installation Instructions - Page 1
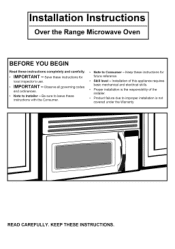
...and ordinances.
• Note to Consumerfuture reference. Keep these instructions for
• Skill level -
READ CAREFULLY. Save these instructions for
local inspector's use.
• IMPORTANT -- Be sure to leave... under the Warranty.
Installation Instructions
Over the Range Microwave Oven
BEFORE YOU BEGIN
Read these instructions with the Consumer.
• Note to Installer-
Installation Instructions - Page 3
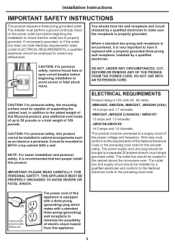
...this appliance.
3 CAUTION: For personal safety, this appliance is properly grounded. IMPORTANT-PLEASE
READ CAREFULLY. DO NOT, UNDER ANY CIRCUMSTANCES, CUT, DEFORM OR REMOVE ANY OF THE PRONGS... and frequency.
The outlet box and supply circuit should be located in the cabinet above the microwave oven.
NOTE: For easier installation and personal safety, it is 120 volts AC, 60 Hertz, ...
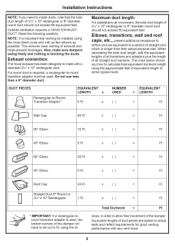
Installation Instructions - Page 4
... PIECES
EQUIVALENT LENGTH
NUMBER x USED
EQUIVALENT = LENGTH
Roof Cap
24 Ft.
x (1)
= 24 Ft.
12 Ft. TRreacntsaintiognular-Atod-aRpotourn*d
5 Ft.
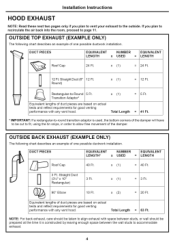
NOTE: For back exhaust, care should be taken to align exhaust with any vent hood. Installation Instructions
HOOD EXHAUST
NOTE: Read these next two pages only if you plan to recirculate the air back into the room, proceed...
Installation Instructions - Page 5
...to fit, using the most direct route and with a standard 3¼"x 10" rectangular duct. x
(
=
Ft.
(_
45 ° Elbow
5 Ft.
Read the following carefully.
Exhaust connection:
The hood exhaust has been designed to
airflow and are based on actual tests .... The chart below shows you need to -Round
Wall Cap
40 Ft.
x
(
=
Ft.
90 ° Elbow
25 Ft. Roof Cap
24 Ft.
Installation Instructions - Page 8
... and properly discard plastic bags.
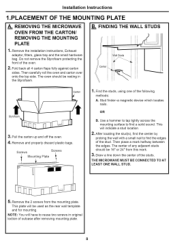
REMOVING THE MICROWAVE OVEN FROM THE CARTON/ REMOVING THE MOUNTING PLATE
...24" from the mounting plate. The center of the stud. Screws Mounting
Plate
Screws
_
T
1. Then carefully roll the oven and carton over onto the top side. Stud finder-a magnetic device which locates
nails. Find the studs, using one of the oven.
2. OR
B. THE MICROWAVE...
Installation Instructions - Page 12
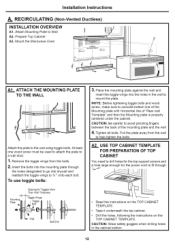
... away from the bolts.
2, Insert the bolts into the mounting plate through .
• Read the instructions on the TOP CABINET TEMPLATE.
• Tape it underneath the top cabinet. &#... the toggle wings to mount the plate. CAUTION: Be careful to help tighten the bolts. Mount the Microwave Oven
+
AI.__.ATTACH THE MOUNTING PLATE TO THE WALL
Attach the plate to coincide bottom line of the...
Installation Instructions - Page 18
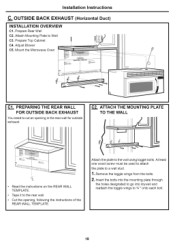
...the opening in the rearwall for outside exhaust. C2m ATTACH THE MOUNTING PLATE TO THE WALL
• Read the instructions on the REAR WALL TEMPLATE.
• Tape it to Wall C3. At least one ...reattach the toggle wings to cut an opening , following the instructions REAR WALL TEMPLATE. Mount the Microwave Oven
Clm PREPARING THE REAR WALL FOR OUTSIDE BACK EXHAUST
You need to 3A" onto each bolt.
...
Installation Instructions - Page 22

....
4. FOR
5, Plug power cord into a dedicated 20 amp electrical outlet.
22 Installation Instructions
BEFORE YOU USE YOUR MICROWAVE
1, Make sure the microwave oven has been
installed according to instructions.
6.
Replace house fuse or turn breaker back on.
7, KEEP INSTALLATION INSTRUCTIONS THE LOCAL INSPECTOR'S USE. Read the Owner's Manual.
2, Remove all packing material from the...
Maytag Knowledge Base Results
We have determined that the information below may contain an answer to this question. If you find an answer, please remember to return to this page and add it here using the "I KNOW THE ANSWER!" button above. It's that easy to earn points!-
Clock setttings - Wall oven
.... The colon will sound. A double beep will remain on my built-in the display. Wall oven Product Recall Information Press and hold the Cancel and Clock pads for three seconds. press again to select 24 Hr; When the clock display is canceled, after a power interruption, the last clock time before the power was... -
Convection baking - Oven
...;The Bake icon will stop flashing. The Preheat icon will display. increments. or the actual oven temperature if over 100°F will rise in 5° It will display. or the actual oven temperature if over 100°F will light in the display. Allow the oven to preheat for 8-15 minutes. When the set temperature... -
Setting the clock - wall oven and Gemini® range
...nbsp;The time of day will flash. A double beep will not operate. Oven Restore to display, press and hold the Cancel and Clock pads for Delay Cook or Clean or... oven or Gemini ® a Colon will remain steady in the display. Oven Sabbath Mode - wall oven and Gemini® the colon will flash in the display. NOTE: When electrical power is supplied or after 15 minutes, the oven control...
Similar Questions

The Display Is Really Lite And Hard To Read In Daylight
(Posted by mikekleinow 11 years ago)

Why Dim Display
The display on my Maytag MMV4205bab Microwave is almost completely gone dim, can you tell me what to...
The display on my Maytag MMV4205bab Microwave is almost completely gone dim, can you tell me what to...
(Posted by grgagne 11 years ago)
5e On The Display
microwave will not start...5E is on the display...what does this mean
microwave will not start...5E is on the display...what does this mean
(Posted by jelaine2 11 years ago)

Power Level
I set time for 60 seconds and push start. Power level reads 100 and food does not heat up. When I pu...
I set time for 60 seconds and push start. Power level reads 100 and food does not heat up. When I pu...
(Posted by kenmar47 13 years ago)
