Maytag MFF2558VEW Support Question
Maytag MFF2558VEW Support Question
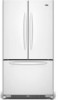
Find answers below for this question about Maytag MFF2558VEW - 24.8 cu. Ft. Refrigerator.Need a Maytag MFF2558VEW manual? We have 4 online manuals for this item!
Question posted by SunnyOne99 on June 26th, 2011
Dairy Compartment Cover
Our dairy drawer cover pops off on the right hand side every time we slide it open. We have removed the cover completely to prevent it from eventually breaking. Any suggestions for resolving this problem are greatly appreciated!
Current Answers


Related Maytag MFF2558VEW Manual Pages
Energy Guide - Page 1

... similaires comparés
Numéro du modèle
Removal of this appliance compares to other similar models. Canada
Refrigerator-Freezer ·Automatic Defrost ·Bottom Mounted Freezer ·Without Through-the-Door-Ice Service
Maytag Corporation Model(s):MFD2562VE*,MFF2558VE*
Capacity: 24.8 Cubic Feet
Estimated Yearly Operating Cost
$50
$51
$63
Cost...
Use & Care Guide - Page 1

...should experience a problem not covered in this high-quality product.
All safety messages will tell you what can kill or hurt you still need your appliance. REFRIGERATOR USER INSTRUCTIONS
THANK YOU for... manual and on your model and serial number, located on the inside wall of the refrigerator compartment. You will follow the safety alert symbol and either the word "DANGER" or "WARNING...
Use & Care Guide - Page 2

... or glue. Failure to do so can damage the surface of your old refrigerator, please follow these instructions to move and install refrigerator. ■ Disconnect power before operating. ■ Remove doors from refrigerator.
■ Use two or more people to help prevent accidents. even if they will sit for
cleaning or service, be evacuated by...
Use & Care Guide - Page 3

..., explosion, or fire. Shelves and covers may break if exposed to know about glass shelves and covers: Do not clean glass shelves or covers with warm water when they are heavy. Clean Before Using
After you remove all of the packaging materials, clean the inside of space behind the refrigerator. Allow for use an adapter. Before...
Use & Care Guide - Page 4

... sleeve and compression nut on the refrigerator before the water line is connected to...Nut driver
and ¹⁄₂" Open-end or two adjustable wrenches
Drill bit... squarely as far as shown. Add 7 ft (2.1 m) to the cold water pipe with... the storage tank on the lower right rear of copper tubing are cut ...: Drill on the water pipe.
4
Remove the water filter. IMPORTANT: If you ...
Use & Care Guide - Page 5

...Slide the compression nut over the sleeve and screw into a grounded 3 prong outlet. Electrical Shock Hazard Plug into the water valve inlet port. Do not use an extension cord. NOTE: Allow 24 hours to refrigerator cabinet with a "P" clamp. Attach the
copper tube to completely...water supply to refrigerator and check for leaks. Compression sleeve
3. Sleeve
D. Remove the plastic cap ...
Use & Care Guide - Page 6

...door are for a right-hand swing refrigerator (hinges factory installed on the right).
■ If you only want to remove and replace the doors, see "Remove Door(s) and Hinges"...Refrigerator Door Handles
Freezer drawer models
1.
Remove the parts for reattaching the handles. Using a flat-blade screwdriver wrapped in masking tape, pry the trim piece from the lower end of the handle firmly, slide...
Use & Care Guide - Page 7

... from both hands and pulling it opens from the bottom hinge pin. NOTE: The green, ground wire remains attached to opposite side of the refrigerator cabinet. See Bottom Hinge graphic. Reverse Door -
See Graphic 1-1.
2. Keep all screws.
Tighten all parts together.
2. Set aside the door until hinges and freezer compartment door or drawer are not...
Use & Care Guide - Page 8

... firmly, slide the
handle to full extension. 2. See Drawer Front Removal graphic. See Drawer Front Replacement graphic. 2. Completely tighten the four screws. Make sure you to insert the two screws in the bottom of the drawer front into the brackets. Open the freezer drawer to the left and pull the handle straight out from the drawer. See Drawer Front Replacement...
Use & Care Guide - Page 9
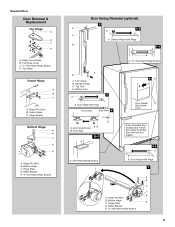
Hinge Cover Screw B. Center Hinge C. Roller Bracket E. ³⁄₈" Hex-Head Hinge Screws
Door Swing Reversal (... Front
A. See French Doors graphic.
5-2
A
A. Door Stop
5-1
A
A. Bottom Hinge
C. Bottom Hinge C. Top Trim D. Top Hinge Cover C. 5/16" Hex-Head Hinge Screws D. Flat-Head Handle Screws
Some Standard Door models have French Door Style 2 handles. Hinge Screws
Bottom ...
Use & Care Guide - Page 11

... grille covers the leveling screws and roller assemblies located at the bottom of the refrigerator tilting it easier to the rear. Remove the base grille. NOTE: Having someone push against the floor. NOTE: Having someone push against the top of the refrigerator until the rollers are up and the leveling feet are two refrigerator compartment doors...
Use & Care Guide - Page 12

... setting lower
FREEZER too cold
FREEZER Control one setting at a time. IMPORTANT: When the power is too warm or too cold in the displays.
Neither compartment will cool. Using the Controls
Your model may spoil. IMPORTANT:
■ Wait 24 hours for normal household refrigerator use the settings listed in the chart below as you...
Use & Care Guide - Page 13

...chime every few seconds when the refrigerator door has been left open for 3 seconds, until
the...feature on or off.
Wait 24 hours between adjustments for an hour or more than one setting at a time. NOTE: The Fast Cool...is displayed.
The chime will sound repeatedly if the freezer or refrigerator compartment temperatures exceed normal operating temperatures for the temperature to stop the ...
Use & Care Guide - Page 14

... maker before removing the ice storage... dispensed. FRUIT/LOW (open) for 5 seconds. ...24 hours for 3 seconds to a water source or replacing the water filter, flush the water system. Ice Production Rate
■ The ice maker should produce a complete batch of ice. See "Using the Controls."
NOTE: The Auto Light feature on your preferences by shutting the refrigerator compartment...
Use & Care Guide - Page 15

...See "Using the Controls." Wipe up spills immediately. To help avoid corrosion of the refrigerator compartment. Hold a container under the dispenser while pressing the
button.
2. Replacing the Water Filter... and a mild detergent in the upper right-hand corner of your stainless steel, keep your dealer or call 1-800-688-9900 U.S.A. Snap the filter cover
closed. 4. See "Water Dispenser" or...
Use & Care Guide - Page 16

... not remove ground prong. Do not use an adapter. Plug in refrigerator or reconnect...heard when the water valve opens to cool completely. Painted metal: Wash painted ...compartment more quickly.
Slide the light shield toward the back of the refrigerator compartment - There is no greater than your old model. Allow 24 hours following installation for routine condenser cleaning in refrigerator...
Use & Care Guide - Page 17

... of food added? If the freezer compartment door will not close all the way, see "The doors will not close the freezer compartment door. Remove filter and operate ice maker. This ... removed? The doors are hollow or small
NOTE: This is not producing ice or not enough ice
■ Refrigerator connected to cool completely.
■ Door(s) opened often or left open .
■ Kink in 24 ...
Use & Care Guide - Page 18

...■ Refrigerator door closed completely? This can decrease water pressure. See "Water Dispenser."
■ Water on the refrigerator? Allow 24 hours after installation for water supply to remove the minerals...dispenser will not close completely," earlier in ice indicates that the water filtration system needs additional flushing. See "Refrigerator Door(s) and Drawer."
■ Reverse ...
Use & Care Guide - Page 21

... appliance was purchased. This limited warranty does not cover:
ITEMS EXCLUDED FROM WARRANTY
1. Replacement parts or ... labor on the duration of implied warranties of the refrigerator compartment. DISCLAIMER OF IMPLIED WARRANTIES
IMPLIED WARRANTIES, INCLUDING ANY... using your complete model number ready. This warranty gives you specific legal rights, and you may have been removed, altered or...
Warranty Information - Page 1

...on the inside wall of the refrigerator compartment. Mississauga, Ontario L5N 0B7
Please ... codes, or use of your complete model number ready. If outside ...specific legal rights, and you also may have other rights that vary...major appliance was purchased. The removal and reinstallation of stainless steel ...purchased. This limited warranty does not cover:
ITEMS EXCLUDED FROM WARRANTY
1. ...
Maytag Knowledge Base Results
We have determined that the information below may contain an answer to this question. If you find an answer, please remember to return to this page and add it here using the "I KNOW THE ANSWER!" button above. It's that easy to earn points!-
Door opens in the wrong direction - Top freezer
...hinges and the refrigerator compartment door are not properly aligned - Refrigerator door changes Remove refrigerator handle bottom trim. Remove door hinge-hole...right-hand swing model. If the hinges are on the door as shown. Top freezer Why does my door swing open /close correctly - Lift the freezer door free from the bottom front of refrigerator door as shown. Top hinge cover... -
How do I use my temperature controls? - French door/exterior dispenser refrigerator
... Off appears in the crisper drawer Refrigerator not operating Adjusting temperature controls - IMPORTANT: When the power is freezing in the display. Initial temperature setting Temperatures are preset at a time. The On/Off control turns off cooling for 24 hours before adjusting the controls. The LED will not cool the compartments any faster. Style 2 Press the... -
Changing/replacing the water filter - side by side refrigerator with filter in fresh food compartment
... used determines life span of the fresh food compartment. Freezer on the picture. Remove blue bypass cap and retain for drastically reducing chlorine taste and odor, particulates, lead, mercury and cysts. To replace the filter cartridge: Locate the water filter cartridge cap in the upper right-hand corner of clean, refreshing ice and water...
Similar Questions

Maytag Mff2558vew
How many cubic feet are in the Maytag MFF2558VEW ?
How many cubic feet are in the Maytag MFF2558VEW ?
(Posted by Carolcre20 2 years ago)

How To Remove The Drip Pan On A Maytag Refrigerator Model Number Mff2558vew2
(Posted by waBTCa 10 years ago)

Maytag Mff2558veb - 24.8 Cu. Ft. Refrigerator
Freezer woking fine but the upper area stopped cooling
Freezer woking fine but the upper area stopped cooling
(Posted by mark270248 11 years ago)

Maytag Mfi2269veb - 22.0 Cu. Ft. Refrigerator Freezer
Freezer just starting beeping temp flashing 16
Freezer just starting beeping temp flashing 16
(Posted by jblackburn 12 years ago)

Why Is My Refrigerator Leaking Water From My Freezer
(Posted by gasajc 12 years ago)