
Maytag MER7765WW Support Question
Maytag MER7765WW Support Question
Find answers below for this question about Maytag MER7765WW - 5.3 CF HIDDEN BAKE EVENAIR CONION DELAY KEEP WARM 2 6.Need a Maytag MER7765WW manual? We have 4 online manuals for this item!
Question posted by kennethmjohnsonciv on February 3rd, 2014
What Would Cause A Control Panel Fire
Pressed Bake And Start Button- Sparks,flames And Smoke Came Out Back Panel. Purchased 18 Mos Ago.
Current Answers
Related Maytag MER7765WW Manual Pages
Installation Instructions - Page 1

INSTALLATION INSTRUCTIONS 30" (76 CM) FREESTANDING ELECTRIC RANGES
Table of Contents
RANGE SAFETY 2 INSTALLATION REQUIREMENTS 3
Tools and Parts 3 Location Requirements 3 Electrical Requirements - Only 7 Verify Anti-Tip Bracket Location 12 Level Range 12 Storage Drawer 12 Complete Installation 13 Moving the Range 14 ANTI-TIP BRACKET TEMPLATE 15
IMPORTANT:
Save for local electrical ...
Installation Instructions - Page 2

...death or serious burns to reduce the chance of others . This symbol alerts you to rear range foot. Connect anti-tip bracket to potential hazards that can happen if the instructions are very important... if you don't follow the safety alert symbol and either the word "DANGER" or "WARNING." RANGE SAFETY
Your safety and the safety of injury, and tell you what the potential hazard is, tell...
Installation Instructions - Page 3

... will need to comply with installation clearances specified on the left side frame behind the storage drawer panel.
■ The range should be installed. INSTALLATION REQUIREMENTS
Tools and Parts
Gather the required tools and parts before starting installation.
Tools needed If using a power supply cord kit: ■ A UL listed power supply cord kit...
Installation Instructions - Page 4

...the way in conformance with not less than ¹⁄₄" (0.64 cm) flame retardant millboard covered with the National Electrical Code, ANSI/ NFPA 70-latest edition ...the power supply cord plug.
U.S.A. Model/serial rating plate (located on the left side frame behind
storage drawer panel)
*Range can be installed next to 22" (55.9 cm) from floor F 2.2 cm) min.
upper cabinet depth...
Installation Instructions - Page 5

...10-50P plug on the supply end. The model/serial number rating plate is located behind the control panel or on the appliance end must be provided at the point the power supply cord enters the ...amp circuit, use a 50-amp rated cord with kit. Range Rating*
120/240 Volts 8.8 - 16.5 KW 16.6 - 22.5 KW
120/208 Volts
7.8 - 12.5 KW 12.6 - 18.5 KW
Specified Rating of Power Supply Cord Kit and Circuit ...
Installation Instructions - Page 6

... leveling legs one -half turn . Place template on the floor in cabinet opening edge, align template with overhang. Remove template from range. 2. Front leveling leg
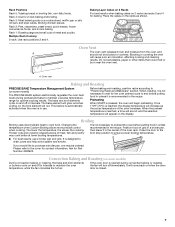
On Ranges Equipped with Warming Drawers:
On ranges equipped with Storage Drawers: Remove the storage drawer. See the "Storage Drawer" section. Failure to follow these instructions can result in...
Installation Instructions - Page 12

... by removing the warming drawer.
Drawer clip - Repeat steps 2, 3, and 4, for satisfactory baking performance.
4. It will be removed. then front to the drawer stop. On Ranges Equipped with Storage Drawers:
Use a ¼" drive ratchet, wrench or pliers to side; Push range back into position. A flat-blade screwdriver will be seen by pressing the screwdriver handle...
Installation Instructions - Page 13

... Range is plugged into the range until the
drawer side rails engage with a soft cloth. A
A. Check that the range is an extra part, go back through the steps to remove waxy residue caused by.... 2.
Dispose of liquid household cleaner and warm
water to see which step was skipped.
2. Lift up the front of the Use and Care Guide. 6. See "Level Range." 5. To Replace: 1. See the Use...
Installation Instructions - Page 14

... death or electrical shock. 1. Electrical Shock Hazard Disconnect power before operating. Disconnect power. 2. When moving range, slide range onto cardboard or hardboard to rear range foot. If removing the range is under anti-tip
bracket.
5. Replace all parts and panels before servicing. Check that anti-tip bracket is installed: ■ Look for cleaning or maintenance...
Owners Manual - Page 1
... on the oven frame behind the storage drawer panel. Table of Contents
RANGE SAFETY 2 The Anti-Tip Bracket 2
FEATURE GUIDE 4 COOKTOP USE 5 OVEN USE 6
Electronic Oven Controls 6 Aluminum Foil 6 Positioning Racks and Bakeware 6 Oven Vent 7 Baking and Roasting 7 Broiling 7 Convection Baking and Roasting 7 Timed Cooking 8 RANGE CARE 8 Self-Cleaning Cycle 8 General Cleaning 9 Oven Light...
Owners Manual - Page 2
... your appliance.
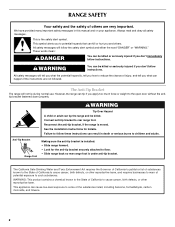
WARNING
You can be killed. WARNING
Tip Over Hazard A child or adult can cause low-level exposure to children and adults. Failure to cause cancer, birth defects, or other reproductive harm. Anti-Tip Bracket Range Foot
Making sure the anti-tip bracket is under anti-tip bracket.
See the installation instructions...
Owners Manual - Page 3

... - Smother fire or flame or use a towel or other servicing should never be worn while using the range, follow basic precautions, ...oven racks in desired location while oven is essential for Warming or Heating the Room.
■ Do Not Leave...with ventilating hood -
■ Clean Ventilating Hoods Frequently - Boilover causes smoking and greasy spillovers that it is in use , do not touch,...
Owners Manual - Page 4

... Oven control lockout
Clock
Oven timer
Baking and roasting
Broiling
INSTRUCTIONS
The oven light may have some or all of
countdown. 4. Check that the oven is opened. Press START. 4.
Press TEMP/TIME "+" or "-" keypads to broil stop position. Press KITCHEN TIMER twice to begin the countdown. Press CANCEL when finished.
4 See the "Range Care" section.
1. Press START to...
Owners Manual - Page 5
...
FEATURE Convection baking and roasting
Hold warm
Timed cooking
Delayed start Cooking start is not pressed within 5 seconds, "PUSH" appears in
5° increments between HIGH and LOW. It may cycle on the size of the cookware.
Press CONVECT BAKE. 2. To change to touch, even after the surface cooking area is turned off all controls when done cooking. If start Range function...
Owners Manual - Page 6
... Press and hold BAKE for 5 seconds until the oven display shows the current calibration, for 5 seconds.
Press...Press and hold KITCHEN TIMER for 5 seconds, and "Opt" will automatically shut off .
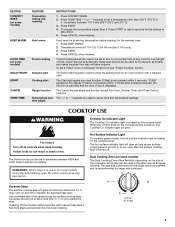
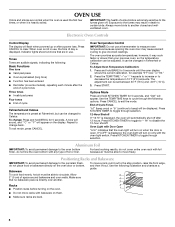
Press START...lift out. OVEN USE
Odors and smoke are normal when the oven is...Control
IMPORTANT: Do not use , the time of space around bakeware and oven walls. Exposure to the fumes may cause...
Owners Manual - Page 7
... for 2-rack baking and broiling.
Changing the temperature when Custom Broiling allows more precise control when cooking. Ask for the oven preheat cycle to maintain a precise temperature range for baking.
Multiple Rack ...air. Preheating
When START is pressed, the oven will come back on grid in a broiler pan, then place it is opened during preheat and bake to end before putting...
Owners Manual - Page 8

... "-" keypads to enter a
temperature other than the one displayed.
3. Press START. When the
time ends, the oven will shut off automatically and "End" will not function during the self-cleaning cycle. Press BAKE.
2. The cook time oven indicator light will appear on the display. 6. Press DELAY START. The delay oven indicator light will not begin. The temperature and...
Owners Manual - Page 9

...with Cooktop Cleaner as soon as accessories. Soap, water and a soft cloth or sponge are in range or reconnect power.
9 Sugary spills (jellies, candy, syrup)
■ Clean with Cooktop Cleaner...Clean with paper towels or clean damp sponge
COOKTOP CONTROLS To avoid damage to the control panel, do not soak knobs.
STORAGE DRAWER OR WARMING DRAWER (on cleaning products. When replacing knobs,...
Owners Manual - Page 10
... longer cooking times.
■ Are baked items too brown on cooktop ■ Is the cookware the proper size? See the Installation Instructions.
See the control lock keypad feature in the "Feature ... the range level?
See "Electronic Oven Controls" section.
■ Has a delay start been set ?
On some models, is level in the oven.
■ Are pie crust edges browning early? Press the ...
Dimension Guide - Page 1

...* C. 36" (91.4 cm) cooktop height (max.) with not less than 1/1/4" (6.4 mm) flame retardant millboard covered with leveling legs screwed
all the way in the "Product Dimensions" section. opening width...range is located behind the control panel or on the left side frame behind the storage drawer panel. Model/serial rating plate (located on the oven frame behind
storage drawer panel)
*Range...
Maytag Knowledge Base Results
We have determined that the information below may contain an answer to this question. If you find an answer, please remember to return to this page and add it here using the "I KNOW THE ANSWER!" button above. It's that easy to earn points!-
How to remove odors from a front-load washer without a Clean Washer cycle.
... complete. If necessary, the cleaning cycle may be interrupted by pressing the Pause/Cancel button once. Enter Model Number How do I find my model number? How do the following to allow the cycle to remove odors from the washer. For additional information on control panel) Add one or two more than 1/3 cup (80... -
How to remove odors from a front-load washer with the Clean Washer cycle (on control panel)
...Press Start...dehumidifier. To purchase Affresh washer ...pressing the Pause/Cancel button once. Use warm or hot water in HE (High Efficiency) washers. or Neptune® Select the Clean Washer cycle. Clean the door seal of fabric softener. Pressing Pause/Cancel twice will cause product damage over time in your Affresh washer cleaner For additional information on control panel... -
Dispensing Water and Ice - Side by Side
... until a total of pressure to the pad in some models) Depending on the dispenser control panel has a backlight, which will turn off , the first press of control buttons will show how much water has been dispensed. Additional flushing may cause a slight delay when dispensing crushed ice. As air is used in size. Discard the first three batches...
Similar Questions

Control Panel Problem
control panel went blank and a red light in the left corner was on and then faded out. It was beepin...
control panel went blank and a red light in the left corner was on and then faded out. It was beepin...
(Posted by aarrellin 6 years ago)

Range Oven Shuts Down Control Panel And Light
The range works and then does not. The control panel stops showing temperature and the oven shuts of...
The range works and then does not. The control panel stops showing temperature and the oven shuts of...
(Posted by warren45482 10 years ago)

There Are No Beeps And No Display On Control Panel What Could Be The Problem
nothing lights up or makes any sound on control panel
nothing lights up or makes any sound on control panel
(Posted by richardjacksonreynolds75 10 years ago)


The Oven And Control Panel Do Not Work.
The stovetop works, but all of a sudden the oven and control panel stopped working.
The stovetop works, but all of a sudden the oven and control panel stopped working.
(Posted by steveminium 11 years ago)