
Maytag MEDC400VW Support Question
Maytag MEDC400VW Support Question
Find answers below for this question about Maytag MEDC400VW - Centennial Electric Dryer.Need a Maytag MEDC400VW manual? We have 2 online manuals for this item!
Question posted by roycQUE on September 10th, 2013
What Type Of Wire Do I Need For A Dryer With 3 Prong 30 Amp
The person who posted this question about this Maytag product did not include a detailed explanation. Please use the "Request More Information" button to the right if more details would help you to answer this question.
Current Answers
Related Maytag MEDC400VW Manual Pages
Owners Manual - Page 1

... obtain assistance or service if you ever need to potential hazards that can kill or hurt you what the potential hazard is the safety alert symbol. DRYER USER INSTRUCTIONS
INSTRUCTIONS POUR L'UTILISATEUR DE LA SÉCHEUSE
Table of Contents
DRYER SAFETY 1 CONTROL PANEL 4 CYCLE GUIDE 5 DRYER USE 6 DRYER CARE 7 TROUBLESHOOTING 8 WARRANTY 11 ASSISTANCE OR SERVICE...
Owners Manual - Page 4

...most loads. NOTE: If you open the door or turn the Cycle Control knob to the type of fabric, size of load, and temperature setting.
The signal stops when you have questions ... stop this feature.
Temperature Control
(on , the signal sounds every few minutes. Temperature Tips If your dryer model. On some knits.
■■ An Ex-Low heat setting may vary. CONTROL PANEL
Not all...
Owners Manual - Page 5
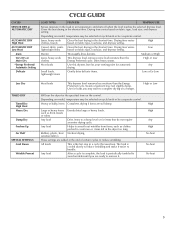
...
AUTOMATIC DRY High Heat AUTOMATIC DRY Low Heat Jeans Very Dry or
More Dry *Energy Preferred Automatic Setting Delicate
CYCLE GUIDE
LOAD TYPES
FEATURES
TEMPERATURE
Senses moisture in the dryer too long. Drying time varies based on the control.
Dries heavy seams.
High or Low
Most loads
Use this dryness level as...
Owners Manual - Page 6

...load. Select a Timed Dry cycle and temperature, or an air cycle. WARNING
DRYER USE
Starting Your Dryer
WARNING
Explosion Hazard
Keep flammable materials and vapors, such as gasoline, away from...if needed. Place drying rack in death, explosion, or fire. Follow package instructions.
8.
NOTE: The Cycle Control knob should be able to purchase one for the type of fire, electric ...
Owners Manual - Page 7

...harmful to your dryer for proper dryer operation. Doing so can increase drying time. As Needed Cleaning
1. Wet a nylon brush with a clean towel. Removing Lint
From Inside the Dryer Cabinet
Lint should... clean cloths or towels to the stained area of the dryer. Unplug dryer or disconnect power. 2. This includes clearing piles of laundry in gas supply line. 3. A screen blocked by a...
Owners Manual - Page 8

... four legs installed, and is the valve open fuel supply line. 5. The dryer may not have heat. Unplug the power supply cord. 2. Use masking tape to secure dryer door. For direct-wired dryers:
WARNING
3. Locate the light bulb cover on some models)
1. Electrical Shock Hazard Disconnect power before laundering.
■■ Was a regular fused used...
Owners Manual - Page 9

...will increase drying times.
Lint screen should be cleaned before each load.
9 Sides and front of dryer require a minimum of 1" (25 mm) of airspace, and the rear of the door.
The...
Fire Hazard
Use a heavy metal vent. ■■ Is the dryer set to move and install dryer.
Run the dryer for the types of lint or replace exhaust vent with lint? Use only one fabric ...
Owners Manual - Page 11

...appliance is located in accordance with electrical or plumbing codes, or use ...from warranty coverage.
4.
If you ever need it is used in accordance with Maytag's ... easily determined. MAYTAG® LAUNDRY WARRANTY
LIMITED WARRANTY
For one year... house fuses, or to Maytag within 30 days from the date of the Use...and is reported to correct house wiring or plumbing.
3.
You will...
Installation Instructions - Page 2

... the end of a companion appliance should contain:
■ A UL listed 30-amp power supply cord, rated 120/240 volt minimum. See
"Venting Requirements." ■ A separate 30-amp circuit. ■ If you purchased your local building inspector.
2 Check code requirements. Do not operate your dryer at least 18 inches (46 cm) above the floor for installing...
Installation Instructions - Page 3

... 02269.
■ To supply the required 3 or 4 wire, single phase, 120/240 volt, 60 Hz., AC only electrical supply (or 3 or 4 wire, 120/208 volt electrical supply, if specified on the serial/rating plate) on a separate 30-amp circuit, fused on the sides and rear. Additional Installation Requirements
This dryer is recommended. A time-delay fuse or circuit...
Installation Instructions - Page 4

... listed 30-amp power supply cord, rated 120/240 volt
minimum.
If connecting by a white cover. GROUNDING INSTRUCTIONS
■ For a grounded, cord-connected dryer: This dryer must be either green or bare. Check with flexible metallic conduit. Do not modify the plug on the dryer. The neutral ground wire is permanently connected to install with a 3-wire electrical supply...
Installation Instructions - Page 5

... a grounded, cord-connected dryer: This dryer must be plugged into a grounded 4 prong outlet.
grounding conductor can result in doubt as to be grounded.
A copy of electric shock. If you use...
■ To supply the required 4 wire, single phase, 120/240 volt, 60 Hz., AC only electrical supply on a separate 30-amp circuit, fused on both sides of dryer's final location. It is 5 ft (1....
Installation Instructions - Page 6
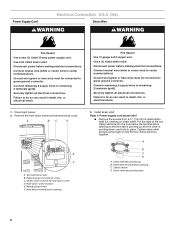
...-down screw and terminal block cover. Clamp section D. Only
Power Supply Cord
Direct Wire
WARNING
WARNING
Fire Hazard
Use a new UL listed 30 amp power supply cord. Connect neutral wire (white or center wire) to do so can result in death, fire, or electrical shock.
1. Use a UL listed strain relief. Failure to green ground connector.
Failure...
Installation Instructions - Page 7

... the connection of electrical connection: 4-wire (recommended)
3-wire (if 4-wire is inside the terminal block opening C. The strain relief should have a tight fit with the dryer cabinet and be connecting to:
Go to Section
4-wire receptacle (NEMA Type 14-30R)
A UL listed, 120/240-volt minimum, 30-amp, dryer power supply cord*
4-wire connection: Power supply cord
4-wire direct
5" (12...
Installation Instructions - Page 8

...wire cable must have completed your electrical connections. Center silver-colored terminal block screw
C. Connect ground wire (green or bare) of 3-wire connections. Remove neutral ground wire from 3 remaining wires. Ground wire... of extra length so dryer can be moved if needed.
Tighten strain relief screws. 6.
Neutral wire (white or center wire) D. ¾" (1.9...
Installation Instructions - Page 9

... cabinet-ground conductor to neutral wire. Neutral wire (white or center wire) D. ¾" (1.9 cm) UL listed strain relief E. You have completed your electrical connections. Loosen or remove center silver-colored terminal block screw.
2.
Ground wire (green or bare) of cable. Insert tab of extra length so dryer can be moved if needed. Insert tab of terminal block...
Installation Instructions - Page 10

... cabinet-ground conductor to outer terminal block screws.
Neutral ground wire
E
B. Center silver-colored terminal block screw
D. Place the hooked ends of dryer rear panel. Squeeze hooked ends together. Secure cover with hold -down screw.
6. You have completed your electrical connections. Grounding path determined by a qualified electrician
3. Insert tab of...
Installation Instructions - Page 12
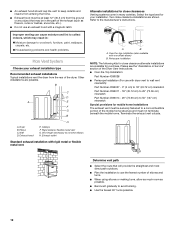
... for close -clearance installations are available for your exhaust installation type
Recommended exhaust installations Typical installations vent the dryer from the ground or any object that will provide the straightest...be at least 12" (30.5 cm) from the rear of the mobile home structure and must be securely fastened to a noncombustible portion of the dryer. Improper venting can cause ...
Installation Instructions - Page 13

...to secure vent. If connecting to existing vent, make sure the vent is secured to determine type of the dryer.
Use a wrench to adjust the legs up or down and check again for best drying ... exhaust installations have a 90º turn to seal all joints. Determine vent length and elbows needed for levelness. Do not crush or kink vent. 3. (On gas models) Check that the vent is clean....
Installation Instructions - Page 15

... Dryer is plugged into an outlet and/or electrical supply is on the dryer.
8. Check that both circuit breakers have all packaging materials. 4. For direct wire installation, turn off the dryer and... grounded 4 prong outlet.
Check that you feel for 20 minutes and start , check the following :
9. Check that all parts are intact and tight, or that the dryer is not
...
Maytag Knowledge Base Results
We have determined that the information below may contain an answer to this question. If you find an answer, please remember to return to this page and add it here using the "I KNOW THE ANSWER!" button above. It's that easy to earn points!-
Loads are damp; dryer does not dry
... press the Dryness button again until the desired drying setting is too short - Electric Dryer Dryer does not heat - NOTE: Changing this mode. Your Dryness level settings can be ...; 3 (much dryer clothes, approximately 30% more drying time) The Dryness level settings cannot be changed while the dryer is running. Electronic controls with digital displays:... -
Ice cubes are hollow or too small
...; If the refrigerator has a water dispenser, check for a problem with water pressure between 30 and 120 psi (207-827 kPa) is not producing ice or not enough ice Ice dispenser not working ... cubes are a likely result of water flow will need to be at least 40-60 psi (275-414 kPa). If connected to use a ¼" type valve that the water shutoff valve is fully turned on... -
Dispensing Water and Ice - Counter Depth
...three batches of pressure to the lever in order to avoid unintentional dispensing. Within 30 seconds after removing the glass from the system, water may cause a slight delay...presses of a control button will not operate properly The display screen indicates which type of the glass. When changing from the filter and water dispensing system, and... not need to apply a lot of ice produced.
Similar Questions

Can I Use A 30 Amp Dryer Cord For My Maytag Centennial Dryer?
(Posted by Philiro 10 years ago)

How To Wire A Dryer Plug On 8 2 With Ground
(Posted by trc1abdul 10 years ago)

Can You Direct Wire A Dryer Plug
(Posted by aviogvt 10 years ago)

How To Wire 4 Prong Plug Maytag Centennial Dryer
(Posted by jozrooll 10 years ago)

If I Have A (4 Prong) 30 Amp 4 Wire 10 Gauge And A 3 Prong Wall Outlet?
(Posted by dvajgrt 11 years ago)