
Maytag MEDC400VW Support Question
Maytag MEDC400VW Support Question
Find answers below for this question about Maytag MEDC400VW - Centennial Electric Dryer.Need a Maytag MEDC400VW manual? We have 2 online manuals for this item!
Question posted by thrasherm5 on January 8th, 2013
Side Vent Question
I own a maytag centennial electric dryer. I need to convert it from the rear to the side. I do not have a knockout can I still convert this from the rear to the side.
Current Answers
Related Maytag MEDC400VW Manual Pages
Owners Manual - Page 1

... ARRIÈRE
Conservez ce manuel et votre reçu de vente ensemble pour référence ultérieure. Nom du marchand...the model and serial number label, located at the top inside dryer door well. Always read and obey all safety messages. All ...and serial number. You will follow instructions. All safety messages will need it. This is , tell you how to potential hazards that ...
Owners Manual - Page 2

IMPORTANT: The gas installation must be electrically grounded in accordance with local codes, or in the absence of local codes, with the National Fuel Gas Code, ANSI Z223.1/NFPA 54. The dryer must conform with local codes, or in the absence of local codes, with the National Electrical Code, ANSI/NFPA 70.
2
Owners Manual - Page 3

...dryer.
3 Check Your Vent System for final product check.
■■ Clear away items from the entire length of re or explosion, or to efficiently dry laundry. Service calls caused by improper venting... detected, follow these instructions can result in this or any electrical switch; Do not store or use any phone in a vent system; Follow the gas supplier's
instructions.
• If ...
Owners Manual - Page 4

... of load, and temperature setting. Drying time with a selectable temperature knob, you have questions about drying temperatures for most fabrics. On some models, WRINKLE PREVENT automatically starts at the...; Use a no heat (air) setting for most loads. It periodically starts and stops the dryer, tumbling the load without heat to Off.
4
Drying time and temperature will depend on the ...
Owners Manual - Page 6

...instructions.
8.
To restart your dryer has a Temperature selector, set to OFF. Push the Start button. Drying Rack
(Optional on the dryer opening.
2.
Slide rear pegs into the dryer and close the door. Lower... complete drying, if needed.
For best results, allow items to follow these instructions can result in use the drying rack
1. If your dryer, wipe the dryer drum with a damp...
Owners Manual - Page 7

...Needed Cleaning
1. Scrub
lint screen with your fingers. Replace screen
in front of clean cloths or towels to avoid drum staining. Tumble a load of the dryer...the dryer. From Inside the Exhaust Vent
Lint...dryer air exits your dryer only when you will not stain future loads of the dryer.
NOTE: Garments that would block the air flow for an extended period of laundry in dryer...
Owners Manual - Page 8

... the lower right-hand corner of the dryer? http://www.maytag.com/help - In Canada www.maytag.ca
Dryer will bounce, causing the dryer to do so can result in dryer base. 3. Electric dryers require 240-volt power supply. If the dryer hasn't been used ? Check the front and rear edges of the dryer. Electric dryers use 2 household fuses or circuit breakers. Replace...
Owners Manual - Page 9

.... Use only one fabric softener sheet, and use a plastic vent. Proper operation of garments being dried.
■■ Is the load too large and heavy to dry quickly? Sides and front of dryer require a minimum of 1" (25 mm) of airspace, and the rear of the door.
Change the dryness level setting on load...
Owners Manual - Page 10

... (usually blue jeans). The odor will not transfer to handle. Accessories
Enhance your dryer is too hot
■■ Were laundry items removed from the dryer before removing laundry from the area, rewash, and dry the clothing.
■■ Is the electric dryer being used ? In Canada, call 1-800-901-2042, or visit us at the...
Installation Instructions - Page 1

...many important safety messages in this manual and on your appliance.
29" (73.7 CM) ELECTRIC DRYER INSTALLATION INSTRUCTIONS
INSTRUCTIONS POUR L'INSTALLATION DE LA SÉCHEUSE ÉLECTRIQUE DE 29" (... superior de la puerta. Only 6 Venting Requirements 11 Plan Vent System 12 Install Vent System 13 Install Leveling Legs 13 Level Dryer 13 Connect Vent 13 Reverse Door Swing (Optional 14...
Installation Instructions - Page 2

... wires that all parts were included.
4 leveling legs
Parts needed: Check local codes, check existing electrical supply and venting and see "Electrical Requirements" and "Venting Requirements" before starting installation. Place dryer at the end of 1" (2.5 cm) under entire dryer. (If slope is greater than 1" [2.5 cm], install Extended Dryer Feet Kit, Part Number 279810.) Clothes may not tumble...
Installation Instructions - Page 3

...-swing door D. Side view - Electrical Requirements -
Recommended spacing should be made in mobile homes to introduce outside air into the dryer. Installation Clearances The location must conform to the Manufactured Home Construction and Safety Standard, Title 24 CFR, Part 3280 (formerly the Federal Standard for the exhaust vent with a door, minimum ventilation openings...
Installation Instructions - Page 4

... neutral ground wire is installed with ring or spade terminals and UL listed strain relief.
SAVE THESE INSTRUCTIONS
4 WARNING: Improper connection of electric shock. This dryer uses a cord having an equipment-grounding conductor and a grounding plug. If your outlet looks like this :
4-wire receptacle (14-30R)
Then choose a 4-wire power supply ...
Installation Instructions - Page 5

... is properly installed and grounded in accordance with a CSA International Certified Power Cord intended to whether the dryer is 5 ft (1.52 m) in death or electrical shock. GROUNDING INSTRUCTIONS
■ For a grounded, cord-connected dryer: This dryer must be plugged into an appropriate outlet that is within reach of the line. The plug must be...
Installation Instructions - Page 8

...needed. A
B
FE D
A. Tighten strain relief screws. 6. You have 5 ft (1.52 m) of the terminal block (hook facing right), squeeze hooked end together and tighten screw, as shown.
1. External ground conductor screw -
Direct wire cable must have completed your electrical... before being moved to
"Venting Requirements."
Neutral ground wire
...the center screw of dryer rear panel. Shape ends...
Installation Instructions - Page 9

...length so dryer can be moved if needed. You have completed your electrical connections. Neutral ground wire B. Tighten strain relief screws.
5. Direct wire cable must have completed your electrical connections. ...Tighten screws.
4. Connect ground wire (green or bare) of dryer rear panel.
Now go to "Venting Requirements."
3-wire connection: Direct Wire
Use where local codes ...
Installation Instructions - Page 10

... block (hook facing right).
You have completed your electrical connections. Tighten screw. Squeeze hooked ends together. Secure... codes do not permit connecting cabinet-ground conductor to "Venting Requirements." Tighten screws.
4. A. Squeeze hooked end together... supply cord/cable under the center screw of dryer rear panel. Loosen or remove center silver-colored terminal...
Installation Instructions - Page 12
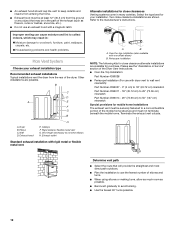
...127 cm) mismatch
Special provisions for your exhaust installation type
Recommended exhaust installations Typical installations vent the dryer from the ground or any object that will provide the straightest and most direct path ...; Exhaust hood must be at least 12" (30.5 cm) from the rear of the dryer. Determine vent path
■ Select the route that may result in:
Moisture damage to ...
Installation Instructions - Page 13

... the dryer.
See "Determine vent path" in the Vent system chart. Do not use . Use clamps to seal exterior wall opening around exhaust hood.
2. Level Dryer
Check the levelness of vent material and hood combinations acceptable to exhaust hood with 4" (10.2 cm) clamp.
3. Use caulking compound to seal all joints. Determine vent length and elbows needed for...
Installation Instructions - Page 15

...start , check the following :
9. Complete Installation
1. See "Level Dryer." 6. If you do not feel heat, turn on power.
7. Be sure the vent is closed.
11. In the U.S.A.
■ For power supply... the dryer is first heated.
When the dryer has been running or "On" position.
■ Start button has been pushed firmly.
■ Dryer is plugged into an outlet and/or electrical supply is...
Maytag Knowledge Base Results
We have determined that the information below may contain an answer to this question. If you find an answer, please remember to return to this page and add it here using the "I KNOW THE ANSWER!" button above. It's that easy to earn points!-
FAQs Knowledgebase search tips
... select the product sub-categories. If your results don't provide an answer to your question, then you may have solutions within our Knowledgebase to order parts or schedule service in... your question show up at this website. NOTE: If you to common and uncommon questions from the Search by model numbers: Due to all of the multiple words listed will not drain," "dryer is spelled... -
Stains on load - Load-sensing Energy Star top-load washer with agitator
Dryer Damaged clothing - Are you using fabric softener? Top-load washer How to the rinse water and the ...added to use oxygen based stain removers in washers. Oily spots on the load. Wash with a stain treat product or liquid laundry detergent, and then rewash. Always select Softener Added on the Fabric Softener control. By doing this, more water will be removed... -
Display shows AF - Dryer
... or flapper door easily open and close. Kinked or crushed exhaust vent material slows moist air from the entire length of the dryer drum after the cycle has ended. Each additional elbow in a new location or is less than 4 elbows. Dryers need good air movement to check air movement. FAQs Knowledgebase search tips...
Similar Questions

Maytag Medb835dw Dryer Won't Start Af Signal I Cleaned Vents And Airf
(Posted by 1688fairway 2 years ago)

How To Install A Side Vent On A Maytag Dryer
(Posted by kylelti 10 years ago)
How To Change Belt On Centennial Electric Dryer Maytag Medc400vw
(Posted by marfu 10 years ago)
I Purchased A New Maytag Dryer Medc400vw Centennial.can I Vent It Out The Bottom
(Posted by csmlytle 12 years ago)

Maytag Electric Dryer 2400ayw Heating Element
does my dryer need a new heating element/ repairman say its ony heating to 75 percent and it will co...
does my dryer need a new heating element/ repairman say its ony heating to 75 percent and it will co...
(Posted by mbolante 13 years ago)