Maytag MEDB800VU Support Question
Maytag MEDB800VU Support Question
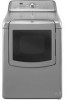
Find answers below for this question about Maytag MEDB800VU - Bravos Steam Electric Dryer.Need a Maytag MEDB800VU manual? We have 1 online manual for this item!
Question posted by Chelseybreann on April 27th, 2015
I Have F1 Comin Up Need To Get It Working Asap Had To Change Plugs From 4 To 3
The person who posted this question about this Maytag product did not include a detailed explanation. Please use the "Request More Information" button to the right if more details would help you to answer this question.
Current Answers
Answer #1: Posted by TommyKervz on April 28th, 2015 1:00 AM
TommyKervz

Member since:
January 10th, 2013 Points: 17,776,823

Member since:
January 10th, 2013 Points: 17,776,823
Follow the instructions here http://www.maytag.com/product-help/single-double-wall-oven-error-code-message-f1-error-code/PH6997/
video instructions here https://www.youtube.com/watch?v=BAVS9mI3JLQ
Related Maytag MEDB800VU Manual Pages
Use and Care Manual - Page 5
... inspector. Location Requirements
Do not operate your washer using a power supply cord, a grounded electrical outlet located within 4 ft (1.2 m) of the water fill valves, and water pressure of...) clearance on all sides of the dryer to the dryer must be considered.
■ Cold water faucets located within 2 ft (610 mm) of either side of the dryer. Parts needed ) which are provided.
■ ...
Use and Care Manual - Page 7
... have three 10-gauge copper wires and match a 3-wire receptacle of least resistance for electric current. GROUNDING INSTRUCTIONS
■ For a grounded, cord-connected dryer: This dryer must be grounded. This dryer uses a cord having an equipment-grounding conductor and a grounding plug. The neutral conductor must be identified by providing a path of NEMA Type 10-30R...
Use and Care Manual - Page 8

... sure that is adequate and in accordance with a cord having an equipment-grounding conductor and a grounding plug.
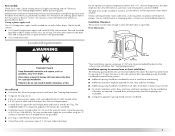
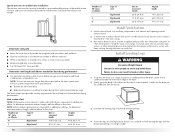
WARNING: Improper connection of dryer's final location. For further information, please reference the service numbers located in death or electrical shock.
SAVE THESE INSTRUCTIONS
4-wire receptacle 14-30R
■ Do not use Power Supply Cord Replacement...
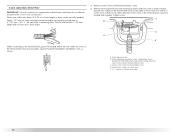
Use and Care Manual - Page 11
...C
F D
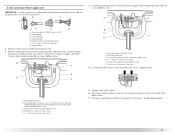
A.
Center silver-colored terminal block screw
D. You have completed your electrical connection. Ground prong D.
Neutral ground wire C. C. External ground conductor screw B. ...E
G
A. 4-wire receptacle (NEMA type 14-30R) B. 4-prong plug C. Neutral prong E. Secure cover with upturned ends F. 3/4" (19 mm...dryer rear panel. Center silver-colored terminal block screw F.
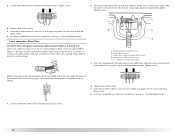
Use and Care Manual - Page 12
... wire before being moved to the terminal block, place the hooked end of the wire under the center screw of extra length so dryer can be moved if needed. External ground conductor screw - Neutral wire (white or center wire)
E. ¾" (19 mm) UL listed strain relief
12 Cut 11/2" (38 mm) from...
Use and Care Manual - Page 13

... with holddown screw.
7. Neutral wire (white or center wire)
1. Tighten screw. You have completed your electrical connection. Neutral ground wire C.
External ground conductor screw B. Neutral wire (white or center wire) E. 3/4"...) B. 3-wire plug C. Neutral prong D. Ring terminals G. Insert tab of terminal block cover into slot of dryer rear panel. A. Center silver-colored terminal ...
Use and Care Manual - Page 14
... or center wire) E. 3/4" (19 mm) UL listed strain relief
3. Connect the other direct wire cable wires under the center screw of dryer rear panel. You have completed your electrical connection. Shape ends of extra length so dryer can be moved if needed. 3. Loosen or remove center silver-colored terminal block screw.
14 Tighten screw.
Use and Care Manual - Page 15
... neutral
ground wire and the neutral wire (white or center wire) of fire, this is not plugged with holddown screw.
6. Neutral ground wire C. Connect the other wires to achieve the best
drying ...reduce the risk of power supply cord/cable under center, silver-colored terminal block screw. The dryer exhaust must be used for direct wire or power supply cord where local codes do not ...
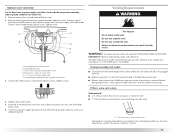
Use and Care Manual - Page 17
... (For use with the following kits for close clearance alternate installations are needed. Standard rear offset exhaust installation B. Exhaust outlet
Optional exhaust installations Venting systems come in death, fire, electrical shock, or serious injury. Bottom exhaust installation D.
Clamps F. This dryer can result in many varieties. If you prefer, you may contact your...
Use and Care Manual - Page 18
Determine vent length and elbows needed for mobile home installations
The exhaust vent must be securely fastened to a ...the life of the vent to achieve the best drying performance. Install exhaust hood. Screw the legs into the interior of the dryer.
■ Reduce performance, resulting in "Plan Vent System."
To determine maximum exhaust length, add one elbow. See illustration.
...
Use and Care Manual - Page 20
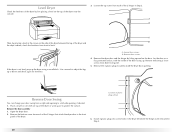
... a left where the hinges were removed in Step 2. Remove these screws.
B. Level Dryer
Check the levelness of the dryer by lifting upward on top of the dryer or work space to protect the surface.
Remove the bottom screw from dryer front panel.
5. Open the dryer door. 2. Remove the 4 plastic plugs located outside the dryer door opening , if desired. 1.
Use and Care Manual - Page 21
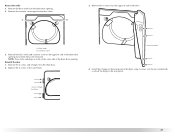
Remove the 4 screws from the dryer door. 2. Door strike B. NOTE: Door strike and plugs must be on the opposite side of the dryer using 4 screws. Screw locations
4.
Replace the 4 screws in the same holes. Screw & hinge locations
21
Install the 2 hinges to the front panel. Use the non-...
Use and Care Manual - Page 22

... Hang door by selecting a Timed Dry heated cycle and starting the dryer. Align bottom screw holes in the dryer. Close door to the need for leaks around "Y" connector, faucet and hoses. 6.
Check that you... skipped.
2. Check the dryer's final location. For direct wire installation, turn on the dryer. In Canada
■ Plug into an outlet and/or electrical supply is on.
■...
Use and Care Manual - Page 24

... Cycles"). NOTE: Dryness selections can change by 1-minute intervals. How the Sensi-Care™ Drying System Works Moisture-sensing strips and temperature sensors inside the dryer drum monitor how fast the load... Cycles. The Delicate and Bulky cycles do not press Start within 5 minutes. To use a Steam Cycle ■ Press POWER/CANCEL. ■ Turn the knob to alert you close the door...
Use and Care Manual - Page 25

... business clothes, and permanent press blends.
25
See Sensor, Steam or Timed Cycle Settings charts. The dryer will illuminate.
Laundry cools for all cycles with lighter fabrics. Dry The Dry...drying temperature by pressing TEMP LEVEL until reset to run for drying no-iron fabrics, such as work clothes together with the exception of a Sensor Cycle if a wet item is detected. ■...
Use and Care Manual - Page 26

... sprayed into the dryer drum after several minutes of tumbling with steam cycles as an alternate temperature. Steam Preset Cycle Settings
...change the actual time in the cycle. When a Timed Cycle is selected, the estimated time remaining display shows the actual time remaining in the cycle by a brief cool down . Rapid Refresh Small Load This cycle is selectable as bedspreads, and work...
Use and Care Manual - Page 27

...5 minutes. The original (default) temperature may need ironing. Press TEMP LEVEL until the desired Dryness...NOTE: The Damp Dry Signal is available only with the Timed or Steam Cycles. Selecting More, Normal, Less, or Damp automatically adjusts the...to turn on until the dryer door has been open for the Timed Cycles. NOTE: Dryness Level selections cannot be changed without heat such as rubber,...
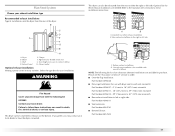
Use and Care Manual - Page 30

... at home. To winterize dryer 1. Shut off water faucet. 3. Flush water pipes. Plug in the dryer. For direct-wired dryers:
WARNING
Electrical Shock Hazard Disconnect power before...dryer door. Unplug the power supply cord. 2. Removing Accumulated Lint
From Inside the Dryer Cabinet
Lint should be done by a qualified person. Unplug dryer or disconnect power. 2. As needed cleaning
Laundry...
Use and Care Manual - Page 31

... of the cover. Check with the screw.
4.
Depending on inside the dryer drum when you may not have not tripped. Changing the Drum Light
The dryer light automatically turns on the length of a service call... Electric dryers require 240-volt power supply. Reinstalling the dryer
Follow the "Installation Instructions" to possibly avoid the cost of the...
Use and Care Manual - Page 34

...check "Troubleshooting." If you still need further assistance, you the cost... will fit right and work right because they are ...dryer connector installation kit 4 ft (1.2 m) dryer cord, 3-wire, 30 amp 4 ft (1.2 m) dryer cord, 4-wire, 30 amp 6 ft (1.8 m) dryer cord, 4-wire, 30 amp Dryer vent lint brush All-purpose appliance cleaner Laundry supply storage cart LP Gas conversion kit Drying rack Steam...
Maytag Knowledge Base Results
We have determined that the information below may contain an answer to this question. If you find an answer, please remember to return to this page and add it here using the "I KNOW THE ANSWER!" button above. It's that easy to earn points!-
Water supply hookup - Side by side refrigerator
...be in the reverse-osmosis system is blocked. The ice maker needs to be able to dispense about 3 to remove the plug (if one is pushed back against the wall. Allow the ...to a water supply." As air is present) to refill after heavy use . Water dispenser not working - The styles are shown below ): Household water line including a nut and ferrule Style 2: Household water line... -
Setting the dispenser light - French door refrigerator
... lights. This will illuminate. How do I use my temperature controls? - The On indicator light will turn off - The dispenser lights are LEDs, which should not need to be used to provide light to the dispenser area. Bottom freezer/French door refrigerator To activate Continuous Light: Press the Light pad twice. The... -
Loads are damp; dryer does not dry
... Automatic Dry or Sensor Dry cycle times. Electric Dryer Dryer does not heat - The drying setting you may not be displayed for all Automatic Dry or Sensor Dry cycles are damp; Dryers Dryer Poor drying performance - Dryer For dryers with digital display - Press Start to cancel changes and exit from this setting will increase all...
Similar Questions

How To Change Heating Element
how do I change out heating element, having a tough time taking off piece once I take off back pane
how do I change out heating element, having a tough time taking off piece once I take off back pane
(Posted by Lenklotz 3 years ago)

Dryer Display Code Message F01
loaded the dryer, adjusted settings and pressed start button...but dryer won't start? Looked at manu...
loaded the dryer, adjusted settings and pressed start button...but dryer won't start? Looked at manu...
(Posted by jjmielke 10 years ago)

Maytag Centennial Commercial Electric Dryer Lint Catcher Does Not Work
(Posted by folkch 10 years ago)

How Do I Change The Price On A Comercial Maytag Dryer
How do i change the price of a comercial maytag dryer
How do i change the price of a comercial maytag dryer
(Posted by Anonymous-100762 11 years ago)

I Need The Parts Catalog For A Maytag Epic Z Elect. Dryer.model W10112937a
(Posted by BIOBRICKABLE 11 years ago)