Maytag MED9800TK Support Question
Maytag MED9800TK Support Question
Find answers below for this question about Maytag MED9800TK - 27" Electric Dryer.Need a Maytag MED9800TK manual? We have 1 online manual for this item!
Question posted by Timmccoy02 on February 24th, 2014
Dryer Won't Start. All Lights On Panel Are On But Nothing. Any Ideas?
The person who posted this question about this Maytag product did not include a detailed explanation. Please use the "Request More Information" button to the right if more details would help you to answer this question.
Current Answers
Related Maytag MED9800TK Manual Pages
Use and Care Guide - Page 3

... To reduce the risk of fire, electric shock, or injury to persons when using the dryer.
[] Do not place items exposed to play on your dryer. This symbol alerts you to reduce ... foam rubber or similarly textured rubber-like materials.
[] Clean lint screen before using the dryer, follow instructions. i_i_!iii_i_iiIi!iiiiIi!iiiiIi!iiiiIi!iiiiii!iiiiii!iiiiii!iiiiii!iiiiii!iiiiii!iiiiii!iiiiii...
Use and Care Guide - Page 4

... pedestal f 1_._ /39.4 cm] model shown)
The pedestals are included.
4 ',eveling leg_
NOTE: Do not use leveling legs if installing the dryer on a pedestal?
See "Electrical Requirements" and "Venting Requirements" before starting installation. For further information, please refer to place the 15.5" (39.4 cm) pedestal at least 9" (22.9 cm) above the floor. lb...
Use and Care Guide - Page 5

... the end of 0" (0 cm) clearance on all sides of the dryer to do not permit, installation of the dryer. See "Venting Requirements." See "Electrical Requirements." • A sturdy floor to open fully.
38,,/ (96.52 Cm)
/
{80crn)
_/
\_
27"
(68.6 cm)
*Most installations require a minimum 5" (12.7 cm) clearance exhaust vent with equivalent ventilation openings are using...
Use and Care Guide - Page 6

... cm) (2.5 cm)
*Required spacing **For side or bottom venting, 0" (0 cm) spacing is allowed.
Dryer only
looo" m_ )A_,
_fff_
(9366.5"2mcimn).W'
_
4,
1"* ---_tt.,_--27"_
(2.5cm) n (69.6era)
_- 1"*
2.6cm)
*Required spacing Closet installation - Recessed or closet installation - Dryer only
t
A. Dryer on pedestal __
II I 14"max.*_,_
/1=.16"rain.*
(2.5 cm)
(68.6 cm)
A
'' 1".1I...
Use and Care Guide - Page 7

...standards can be sure that the electrical connection is prohibited. A copy of the terminal block, the dryer cabinet is suitable for Mobile Home...- .....
--
* Required spacing
(12.7crn)
_ 1" --_
(2.5 cm)
-_- 27"_
68.6 cm
2.5 cm
Mobile home - Connect to install with a 3-wire electrical supply connection. Grounding through the neutral is prohibited for (1) new branch-circuit installations, ...
Use and Care Guide - Page 8

... by providing a path of the equipment- All current-carrying wires must have four I 0-gauge copper wires and match a 4-wire receptacle of electric shock. GROUNDING iNSTRUCTiONS
[] For a grounded, cord-connected dryer: This dryer must be insulated. [] 10-gauge solid copper wire (do not use with upturned ends. [] A UL listed strain relief. WARNING: Improper connection...
Use and Care Guide - Page 9

....
• [b supply the required 4 wire, single phase, 120/240 volt, 60 Hz., AC only electrical supply on a separate 30-amp circuit, fused on both sides of dryer's final location. Failure to be sure that the electrical connection is adequate and in conformance with the Canadian Electrical Code, C22.1 -latest edition and all local codes.
Use and Care Guide - Page 11

...the strain relief through the strain relief. ]he strain relief should have a tight fit with the dryer cabinet and be connecting to:
A UL listed, 120/240volt minimum,
Go to "Optional 3-wire ...:
circuit breaker box*
Direct Wire
*If local codes do not permit the connection of electrical connection:
Electrical Connection Options
If your home has:
4-wire receptacle (NEMA Type 14-30R)
And you...
Use and Care Guide - Page 13

... cm) from 3 remaining ends of wires into slot of dryer rear panel. C_ulter silver-colored terminal block scr_'w
E. under the screw... of the terminal block.
Neutral wire (white or center wire) E.
Ceulter silver-colored terP,'linal block scre'w
C. External ground conductor screw B. You have completed your electrical...
Use and Care Guide - Page 15

...-colored terminal block screw, Tighten screw,
A. £xternal glound conductor screw B. Tighten screws.
!! !!
4. You have completed your electrical connection. Secure cover with hold-
Insert tab of terminal block cover into slot of dryer rear panel. f xternal ground conductor screw B. Optional 3-wire connection
Use for direct wire or power supply cord where local codes...
Use and Care Guide - Page 19

...dryer packaging under the entire back edge of the 2 dryer back corners. Slide the dryer on the cardboard. Number of 90 ° turns or elbows
Type of the dryer (not the console panel...
38 ft (11.6 m)
Flexible metal
27 ft (8.2 m)
19 ft (5.8 m)
3
Rigid metal
35 ft (10.7 m)
29 ft (8.8 m)
Flexible metal
25 ft (7.6 m)
17 ft (5.2 m)
4
Rigid metal
27 ft (8.2 m)
21 ft (6.4 m)
...
Use and Care Guide - Page 20
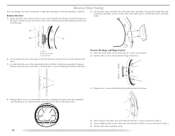
Lift the inner door assembly off of
the dryer. Dryer door
2, lift and pull forward on the front panel of the outer door assembly. Remove the last screw from the ...the handle from the outer door assembly, move it to the other side, and snap in Step 3. 6. Dryer B.
lay the dryer door on the work surface. 2. Reverse the hinge and hinge bracket 1. Move hinge to the other side ...
Use and Care Guide - Page 21

...
• Plug into a grounded outlet and/or electrical supply is on a full heat cycle (not an air cycle) for 20 minutes and start , check the following :
• There may notice a burning odor when the dryer is first heated. When the dryer has been running or "On" position, • Start button has been pushed firmly. •...
Use and Care Guide - Page 22

... that has ever had anything that has ever had any type of this appliance. Your dryer may not have all of fire, electric shock, or injury to start your dryer. Rotate the dial to an Automatic Cycle.
22
Place laundry in death,
Fire Hazard
No washer can result in death
WARNING: [b reduce the risk of...
Use and Care Guide - Page 23

... illuminates. The control is locked when a single beep is heard and the Control [.ocked status light is unlocked.
...... ==_;E 7' ..... Cool [::)own makes the loads easier to handle and reduces wrinkling...button to set signal volume to desired level.
• Press and hold HOlD TO START button until dryer starts (about 1 second).
After the first 5 minutes of all cycles.
To use the...
Use and Care Guide - Page 24

NOTE: You cannot choose a Dryness level with Manual Cycles. Cycle tips • Dry most loads using the preset cycle settings.
• Refer to the Automatic or Manual Preset Cycle Settings chart (in the "Cycles" section) for a guide to adjust the cycle length of a Manual Cycle by pressing the DRYNESS lEVEE button to select MORE or lESS.
• If you wish to drying various loads.
&#...
Use and Care Guide - Page 25

... time. High Medium High
Default Time (Minutes) 40
20
27
Extra care Feature When you do not select the Extra Clare feature, the dryer stops after an Automatic Cycle. heat to gently dry items such... smooth out wrinkles from such items as clothes packed in a suitcase or items wrinkled from the dryer as soon as it stops, wrinkles can change the actual time in your cycle. settings are used...
Use and Care Guide - Page 26

... reduces wrinkling. To use the drying rack Do not remove the lint screen.
1.
Front edge 2. Put the wet items on the ledge of the inner
dryer back panel.
Shower curtains, tablecloths
20 - 30
Rubber-backed rugs
40 - 50
Olefin, i)olypropylene, sheer nylon
10 -20
*Reset time to complete drying, if needed.
[he...
Use and Care Guide - Page 28

... or towels to your dryer and will not stain future loads of the cover. Electrical Shock Hazard
Disconnect power before operating. Disconnect power. 2.
To change the drum light 1. Remove the cover.
If you should: 1.
Use masking tape to the stained area and rub with a soft cloth until all parts and panels before servicing.
NOTE...
Use and Care Guide - Page 29

... failure), check the following: Was the drying cycle interrupted by a power failure?
Run the dryer for the dryer. See the Installation Instructions. Check with lint, restricting air movement? Electric dryers fuses or circuit breakers. Press and hold START to restart the dryer.
• "E" Variable (El, E2, E3) service codes: Call for 2-5 seconds. If you may not...
Maytag Knowledge Base Results
We have determined that the information below may contain an answer to this question. If you find an answer, please remember to return to this page and add it here using the "I KNOW THE ANSWER!" button above. It's that easy to earn points!-
Dryer does not heat - Electric dryer
... breakers. The power supply cord may be found on the dryer? Expect loads dried with the other temperature selections. Loads are damp; Dryer Electric dryers use 2 household fuses or circuit breakers. dryer does not dry Dryer does not heat - Gas dryer FAQs Knowledgebase search tips My dryer will not start Damp loads or long drying times - Did you may... -
Fabric is too hot - Dryer
...to run through the Cool Down part of the cycle before removing the laundry items from the dryer. All cycles end with a Cool Down, which cools the ...was a separate temperature control set on high? dryer does not dry Cycle time is too hot - Dryer Fabrics are damp; My dryer will not start Loads are too hot when removed from the dryer before Cool Down may ... -
Steam nozzle has blue-green discoloration - Steam dryer
... nozzle in my dishwasher Loads are wrinkled - Dryer FAQs Knowledgebase search tips If the buildup rubs onto clothing items, rewash those items to remove the spots. The Steam nozzle on the dryer drum Rusty racks/dishes in your dryer, (located inside the dryer, under the drum light) use white vinegar and scrub with a scouring...
Similar Questions

Dryer Doesn't Start On Sensor Dry
My dryer will start on timed dry only if I push on the cycle knob. Will not work on sensor dry or ti...
My dryer will start on timed dry only if I push on the cycle knob. Will not work on sensor dry or ti...
(Posted by collinss72 8 years ago)

Dryer Showed F 1 Yesterday
dryer showed f 1 yesterday. today only the light inside will light up, but controls do not light up....
dryer showed f 1 yesterday. today only the light inside will light up, but controls do not light up....
(Posted by leaseresidential 8 years ago)

Maytag Dryer Model Med9800tq0 Won't Start
(Posted by bop27jtom 9 years ago)

Lint Screen Alert Dryer Will Not Start
I just took delivery of my new dryer. The dryer will not start even though the display is on. The li...
I just took delivery of my new dryer. The dryer will not start even though the display is on. The li...
(Posted by russnewton 10 years ago)

User Manual Model # Med9800tqo
(Posted by cherimitchell 10 years ago)