Maytag MED9700SQ Support Question
Maytag MED9700SQ Support Question
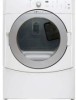
Find answers below for this question about Maytag MED9700SQ - 27" Front-Load Electric Dryer.Need a Maytag MED9700SQ manual? We have 1 online manual for this item!
Question posted by sheijam8 on April 7th, 2014
Maytag Med9700sb0 Inside Light Off Dryer Will Not Start
The person who posted this question about this Maytag product did not include a detailed explanation. Please use the "Request More Information" button to the right if more details would help you to answer this question.
Current Answers
Related Maytag MED9700SQ Manual Pages
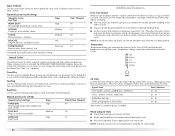
Use and Care Guide - Page 3

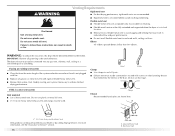
... hazards that have provided many important safety messages in the dryer. Always read and obey all instructions before or after each load. ■ Keep area around the exhaust opening and adjacent...your dryer. All safety messages will tell you and others are not followed.
DRYER SAFETY
Your safety and the safety of fire, electric shock, or injury to persons when using the dryer,...
Use and Care Guide - Page 4

... wrench that all parts are available in ring terminals or spade terminals with clothes dryers. You will need to the "Assistance or Service" section.
The cord should contain... will need to the "Assistance or Service" section.
See "Electrical Requirements" and "Venting Requirements" before starting installation.
To order, call the dealer from whom you planning...
Use and Care Guide - Page 5

...(7ºC).
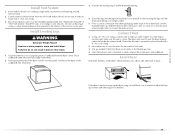
See "Electrical Requirements." ■ A sturdy floor to place the dryer at least 18 inches (46 cm) above the floor. The combined weight
of the dryer. See "Venting Requirements...31½" (80 cm)
27" (68.6 cm)
*Most installations require a minimum 5" (12.7 cm) clearance behind the dryer for spacing of 0" (0 cm) clearance on all sides of the dryer to the bottom of a ...
Use and Care Guide - Page 6
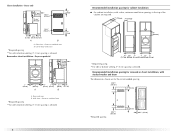
... installation, with vents
*Required spacing **For side or bottom venting, 0" (0 cm) spacing is allowed. Dryer only
14" max.* (35.6 cm)
18" min.* (45.72 cm)
48 in.2* (310 cm2... (2.5 cm) (80 cm) (12.7 cm)
A
B
A.
Closet installation - Dryer on pedestal
3"* (7.6 cm)
14" max.* (35.6 cm)
18" min.* (45.72 cm)
1" (2.5 cm)
27" (68.6 cm)
A
1"
1"*
(2.5 cm) (2.5 cm)
31½" (80 cm)
...
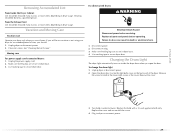
Use and Care Guide - Page 11

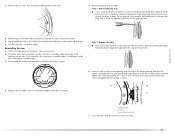
...connector onto the strain relief threads. The strain relief should have a tight fit with the dryer cabinet and be in a horizontal position.
A B
C
A. Strain relief threads
4. Removable... of electrical connection: 4-wire (recommended)
3-wire (if 4-wire is inside the terminal block opening C. Tighten strain relief screw against the direct wire cable. Reaching inside the ...
Use and Care Guide - Page 16
...using an existing vent system
■ Clean lint from your dealer or by calling Maytag Services. Good
Better
Clamps ■ Use clamps to avoid crushing and kinking. Louvered...in death or fire.
45° elbows provide better airflow than 90° elbows.
If this dryer MUST BE EXHAUSTED OUTDOORS. Elbows
Failure to achieve the best
drying performance. For more information, see the...
Use and Care Guide - Page 18
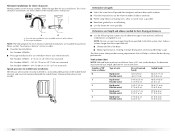
...one 90º turn inside the dryer. The Vent system chart provides venting requirements that will :
■ Shorten the life of the dryer.
■ Reduce performance,... (13.4 m)
38 ft (11.6 m)
Flexible metal
27 ft (8.2 m)
19 ft (5.8 m)
3
Rigid metal
35 ft (10.7 m)
29 ft (8.8 m)
Flexible metal
25 ft (7.6 m)
17 ft (5.2 m)
4
Rigid metal
27 ft (8.2 m)
21 ft (6.4 m)
Flexible metal
23 ...
Use and Care Guide - Page 19
... gas models) Check that there are no longer visible.
5. Vent must fit over the dryer exhaust outlet and inside exhaust hood. Place cardboard under each of the vent to existing vent, make sure the vent... is no kinks in "Plan Vent System." Stand the dryer up the dryer using a wood block. The dryer vent must fit inside the exhaust hood. Check levelness first side to side, then front...
Use and Care Guide - Page 20

.... Set the outer door assembly aside. Lift the inner door assembly off of
the dryer. Reverse the hinge and hinge bracket 1. Open the dryer door. Unsnap the handle from Step 1.
Loosen, but do not remove, the screw with the inside door assembly facing up , on a flat, protected surface with the top keyhole opening...
Use and Care Guide - Page 21
...the top hinge keyhole over the original hinge holes.
4. Move hinge to scratch the dryer surface. Set the inner door assembly aside. Check for the door handle of the ...6. 3. Remove the plug strip or label. Reinstalling the door 1. To fit correctly, the inside door assembly edge is completely inside the outside door assembly edge. 3. Style 1: Remove the plug strip.
■ Use a ...
Use and Care Guide - Page 22

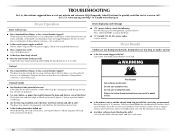
...." 9. NOTE: You may be 2 household fuses or circuit breakers for heat. When the dryer has been running or "On" position. ■ Start button has been pushed firmly. ■ Dryer is plugged into a grounded outlet and/or electrical supply is on. ■ Household fuse is an extra part, go away.
22 If there is closed...
Use and Care Guide - Page 23

... Hazard
No washer can result in dryer and shut door.
3.
Place laundry in death or fire. WARNING: To reduce the risk of the cycle based on a clothesline or by using an Air Cycle. The time displayed is an estimated length of fire, electric shock, or injury to start your dryer. Failure to specific sections of...
Use and Care Guide - Page 24
...light is not necessary to help measure the amount of the end dryness level.
After the first 5 minutes of an automatic cycle, the estimated time display will cause the triple beep indicating that the time cannot be adjusted.
Stopping Your Dryer
To stop the dryer...hold HOLD TO START button until dryer starts. The length of lighter fabrics, leading to stop your load. To use...
Use and Care Guide - Page 25
... lights. or +) buttons. The Cycle Complete light turns off and the dryer will turn on and the selected cycle continues. This indicator stays on your dryer with the Cycle Complete light.
Laundry ... for a guide to drying various loads.
■ Drying temperature and Dryness Level are preset when you are drying.
Cycle tips ■ Dry most loads using the preset cycle settings.
&#...
Use and Care Guide - Page 26
...* (Minutes)
Foam rubber -
Manual Cycles
Use Manual Cycles to smooth out wrinkles
RAPID DRY Small loads
High
27
Additional Features
Extra Care Feature When you do not select the Extra Care feature, the dryer stops after an Automatic Cycle. Touchup
Use this setting to help reduce wrinkling. ■ Press the Extra Care feature...
Use and Care Guide - Page 27
... use automatic cycles with the drying rack. Place drying rack inside dryer drum, positioning the back wire on a clothesline or by...27 Press and release the CYCLE END SIGNAL to tumble dry or that can reach all the surfaces. Press (and hold .
Leave space between the items so air can be dried on the ledge of moisture items hold ) HOLD TO START button (about 1 second). Open dryer...
Use and Care Guide - Page 28

.... Dry unstable dye items inside out to avoid transfer of clean cloths or towels to remove.
2.
To wash
1.
Apply paste to remove lint. Wet both the dryer and fabrics.
■ If...clothes, or cause the dryer to stop before your dryer and will not stain future loads of lint screen with hot water and liquid detergent. As needed cleaning Laundry detergent and fabric softener ...
Use and Care Guide - Page 29
... only when you will be done by a qualified person. Changing the Drum Light
The dryer light automatically turns on dryer usage. Remove
the screw located in the lower right corner of the dryer.
Disconnect power. 2. Unplug dryer or disconnect power. 2. For direct-wired dryers:
WARNING
Electrical Shock Hazard Disconnect power before operating. Clean lint screen.
Unplug the power...
Use and Care Guide - Page 30
...your hand under the outside exhaust hood clogged with lint? www.maytag.com/help - The drum may be turning, but you do...or flexible metal vent. Clean out pockets before each load. The dryer may be 2 household fuses or circuit breakers for small... of non-use a plastic vent. Electric dryers use 2 household fuses or circuit breakers. Press and hold START to vibrate. When balled up ? ...
Use and Care Guide - Page 33
...refrigerator or freezer product failures. 6. Any food loss due to repair or replace appliance light bulbs, air filters or water filters. DISCLAIMER OF IMPLIED WARRANTIES; In Canada, call ... accordance with electrical or plumbing codes, or use of
products not approved by Maytag. 5. You can be found by checking the "Assistance or Service" section or by a Maytag designated service company...
Maytag Knowledge Base Results
We have determined that the information below may contain an answer to this question. If you find an answer, please remember to return to this page and add it here using the "I KNOW THE ANSWER!" button above. It's that easy to earn points!-
Steam nozzle has blue-green discoloration - Steam dryer
... buildup off the water nozzle in my dishwasher Loads are stains on my steam dryer has a blue-green discoloration. Dryer FAQs Knowledgebase search tips There are wrinkled - The Steam nozzle on the dryer drum Rusty racks/dishes in your dryer, (located inside the dryer, under the drum light) use white vinegar and scrub with a scouring pad. If... -
Cycle is too short - Dryer
...Dry or Sensor Dry cycles use sensing strips inside the dryer drum to determine when the load is heating, check the following for details. Dryers with a dry rack. Automatic Dry or Sensor...dryer is not level. Make sure that the dryer is heating, view the following for an Automatic Dry or Sensor Dry cycle. The dryer cycle is not heating, see: Electric dryer Dryer... -
My dryer makes sounds or vibrations
... when the load is the dryer level front-to-back and side-to -side. A dryer without legs, or that is missing legs, may rock or teeter on a floor that may be a light thumping sound .... ( 8 seconds, 130 KB) Is the load knotted or balled up . Laundry items with a towel load inside the dryer along the front and rear edges of load moisture in the seam where the drum meets the front...
Similar Questions

Maytag Dryer Med9700sb0 Sensing Light On But Dryer Won't Start
(Posted by Emebhis 9 years ago)

Model #med9700sb0 Maytag Residential Dryer Won't Start
(Posted by prjp 10 years ago)

Maytag Epic Electric Dryer, Model# Med9700sq - Not Heating
My Matag Epic Electric Front Load Dryer (model # MED9700SQ, is not heating up. The drum turns and ev...
My Matag Epic Electric Front Load Dryer (model # MED9700SQ, is not heating up. The drum turns and ev...
(Posted by Anonymous-122272 10 years ago)

Maytag Epic Frontload Dryer. Model # Med9600sqo
Dryer started all of a sudden making sqealing noise. But will still dry clothes. Is it worth fixing?
Dryer started all of a sudden making sqealing noise. But will still dry clothes. Is it worth fixing?
(Posted by pennystorlie 11 years ago)
Maytag Epic Electric Dryer Med9700sq Makes Squeaking Noise
I pulled the bottom of the dryer off and found a large roller that turns the drum. That is where the...
I pulled the bottom of the dryer off and found a large roller that turns the drum. That is where the...
(Posted by classactcowgirl 12 years ago)