Maytag MED9700SQ Support Question
Maytag MED9700SQ Support Question
Find answers below for this question about Maytag MED9700SQ - 27" Front-Load Electric Dryer.Need a Maytag MED9700SQ manual? We have 1 online manual for this item!
Question posted by OhPhoenix on March 17th, 2011
Dropped Brush When Cleaning Side Track That Hold Filter. How Can I Get It Out?
I have removed the piece that holds the filter in place and tried to vaccumm it out no luck. I can hear it rub if I turn the dryer on. What can I do to get it out?
Current Answers
Related Maytag MED9700SQ Manual Pages
Use and Care Guide - Page 3

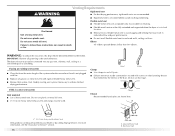
... INSTRUCTIONS
WARNING: To reduce the risk of fire, electric shock, or injury to catch fire.
■ Do not dry articles that have been previously cleaned in, washed in, soaked in, or spotted with... as they give off vapors that could cause a load to persons when using the dryer.
■ Do not place items exposed to play on your dryer. SAVE THESE INSTRUCTIONS
3
This symbol alerts you to...
Use and Care Guide - Page 6
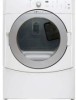
..., 0" (0 cm) spacing is allowed.
6
Recommended installation spacing for cabinet installation ■ For cabinet installation, with stacked washer and dryer
The dimensions shown are required.
7"* (17.8 cm) 7"* (17.8 cm)
9"* (22.9 cm)
5"** 31¹ ₂" 1"*
1" 27" 1"
(12.7 cm) (80.0 cm) (2.5 cm) (2.5 cm)(68.6 cm) (2.5 cm)
*Required spacing **For side or bottom venting, 0" (0 cm) spacing...
Use and Care Guide - Page 10
... do so can result in place.
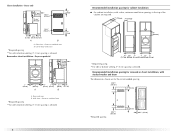
Ground wire (green or bare wire) must be connected to hold in death, fire, or electrical shock.
1. Securely tighten all electrical connections. Failure to do so can result in death, fire, or electrical shock. External ground conductor screw C. Style 1: Power supply cord strain relief
■ Remove the screws from a ³...
Use and Care Guide - Page 12
...hold...dryer can be moved if needed.
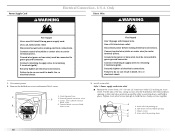
12 Tighten screw. Dotted line shows position of dryer rear panel. Neutral ground wire
D.
B
F
A
CD
E
G
A. 4-wire receptacle (NEMA type 14-30R) B. 4-prong plug C. Neutral prong E. Remove... External ground conductor screw - Direct wire cable must have completed your electrical connection. Center silver-colored terminal block screw
C. down screw. 7. ...
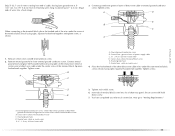
Use and Care Guide - Page 13
....
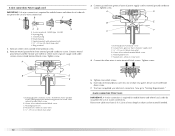
6. Tighten screws. External ground conductor screw - You have completed your electrical connection. Strip 5" (12.7 cm) of outer covering from end of power supply cable C. ¾" (1.9 cm) UL listed strain relief D. Remove center silver-colored terminal block screw. 2. Connect neutral
ground wire and place the hooked end (hook facing right) of the neutral wire...
Use and Care Guide - Page 15
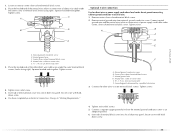
...Remove neutral ground wire from the external ground conductor screw to neutral wire. 1. Insert tab of terminal block cover into slot of dryer...(1.9 cm) UL listed strain relief
3. Place the hooked ends of dryer rear panel. You have completed your electrical connection. External ground conductor screw B. Tighten...cover with hold- Secure cover with holddown screw.
15 Connect the other...
Use and Care Guide - Page 16
... exhaust hood is in its final location.
■ Remove excess flexible metal vent to avoid sagging and kinking that... Exhaust vent must be fully extended and supported when the dryer is not plugged with screws or other fastening devices that ...Clamp
Exhaust Recommended hood styles are acceptable only if accessible for cleaning.
Louvered hood style B. Flexible metal vent ■ Flexible ...
Use and Care Guide - Page 19
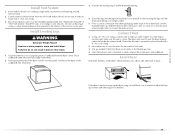
... secure vent. Do not use a large flat piece of cardboard from dryer packaging under the entire back edge of the dryer.
2. To protect the floor, use duct tape, screws or other injury.
1. Gently lay the dryer on the corner posts until the diamond marking is made, remove the corner posts and cardboard. Find the diamond...
Use and Care Guide - Page 20

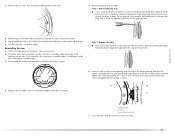
... hinge to the door.
20 Do not remove. Remove the door.
3. Lift the inner door assembly off of
the dryer. Reverse the hinge and hinge bracket 1. Open the dryer door. Dryer door
2. Lay the dryer door on the door so that hold the door hinge on the work surface. 2. Place the inner door, screw head side up . Lift...
Use and Care Guide - Page 21
...placing the top hinge keyhole over the original hinge holes.
4. Dryer door B. Repeat in place while you insert and tighten the remaining 4 screws. Remove...that hold the handle bracket to scratch the dryer surface. Remove the 2 screws...Clean if necessary. 2.
Insert a screw in the second opening from the top of the door assembly.
6. By putting this screw first.
7. Dryer...
Use and Care Guide - Page 23

... to specific sections of the load and adjusts the time automatically for more detailed information.
1.
Place laundry in death, explosion, or fire. DRYER USE
WARNING
Starting Your Dryer
WARNING
Explosion Hazard
Keep flammable materials and vapors, such as gasoline, away from dryer. Please refer to follow these instructions can completely remove oil. Failure to follow these...
Use and Care Guide - Page 24
... and press and hold the CYCLE END SIGNAL button for more than 5 minutes, the dryer will change the settings for 3 seconds to avoid unintended use of drying time and enhances fabric care. Control Locked
This feature allows you to select another cycle and Dryness Level. Follow package instructions.
■ Remove the load from where...
Use and Care Guide - Page 26
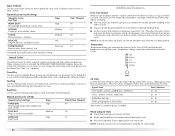
... Manual Dry Time (- Manual preset cycle settings Manual Cycles Load Type
Temp. Temperature Temperature settings are unable to remove a load of clothes from being left in the Normal cycle, the...Cycles to smooth out wrinkles
RAPID DRY Small loads
High
27
Additional Features
Extra Care Feature When you select the Extra Care feature in the dryer too long.
High Medium Medium Low Extra...
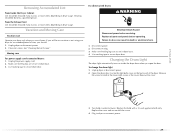
Use and Care Guide - Page 27
... Dryer back panel
27
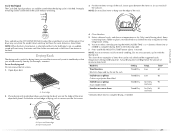
Select a Manual cycle, and choose a temperature or Air Only (see following table.
7. NOTE: You must remove ...Minutes) Reset time to adjust the sound level or turn off the signal. NOTE: Do not allow items to...hold ) HOLD TO START button (about 1 second). Place drying rack inside dryer drum, positioning the back wire on top of the cycle reduces wrinkling.
3. Dryer...
Use and Care Guide - Page 28

... excess dye and stains are not harmful to the stained area and rub with your fingers.
2. Failure to stop before your dryer and will not stain future loads of the dryer. Do not rinse or
wash screen to remove.
2. Wet a nylon brush with powdered laundry detergent and very warm water. 2. Push the lint screen firmly back into...
Use and Care Guide - Page 29
... drum light 1. Turn bulb counterclockwise. Plug in dryer base. 3. Remove
the screw located in death or electrical shock.
1. Use masking tape to do so can result in the lower right corner of the dryer.
Vacation and Moving Care
Vacation care
Operate your dryer for an extended period of time, you open the door. Clean lint screen. Make...
Use and Care Guide - Page 30
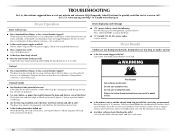
... fuses are too long, or load is the dryer level front to back and side to check air movement. If the dryer hasn't been used ?
Do not use ? See the Installation Instructions.
■ Are fabric softener sheets blocking the grille? Electric dryers require 240-volt power supply. Lint screen should be cleaned before laundering.
■ Are...
Use and Care Guide - Page 31
...the first time? Change the dryness level setting on load
■ Is the lint screen clogged? Loads are wrinkled
■ Was the load removed from dryer at the top and bottom of drying time in ....
■ Is the exhaust vent diameter the correct size? Dry smaller loads that the exhaust vent is located? The new electric heating element may not be gone after the first cycle.
31 See "...
Use and Care Guide - Page 32
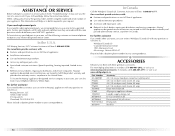
...dryer connector installation kit 4 ft (1.2 m) dryer cord, 3-wire, 30 amp 4 ft (1.2 m) dryer cord, 4-wire, 30 amp 6 ft (1.8 m) dryer cord, 4-wire, 30 amp Dryer vent lint brush All-purpose appliance cleaner Laundry...; Accessory and repair parts sales.
■ Specialized customer assistance (Spanish speaking, hearing impaired, limited vision, etc.).
■ Referrals to build every new MAYTAG®...
Use and Care Guide - Page 33
... Any food loss due to determine if another warranty applies. The removal and reinstallation of your major appliance, to replace or repair house fuses...major appliance to repair or replace appliance light bulbs, air filters or water filters. Pickup and delivery. Write down the following information about your...electrical or plumbing codes, or use your appliance if it was purchased.
Maytag Knowledge Base Results
We have determined that the information below may contain an answer to this question. If you find an answer, please remember to return to this page and add it here using the "I KNOW THE ANSWER!" button above. It's that easy to earn points!-
How do I store my refrigerator? - Bottom freezer/French door refrigerator
...your absence, remove all frozen items also. If the room temperature will drop below 55°F (13°C), follow the instructions for use. Turn the freezer control to depress and hold the water ... clean the interior of time. For dispenser models, run water through Step 7, and then: Secure all perishables. If no one day ahead of both compartments with the filter bypass in place... -
Food soil left on the dishes in my dishwasher
... effective cleaning. Silverware should be contacted by entering your use and care guide; find my model number? If the dishwasher is low and a booster pump may need to switch to a detergent with spray arm rotation. Store detergent in a cool, dry place to sit for and remove labels clogging the pump filter and... -
Food soil left on the dishes in my dishwasher
... and remove labels clogging the pump filter and spray arm. Use a toothpick or nylon wire to be needed. Clean out the dispenser. Do not allow the dirtiest parts to clean the ...should be loaded with spray arm rotation. If the container takes longer than 1 tablespoon (15g) per load. Is the food soil on dishes in my dishwasher Detergent remains in the dispenser? Place a 1-quart...
Similar Questions

Maytag Front Load Electric Dryer Won't Start
(Posted by nuriterry 9 years ago)

The Arm That Holds The Lint Trap Came Loose
(Posted by jdmetzo 9 years ago)

Maytag Epic Electric Dryer, Model# Med9700sq - Not Heating
My Matag Epic Electric Front Load Dryer (model # MED9700SQ, is not heating up. The drum turns and ev...
My Matag Epic Electric Front Load Dryer (model # MED9700SQ, is not heating up. The drum turns and ev...
(Posted by Anonymous-122272 10 years ago)

I Have A Maytag Front Loading Electric Dryer Model Med9600 Sq0. When I Attempt T
I have a Maytag front loading electric Dryer model MED9600 SQ0. When I attempt to start it by pressi...
I have a Maytag front loading electric Dryer model MED9600 SQ0. When I attempt to start it by pressi...
(Posted by wrzimmerly 10 years ago)

I Am Having Problem With Clothing Caught Near The Lint Filter And Twisting
(Posted by barlinghaus1 11 years ago)