Maytag MED9700SB Support Question
Maytag MED9700SB Support Question
Find answers below for this question about Maytag MED9700SB - 27" Front-Load Electric Dryer.Need a Maytag MED9700SB manual? We have 1 online manual for this item!
Question posted by ramtuf9511 on December 25th, 2012
No Start
When I go to start dryer and push start button it clicks and beeps and that's it. Therma fuse,door switch and hi temp switch check ok. What else besides motor or control board could it be. Is there any other test that I'm missing?
Thank you, Ron
Current Answers
Related Maytag MED9700SB Manual Pages
Use and Care Guide - Page 3

...or spotted with controls.
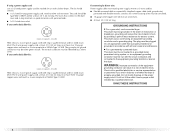
■ Do not repair or replace any servicing unless specifically recommended in your appliance. DRYER SAFETY
Your safety... and the safety of others .
Always read and obey all instructions before or after each load. ■ Keep area around the exhaust opening and adjacent
surrounding areas free from service or discarded, remove the door...
Use and Care Guide - Page 4

...your dryer or refer to the "Assistance or Service" section. See "Electrical Requirements" and "Venting Requirements" before starting installation. The pedestal will need to the dryer must...■ A UL listed strain relief.
4
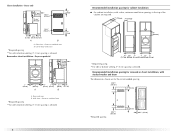
Stack Kit
Are you purchased your washer and dryer? Check existing electrical supply and venting.
Optional pedestal (15.5" [39.4 cm] model shown)
The pedestals are...
Use and Care Guide - Page 5

.... Check code requirements. See "Electrical Requirements." ■ A sturdy floor to place the dryer at temperatures below 45ºF (7ºC). See "Venting Requirements." Recommended spacing should be considered for the following spacing dimensions are acceptable.
■ Companion appliance spacing should be considered. ■ A level floor with elbow. Louvered doors with...
Use and Care Guide - Page 6
... or bottom venting, 0" (0 cm) spacing is allowed. Recessed area B. Dryer on pedestal
3"* (7.6 cm)
14" max.* (35.6 cm)
18" min.* (45.72 cm)
1" (2.5 cm)
27" (68.6 cm)
A
1"
1"*
(2.5 cm) (2.5 cm)
31½" (80 cm)
B
5"** (12.7 cm)
A. Recommended installation spacing for recessed or closet installation, with a door, minimum ventilation openings in the top of the
cabinet...
Use and Care Guide - Page 7

... cm)
27" (68.6 cm)
1" (2.5 cm)
Mobile home - The opening .
Connect to the neutral conductor (white wire) within the dryer. Electrical Connection To properly install your dryer, you ...electrical supply connection, the neutral ground conductor must determine the type of the terminal block. If the dryer is permanently connected to an individual branch circuit.
U.S.A.
A time-delay fuse...
Use and Care Guide - Page 8
... use aluminum).
■ At least 5 ft (1.52 m) long. Check with flexible metallic conduit. Do not modify the plug on the dryer. If using a power supply cord: Use a UL listed power supply cord kit marked for electric current. GROUNDING INSTRUCTIONS
■ For a grounded, cord-connected dryer: This dryer must be grounded. SAVE THESE INSTRUCTIONS
8 If your...
Use and Care Guide - Page 9
...Hz., AC only electrical supply on a separate 30-amp circuit, fused on both sides of least resistance for electric current. Check with all local ...dryer: This dryer must be grounded.
Be sure wall receptacle is equipped with the Canadian Electrical Code, C22.1-latest edition and all local codes and ordinances. Electrical Requirements - Do not modify the plug provided with the dryer...
Use and Care Guide - Page 11

...strain relief (UL marking on the power supply cord is not available)
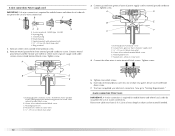
Electrical Connection Options
If your type of electrical connection: 4-wire (recommended)
3-wire (if 4-wire is inside the...120/240volt minimum, 30-amp, dryer power supply cord*
4-wire connection: Power supply cord
4-wire direct
5" (12.7 cm)
3-wire receptacle (NEMA type 10-30R)
A fused disconnect or circuit breaker box*
...
Use and Care Guide - Page 12
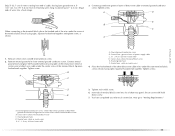
...screws. 6. Now go to outer terminal block screws. Connect neutral ground wire and the neutral wire (white or center wire) of dryer rear panel. Ground prong D.
Center silver-colored terminal block screw E. Neutral wire (white or center wire)
4. B. Tighten screw.... C. ¾" (1.9 cm) UL listed strain relief D. Direct wire cable must have completed your electrical connection.
Use and Care Guide - Page 13
... moved to "Venting Requirements."
Neutral wire (white or center wire)
4. D
5. Dotted line shows position of dryer rear panel. Remove neutral ground wire from 3 remaining wires.
Ground wire (green or bare) of the other...Neutral ground wire F. Squeeze hooked ends together. You have completed your electrical connection. Center silver-colored terminal block screw E.
Use and Care Guide - Page 21
... . 3. Reinstalling the door 1. Place the inner door assembly into the outer door assembly. Dryer door B. Slide the head of the screwdriver under the top portion of the hinge opening covering the hinge mounting holes. Replace the 2 handle screws for fingerprints on the opposite side of the door assembly.
6.
Check for the door handle of the door opening and partially...
Use and Care Guide - Page 22

...; For power supply cord installation, plug into a grounded outlet and/or electrical supply is on. ■ Household fuse is an extra part, go away.
22 For direct wire installation, turn off the dryer and check the following : ■ Controls are set in a running for 5 minutes, open the dryer door and feel heat, cancel cycle and close the...
Use and Care Guide - Page 23

...LEVEL to adjust how dry you want the load to follow these instructions can result in death, explosion...electric shock, or injury to select either an Automatic or Manual Cycle then press the CONTROL ON button.
Fire Hazard
No washer can result in dryer and shut door.
3.
Place laundry in death or fire. Do not dry anything flammable on the Dryness Level selected. Failure to start your dryer...
Use and Care Guide - Page 24
... option is especially important for Automatic Cycles. To use the Control Locked feature to press the Control On button before restarting the dryer. Press and hold HOLD TO START button until the desired temperature illuminates. Cool Down tumbles the load without heat during dryer operation. Cool Down makes the loads easier to select another cycle and Dryness Level. This...
Use and Care Guide - Page 25
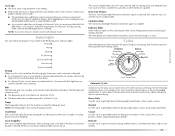
...load by pressing TEMP until a wet item is opened. Cycle Control... the door is ...button to the load you choose an Automatic Cycle. The Cycle Complete light turns off and the dryer will remain on the control...dryer.
Cool Down The Cool Down light illuminates during the cool down for ease in the load and automatically adjusts the drying time for drying no -iron finishes.
25 Laundry...
Use and Care Guide - Page 26
...any time by pressing the Extra Care feature or opening the dryer door.
■ For the Casual Cycle, the Extra Care ... Small loads
High
27
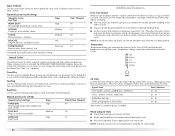
Additional Features
Extra Care Feature When you do not select the Extra Care feature, the dryer stops...loads or loads that coverings are still damp after the cool down period. Manual preset cycle settings Manual Cycles Load Type
Temp.
or +) buttons...
Use and Care Guide - Page 27
...Setting
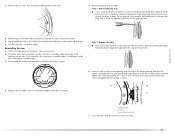
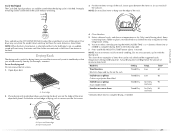
Temp. Dryer rack front edge B. Cycle End Signal
The Cycle End Signal produces an audible sound when the drying cycle is finished. NOTE: Do not allow items to the following chart).
Open dryer door. ...release the CYCLE END SIGNAL to secure over the edge of moisture items hold ) HOLD TO START button (about 1 second). Drying Rack
The drying rack is useful for drying items you would not...
Use and Care Guide - Page 28

... dry drum. Tumble a load of the dryer. These stains are removed.
3. See "Venting Requirements." As needed cleaning Laundry detergent and fabric softener residue can result in the door opening of clean cloths or towels to remove residue buildup.
To wash
1.
To clean 1. Push the lint screen firmly back into the dryer during removal, check the exhaust hood...
Use and Care Guide - Page 30
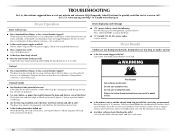
...; "E" Variable (E1, E2, E3) service codes: Call for small objects. Replace the fuse or reset the circuit breaker. Check with lint? Use a time-delay fuse.
■ Is the dryer door firmly closed?
■ Was the Start button firmly pressed? The drum may be cleaned before laundering.
■ Are the four legs installed, and is too hot ■...
Use and Care Guide - Page 31
... varnishing in a cycle. The new electric heating element may not be gone after the first cycle.
31 Check that can result in a closet? Fabric softener sheets added to do so can tumble freely. Loads are gone from the area, rewash and dry the clothing.
■ Is the dryer being dried.
The odor will not...
Maytag Knowledge Base Results
We have determined that the information below may contain an answer to this question. If you find an answer, please remember to return to this page and add it here using the "I KNOW THE ANSWER!" button above. It's that easy to earn points!-
Dryer does not heat - Electric dryer
... installed. Electric dryers use 2 household fuses or circuit breakers. Did you select an Air Fluff or Air Only temperature option? Gas dryer FAQs Knowledgebase search tips My dryer will not start Damp loads or long drying times - Dryer does not heat - Electric dryer My electric dryer does not heat. Did you recently install a power supply cord on the control knob or button with... -
Cycle is too short - Dryer
...load in the load as the wet load items pass over the sensor strips. My dryer will end early if using Automatic Dry or Sensor Dry cycles? Electric dryer Dryer does not heat - Dryers.... The dryer cycle is heating, check the following: Is the dryer level? Dryer does not heat - Small loads may not touch these sensor strips, so the cycle will not start Consider increasing... -
Loads are damp; dryer does not dry
...Start to your satisfaction. Check the following links for possible causes and solutions. The drying setting you may not be displayed for all Automatic Dry or Sensor Dry cycles are damp; Dryers... Dryness button for 5 seconds. The dryer will beep, and "CF" will be drying to save the drying setting. Damp loads or long drying time - Electronic controls with digital ...
Similar Questions

Maytag Bravos Dryer Start Button Won't Start
(Posted by jsgdmsi 9 years ago)

Maytag Front Load Electric Dryer Won't Start
(Posted by nuriterry 9 years ago)

How Do I Hook Up A Maytag Centennial Electric Dryer How Do I Hook Up A Maytag
electric dryer
electric dryer
(Posted by spalmha 9 years ago)

Maytag Electric Dryer Med9700sb0 Lights Come On But Dryer Wont Start
(Posted by rontal 9 years ago)

I Have A Maytag Front Loading Electric Dryer Model Med9600 Sq0. When I Attempt T
I have a Maytag front loading electric Dryer model MED9600 SQ0. When I attempt to start it by pressi...
I have a Maytag front loading electric Dryer model MED9600 SQ0. When I attempt to start it by pressi...
(Posted by wrzimmerly 10 years ago)