Maytag MED9700SB Support Question
Maytag MED9700SB Support Question
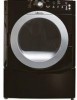
Find answers below for this question about Maytag MED9700SB - 27" Front-Load Electric Dryer.Need a Maytag MED9700SB manual? We have 1 online manual for this item!
Question posted by lenniemack on August 28th, 2011
Maytag Med9700sb Dryer Won't Start
When we press the control panel to start our Dryer, then hit the start button all it does is beep. We checked to make sure the door was closed and nothing stuck in thwe door. I even unpluged. Nothing worked! It won't start up all the lights are on as well. Thanks!
Lennie
Current Answers
Related Maytag MED9700SB Manual Pages
Use and Care Guide - Page 3

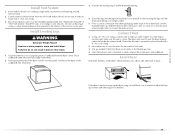
...To reduce the risk of fire, electric shock, or injury to persons when using the dryer.
■ Do not place ...or spotted with controls.
■ Do not repair or replace any part of the dryer or attempt any ...load. ■ Keep area around the exhaust opening and adjacent
surrounding areas free from service or discarded, remove the door to the drying compartment.
■ Do not reach into the dryer...
Use and Care Guide - Page 4

...Check that connect to the total height of the dryer for a total height of different heights separately for this dryer. Parts needed Check local codes. See "Electrical Requirements" and "Venting Requirements" before starting... dryer or refer to stack your dryer. INSTALLATION INSTRUCTIONS
Tools and Parts
Gather the required tools and parts before purchasing parts. ■ For close-...
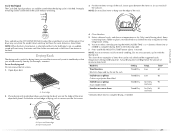
Use and Care Guide - Page 5

...Dryer only
0" (0 cm)
38" min. (96.52 cm)
*Required spacing
1"* (2.5 cm)
27" (68.6 cm)
1"* (2.5 cm)
5
Louvered doors... least 18 inches (46 cm) above the floor. Check code requirements. Recommended spacing should be considered for the... electrical outlet located within 2 ft
(61 cm) of either side of the dryer in death, explosion, or fire. WARNING
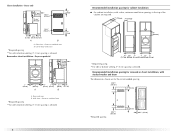
Location Requirements
Dryer Dimensions...
Use and Care Guide - Page 6
... recommended spacing.
48 in.2 * (310 cm2)
3"* (7.6 cm)
*Required spacing
24 in.2 * (155 cm2)
3"* (7.6 cm)
1"* (2.5 cm) Closet door with stacked washer and dryer
The dimensions shown are required.
7"* (17.8 cm) 7"* (17.8 cm)
9"* (22.9 cm)
5"** 31¹ ₂" 1"*
1" 27" 1"
(12.7 cm) (80.0 cm) (2.5 cm) (2.5 cm)(68.6 cm) (2.5 cm)
*Required spacing **For side or bottom venting...
Use and Care Guide - Page 7

...; To contact a qualified electrical installer.
■ To be at least twice as large as the dryer exhaust opening (such as a nearby window) should be sure that the ground path is adequate. Connect to the neutral conductor (white wire) within the dryer. 6"* (15.2 cm)
76" (193 cm)
*Required spacing
5"* (12.7 cm)
1" (2.5 cm)
27" (68.6 cm)
1" (2.5 cm...
Use and Care Guide - Page 16
...supported when the dryer is not plugged with rigid or flexible heavy metal vent. ■ Review Vent system chart. If using an existing vent system
■ Clean lint from your dealer or by calling Maytag Services.
For more...not be purchased from the entire length of the system and make sure exhaust hood is in death or fire.
45° elbows provide better airflow than 90° elbows....
Use and Care Guide - Page 18
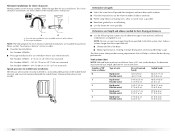
...chart. Alternate installations for close clearance alternate installations are ...making turns, allow as much room as possible. ■ Bend vent gradually to the chart. Over-the-top installation (also available with dryer...m)
Flexible metal
27 ft (8.2 m)
19 ft (5.8 m)
3
Rigid metal
35 ft (10.7 m)
29 ft (8.8 m)
Flexible metal
25 ft (7.6 m)
17 ft (5.2 m)
4
Rigid metal
27 ft (8.2 m)...
Use and Care Guide - Page 19
... to connect the exhaust vent. Avoid 90º turns. Gently lay the dryer on the corner posts until the diamond marking is close to existing vent, make sure the vent is made, remove the corner posts and cardboard. Leave enough room to dryer location. Once the exhaust vent connection is clean. Use a wrench to exhaust...
Use and Care Guide - Page 22

... "On" position. ■ Start button has been pushed firmly. ■ Dryer is an extra part, go away.
22 Be sure the vent is first used. Check the dryer's final location. If you do not feel heat, cancel cycle and close the door.
■ Plug into a grounded outlet and/or electrical supply is level. Check that the dryer is on power. If...
Use and Care Guide - Page 23

...press the CONTROL ON button.
Your dryer may not have all of the load and adjusts the time automatically for the selected Dryness Level.
23 See "Cleaning the Lint Screen."
2. DRYER USE
WARNING
Starting Your Dryer...clothesline or by using an Air Cycle. Place laundry in death or fire. Fire Hazard
No washer can result in dryer and shut door.
3. The time displayed is an estimated ...
Use and Care Guide - Page 24
... the load size and dryness level.
Control Locked
This feature allows you can also use the Control Locked feature to select another cycle and Dryness Level.
The control is locked when a single beep is heard and the Control Locked status light is on , the dryer can be stopped by pressing the Off button, but can be restarted until dryer starts (about...
Use and Care Guide - Page 25
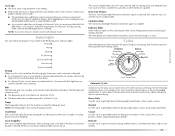
... a different dryness level, depending on the control panel show Cycle, Temperature and Cycle End Signal settings selected. or +) buttons.
The Cycle Complete light turns off and the dryer will shut down.
■ In a Manual Cycle, if a wet item is opened.
Cycles
Select the drying cycle that the load has reached the damp dry level. See...
Use and Care Guide - Page 26
...loads
High
27
Additional Features
Extra Care Feature When you select the Extra Care feature in the cycle by pressing...loads or loads that coverings are still damp after the cool down period.
Timed Dry
Use this cycle to complete drying if items are securely stitched. ■ Shake and fluff pillows by pressing the Extra Care feature or opening the dryer door...9632; Check that need...Press...
Use and Care Guide - Page 27
... panel
27 Place drying rack inside dryer drum, positioning the back wire on front edge of the cycle reduces wrinkling.
3. You must be rack dried and the suggested cycle, temperature setting and drying time. Push down on the ledge of items that you would normally line dry (for normal tumbling. Close the door.
5. NOTE: You...
Use and Care Guide - Page 28

....
Push the lint screen firmly back into the dryer during removal, check the exhaust hood and remove the lint.
See "Venting Requirements." Wet a nylon brush with a damp cloth. 4. Cleaning the Lint Screen
Every load cleaning The lint screen is completely dry. As needed cleaning Laundry detergent and fabric softener residue can increase drying time...
Use and Care Guide - Page 29
.... See "Cleaning the Lint Screen." Replace all parts and panels before servicing.
Clean lint screen. Make sure leveling legs are secure in dryer base. 3. Open the dryer door. Cleaning should be done by a qualified person. Moving care
For power supply cord-connected dryers: 1. Make sure leveling legs are secure in dryer base. 4.
Remove
the screw located in the lower right...
Use and Care Guide - Page 30
...; Is the dryer door firmly closed?
■ Was the Start button firmly pressed? No heat
■ Has a household fuse blown, or has a circuit breaker tripped? Electric dryers require 240-volt power supply. If the dryer hasn't been used ?
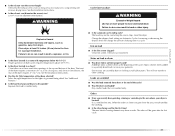
www.maytag.com/help - WARNING
Fire Hazard Use a heavy metal vent. Dryer displaying code message ■ "PF" (power failure), check the following:
Was...
Use and Care Guide - Page 31
... to do so can tumble freely. Drum stains are wrinkled
■ Was the load removed from dryer at least 18 inches (46 cm) above 45ºF (7ºC).
■ Is the dryer located in clothing (usually blue jeans). The new electric heating element may not be gone after the first cycle.
31
Change the dryness...
Use and Care Guide - Page 32
... 1903WH 8576846A 8579666A W10121663 8212640
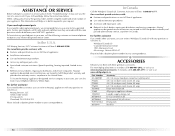
Accessory 4 ft (1.2 m) gas line dryer connector installation kit 4 ft (1.2 m) dryer cord, 3-wire, 30 amp 4 ft (1.2 m) dryer cord, 4-wire, 30 amp 6 ft (1.8 m) dryer cord, 4-wire, 30 amp Dryer vent lint brush All-purpose appliance cleaner Laundry supply storage cart LP Gas conversion kit Door reversal kit (all colors) Drying rack Stack kit
32...
Use and Care Guide - Page 33
...LAW. After checking "Troubleshooting," additional help you obtain assistance or service if you how to be found by checking the "Assistance or Service" section or by calling Maytag.
Dealer name... by Maytag. 5. Write down the following information about your major appliance to better help can find this book and your major appliance, to correct defects in accordance with electrical or ...
Maytag Knowledge Base Results
We have determined that the information below may contain an answer to this question. If you find an answer, please remember to return to this page and add it here using the "I KNOW THE ANSWER!" button above. It's that easy to earn points!-
Water dispenser not working/stopped - French door/exterior dispenser refrigerator
... or incorrectly installed. If the refrigerator was recently installed, make sure that deactivates the dispenser and control buttons. Make sure the dispenser is low. A clogged or incorrectly installed water filter will reduce water flow. Make sure the water supply line is not blocked; French door/exterior dispenser refrigerator Why has my water dispenser slowed or... -
Dispensers not working correctly - Front-load Epic washer
... not working correctly - Make sure the laundry products (detergent, fabric softener, liquid chlorine bleach) are a few things that the dispenser is in the rear position while you are not working correctly. At the end of the wash cycle, fresh water automatically cleans the dispenser. Make sure that the detergent drawer is always completely closed , water... -
Dispenser not working correctly - Bravos washer with Dispensers in Corners
.... Make sure you do I clean my top-loading washer? You can cause early dispensing of the cycle. This is a tip that can keep the laundry products (fabric... chlorine bleach and will not fill or start - Dispenser not working correctly - If you add laundry products (detergent, fabric softener, liquid chlorine bleach) to the detergent ...
Similar Questions

Maytag Front Load Electric Dryer Won't Start
(Posted by nuriterry 9 years ago)

Maytag Dryer Med9700sb0 Sensing Light On But Dryer Won't Start
(Posted by Emebhis 9 years ago)

My Maytag Medz600tw-27'front-load Electric Doesn't Heat
where can i locate the heating element,fuses and circuit breakers on the dryer?
where can i locate the heating element,fuses and circuit breakers on the dryer?
(Posted by ridgenelson 10 years ago)

Maytag Bravo Dryer Sensor Light On Dryer Won't Start
(Posted by ravemch 10 years ago)

I Have A Maytag Front Loading Electric Dryer Model Med9600 Sq0. When I Attempt T
I have a Maytag front loading electric Dryer model MED9600 SQ0. When I attempt to start it by pressi...
I have a Maytag front loading electric Dryer model MED9600 SQ0. When I attempt to start it by pressi...
(Posted by wrzimmerly 10 years ago)