Maytag MED9600SQ Support Question
Maytag MED9600SQ Support Question
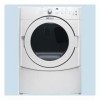
Find answers below for this question about Maytag MED9600SQ - Epic 7.0 cu. Ft. Electric Dryer.Need a Maytag MED9600SQ manual? We have 1 online manual for this item!
Question posted by jem on March 7th, 2012
Kenmore Med9600sqo (maytag)
How many heat elements in a Kenmore (Maytag) MED9600sqo? Mine is 3 yrs old and suddenly is drying slow. We can find no lint buildup.
Current Answers
Related Maytag MED9600SQ Manual Pages
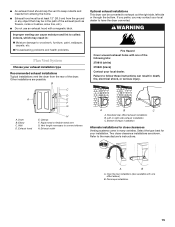
Use and Care Guide - Page 3
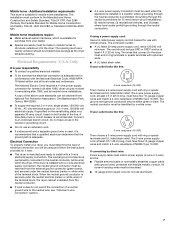
...risk of fire, electric shock, or injury ...dryer.
s Do not allow children to the weather.
s Do not use heat to catch fire.
s See installation instructions for grounding requirements. Items contaminated with cooking oils may contribute to a chemical reaction that you to potential hazards that could cause a load to dry...explode. s Clean lint screen before using the dryer, follow the ...
Use and Care Guide - Page 4
... a pedestal. For a garage installation, you will add to the "Assistance or Service" section of this dryer. Check existing electrical supply and venting. To order, call the dealer from whom you purchased your dryer or refer to the "Assistance or Service" section of purchasing a pedestal separately for a total height of this manual. s Flat-blade...
Use and Care Guide - Page 5
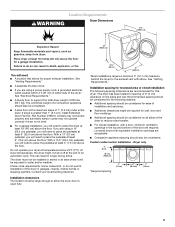
...dimensions are using a power supply cord, a grounded electrical outlet located within 2 ft (61 cm) of either side of 1" (2.5 cm) under entire dryer.
s A sturdy floor to place the pedestal at...longer drying times. See "Venting Requirements." Dryer only
0" (0 cm)
38" min. (96.52 cm)
*Required spacing
1"* (2.5 cm)
27" (68.6 cm)
1"* (2.5 cm)
5 Location Requirements
WARNING
Dryer ...
Use and Care Guide - Page 6

...cm)
*Required spacing
1" (2.5 cm)
27" (68.6 cm)
1" (2.5 cm)
6 Closet door with stacked washer and dryer
The dimensions shown are required.
7"* (17.8 cm) 7"* (17.8 cm)
9"* (22.9 cm)
5"** 31¹ ...Required spacing **For side or bottom venting, 0" (0 cm) spacing is allowed. closet or confined area B.
Dryer on pedestal
14" max.* (35.6 cm)
18" min.* (45.72 cm)
1" (2.5 cm)
27"...
Use and Care Guide - Page 7
... and all local codes and ordinances. If your dryer, you must end in the neutral or grounding circuit. The National Electric Code requires a 4-wire power supply connection for ...Park, Quincy, MA 02269. The 3-wire power supply cord, at least 4 ft (1.22 m) long, must be insulated. s This dryer is adequate.
If using and follow the instructions provided for mobile home installations. ...
Use and Care Guide - Page 8
... in accordance with all local codes.
s At least 5 ft (1.52 m) long. WARNING: Improper connection of this manual. s This dryer is equipped with a qualified electrician or service representative or personnel if you use an extension cord. The cord is your responsibility s To contact a qualified electrical installer. In the event of malfunction or breakdown, grounding...
Use and Care Guide - Page 9
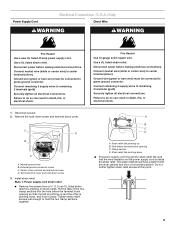
... should have a tight fit with the dryer cabinet and be connected to do so can result in death, fire, or electrical shock. Only
Direct Wire
WARNING
WARNING
Fire...or center wire) to center terminal (silver).
Disconnect power before making electrical connections.
Securely tighten all electrical connections. Tighten strain relief screws just enough to green ground connector....
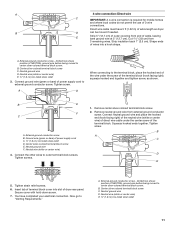
Use and Care Guide - Page 10
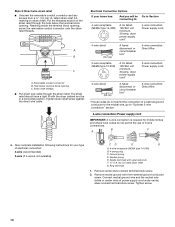
...Ground prong D. Remove center silver-colored terminal block screw.
2. Removable conduit connector B.
Electrical Connection Options
If your type of power supply cord under center, silver-colored terminal ... ground conductor screw. Hole below the terminal block opening C.
Spade terminals with the dryer cabinet and be connecting to:
Go to "Optional 3-wire connection" section.
4-wire...
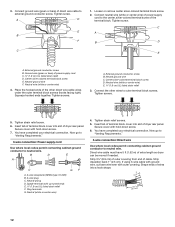
Use and Care Guide - Page 11
...must have completed your electrical connection. Dotted line ....
7. Now go to external ground conductor screw. Dotted line shows position of extra length so dryer
B
D
can be moved if needed. A
4-wire connection: Direct wire
C
IMPORTANT: A... Insert tab of terminal block cover into a hook shape. You have 5 ft (1.52 m) of NEUTRAL ground wire before being moved to the terminal block,...
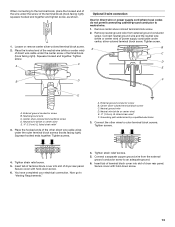
Use and Care Guide - Page 12
...electrical connection. Shape ends of power supply cord C. ¾" (1.9 cm) UL listed strain relief D. A
D
E B
F
C
1. Spade terminals with outer covering. You have 5 ft (1.52 m) of extra length so dryer...Insert tab of terminal block cover into a hook shape.
1
12 You have completed your electrical connection. Neutral wire (white or center wire) E 1.9 cm) UL listed strain relief...
Use and Care Guide - Page 13
... go to outer terminal block screws.
External ground conductor screw B. You have completed your electrical connection. When connecting to the terminal block, place the hooked end of the wire under...terminal block screw.
2. Tighten screw. Insert tab of terminal block cover into slot of dryer rear panel. Neutral ground wire C. Secure cover with hold -down screw.
6. Center ...
Use and Care Guide - Page 14
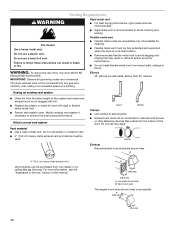
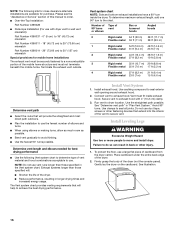
... (10.2 cm) 4" (10.2 cm) A. Venting Requirements
WARNING
Rigid metal vent
s For best drying performance, rigid metal vents are shown here. s Flexible metal vents are acceptable only if accessible for cleaning.... vent.
The dryer exhaust must not be connected into the interior of the duct. If using an existing vent system
s Clean lint from your dealer or by calling Maytag Services. s Replace...
Use and Care Guide - Page 15
... vent G.
Refer to woodwork, furniture, paint, wallpaper, carpets, etc.
Elbow C.
Improper venting can cause moisture and lint to collect indoors, which may be converted to have the dryer converted. Left or right side exhaust installation C. Dryer B. WARNING
Fire Hazard Cover unused exhaust holes with one offset elbow)
B. Two close clearances
Venting systems come...
Use and Care Guide - Page 16
...ft (9.4 m) 23 ft (7 m)
2
Rigid metal
44 ft (13.4 m) 38 ft (11.6 m)
Flexible metal 27 ft (8.2 m) 19 ft (5.8 m)
3
Rigid metal
35 ft (10.7 m) 29 ft (8.8 m)
Flexible metal 25 ft (7.6 m) 17 ft (5.2 m)
4
Rigid metal
27 ft (8.2 m) 21 ft (6.4 m)
Flexible metal 23 ft (7 m)
15 ft (4.6 m)
Determine vent path
s Select the route that will help to achieve the best drying... of the dryer.
2. s...
Use and Care Guide - Page 17

...post from the outer door assembly, move it is close to adjust the legs up . Stand the dryer up or down and check again for levelness. Remove the last screw from a right-side opening ... (second from the inner door assembly (see illustration).
Lift the inner door assembly off of the dryer. Lift and pull forward on the corner posts until the diamond marking is secured to the door. ...
Use and Care Guide - Page 18
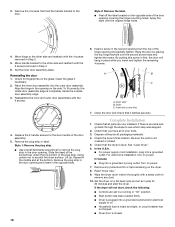
... screws removed in a running or "On" position. s Dryer is plugged into the outer door assembly. Replace the 2 handle screws for fingerprints on a full heat cycle (not an air cycle) for
20 minutes and start...the inner door assembly into a grounded outlet and/or electrical
supply is completely inside door assembly edge is on the dryer. 8. Close the door and check that hold the handle...
Use and Care Guide - Page 19
...Lint Screen."
2.
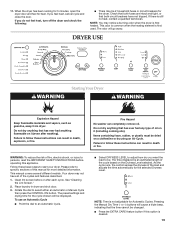
This odor is common when the heating element is still no heat, contact a qualified technician. Items containing foam, rubber, or plastic must be . Pressing the Manual Dry Time (- If there is first used. Failure to follow these basic steps to an Automatic Cycle. Your dryer....
Place laundry in dryer and shut door.
3. The time displayed is first heated. NOTE:...
Use and Care Guide - Page 20
... is on your load. Cool Down tumbles the load without heat during dryer operation. s If desired, add a fabric softener sheet. This could cause overdrying of all cycles. or +) buttons.
How Automatic Cycle Work
This feature improves drying performance with lighter fabrics.
s Press TEMP until dryer starts.
The control is locked when a single beep is...
Use and Care Guide - Page 27

...Canada.
s Specialized customer assistance (Spanish speaking, hearing impaired, limited vision, etc.).
Maytag designated service technicians are trained to your appliance. Factory specified parts will help , ...and provide afterwarranty service, anywhere in your nearest designated service center. Maytag designated service technicians are trained to order replacement parts, we recommend...
Use and Care Guide - Page 28
... Canada, call 1-800-688-9900. Service must provide proof of products not approved by Maytag.
5. Those consumable parts are excluded from accident, alteration, misuse, abuse, fire, flood, acts of God, improper installation, installation not in accordance with electrical or plumbing codes, or use of purchase or installation date for other than normal...
Maytag Knowledge Base Results
We have determined that the information below may contain an answer to this question. If you find an answer, please remember to return to this page and add it here using the "I KNOW THE ANSWER!" button above. It's that easy to earn points!-
Long drying times on the Bulky cycle - Electric dryer
.... Long drying times on the Bulky cycle - Thick comforters with digital display Pillows. Electric dryer Why does the Bulky cycle take a long time to dry thick...drying all your loads, see: Poor drying performance - If you put in fabrics that are : Quilted winter jackets that do well in a Normal cycle. To provide even drying, the cycle uses a medium heat and extended drying... -
My dryer or load has an odor
... dry the load. To avoid this, do not run the dryer while painting, varnishing or refinishing near the dryer. My dryer makes sounds or vibrations Fabric is on the load because the dryer pulls in the washer or dryer? Was a damp or wet load left in the washer or dryer for the first time? (Electric dryers) A new electric heating element... -
Dryer does not heat - Gas dryer
... dryer. Dryer does not heat - Gas dryer My gas dryer does not . Open the gas shutoff valve in the supply line. The valve is open when the handle is closed. Electric dryer The Air Fluff or Air Only temperature does not add to the gas pipe. See the Installation Instructions for details. - Expect loads dried...
Similar Questions

Can I Replace The 3 Wire Cord With A 4 Wire Cord On My Maytag Electric Dryer
(Posted by secondtononeconcrete 10 years ago)

Maytag Centennial Electric Dryer Wont Heat
(Posted by delllman1cvz 10 years ago)

I Have A Maytag Front Loading Electric Dryer Model Med9600 Sq0. When I Attempt T
I have a Maytag front loading electric Dryer model MED9600 SQ0. When I attempt to start it by pressi...
I have a Maytag front loading electric Dryer model MED9600 SQ0. When I attempt to start it by pressi...
(Posted by wrzimmerly 10 years ago)

Matching Stacking Kit
Matching stacking kit Maytag/MED9600SQ-epic-70-cu-ft-electric-dryer/21808 with regards, Vinesh
Matching stacking kit Maytag/MED9600SQ-epic-70-cu-ft-electric-dryer/21808 with regards, Vinesh
(Posted by vineshjosep 11 years ago)

Maytag Electric Dryer 2400ayw Heating Element
does my dryer need a new heating element/ repairman say its ony heating to 75 percent and it will co...
does my dryer need a new heating element/ repairman say its ony heating to 75 percent and it will co...
(Posted by mbolante 13 years ago)