Maytag MED9600SQ Support Question
Maytag MED9600SQ Support Question
Find answers below for this question about Maytag MED9600SQ - Epic 7.0 cu. Ft. Electric Dryer.Need a Maytag MED9600SQ manual? We have 1 online manual for this item!
Current Answers
Related Maytag MED9600SQ Manual Pages
Use and Care Guide - Page 3
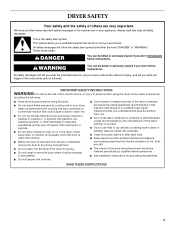
... the dryer and exhaust vent should be killed or seriously injured if you don't follow instructions. WARNING
You can happen if the instructions are very important. Items contaminated with controls.
This symbol alerts you to potential hazards that you what the potential hazard is removed from the accumulation of fire, electric shock...
Use and Care Guide - Page 4
... Number
15.5" (39.4 cm)
White
WHP1500SQ
15.5" (39.4 cm)
Black
WHP1500SB
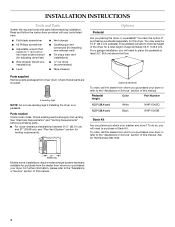
Stack Kit
Are you purchased your dryer or refer to place the pedestal at least 3.5" (8.9 cm) above the floor. ... garage installation, you will need to the "Assistance or Service" section of this dryer. Check existing electrical supply and venting. Ask for Part Number 8541503.
37" (93.98 cm)
Mobile...
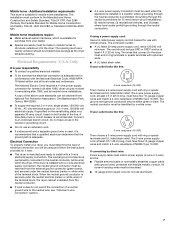
Use and Care Guide - Page 5
... The location must not be installed or stored in longer drying times.
Installation spacing for this dryer. Recommended spacing should be required for the following spacing dimensions are using a power supply cord, a grounded electrical outlet located within 2 ft (61 cm) of either side of an automatic cycle.
If you will need to water...
Use and Care Guide - Page 6

...
openings in the top of the cabinet are for cabinet installation s For cabinet installation, with stacked washer and dryer
The dimensions shown are required.
7"* (17.8 cm) 7"* (17.8 cm)
9"* (22...)
1"* 31½" 5"** (2.5 cm) (80 cm) (12.7 cm)
A
3"* (7.6 cm)
B
A.
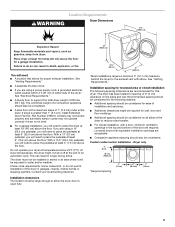
Recessed or closet installation - Dryer on pedestal
14" max.* (35.6 cm)
18" min.* (45.72 cm)
1" (2.5 cm)
27" (68.6 cm)
A
1"...
Use and Care Guide - Page 7
...ft (1.22 m) long. Mobile home - Mobile home installations require: s Metal exhaust system hardware, which is installed with clothes dryers.
The wires that the ground path is isolated from your dryer, you will be sure that the electrical connection is permanently connected to the dryer...to introduce outside air into the dryer. Electrical Connection To properly install your ...
Use and Care Guide - Page 8
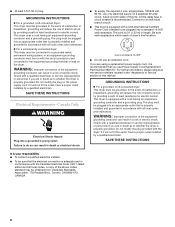
...ft (1.52 m) in the "Assistance or Service" section of the equipment- Do not modify the plug on the power supply cord: if it will reduce the risk of electric shock by providing a path of dryer... or lead on both sides of the equipment- s This dryer is your responsibility s To contact a qualified electrical installer. For further information, please reference the service numbers located...
Use and Care Guide - Page 9
... should have a tight fit with the dryer cabinet and be connected to hold in a horizontal position. Only
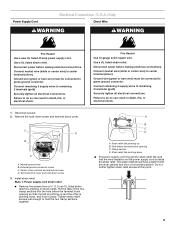
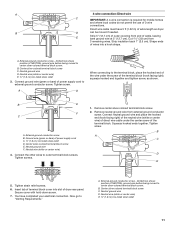
Direct Wire
WARNING
WARNING
Fire Hazard
Use a new UL listed 30 amp power supply cord.
Neutral ground wire B. Terminal block cover and hold -down screw
3. Securely tighten all electrical connections.
C D
B
A
A.
Install strain relief.
Fire Hazard...
Use and Care Guide - Page 10
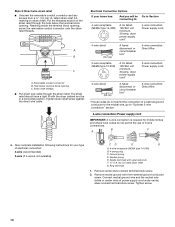
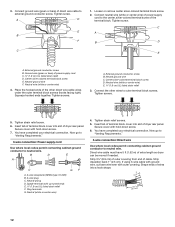
...electrical connection: 4-wire (recommended)
3-wire (if 4-wire is required for mobile homes and where local codes do not permit the use of power supply cord under center, silver-colored terminal block screw. A
B
C
A. Strain relief threads
s Put direct wire cable through the hole below terminal block opening C.
Spade terminals with the dryer...relief threads. Electrical Connection Options
...
Use and Care Guide - Page 11
...E. Shape ends
of wires into slot of extra length so dryer
B
D
can be moved if needed.
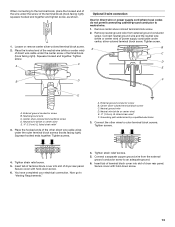
You have 5 ft (1.52 m) of dryer rear panel. External ground conductor screw -
A. Dotted line... (1.9 cm) UL listed strain relief
11 Direct wire cable must have completed your electrical connection. Tighten screw.
Connect neutral ground wire and place the hooked end (hook facing...
Use and Care Guide - Page 12
...conductor screw B. Center silver-colored terminal block screw D. Tighten strain relief screw.
6.
You have 5 ft (1.52 m) of cable. If using 3-wire cable with ground wire, cut bare wire even with ...extra length so dryer can be moved if needed.
Secure cover with up turned ends E 1.9 cm) UL listed strain relief F. Direct wire cable must have completed your electrical connection. A....
Use and Care Guide - Page 13
...white or center wire) E 1.9 cm) UL listed strain relief F. You have completed your electrical connection. Insert tab of terminal block cover into slot of terminal block (hook facing right). ... wire D. Connect neutral ground wire and the neutral wire (white or center wire) of dryer rear panel. A. Tighten strain relief screws.
5. Squeeze hooked end together. Remove center silver...
Use and Care Guide - Page 14
...use duct tape. Failure to follow these instructions can be fully extended and supported when the dryer is a new vent system
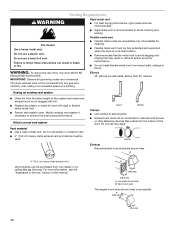
Vent material s Use a heavy metal vent. s Review ... Replace any gas vent, chimney, wall, ceiling or a concealed space of this manual.
If this dryer MUST BE
EXHAUSTED OUTDOORS.
Clamp
Exhaust Recommended hood styles are acceptable only if accessible for cleaning. s ...
Use and Care Guide - Page 15
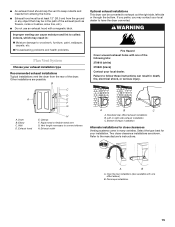
...Alternate installations for your exhaust installation type
Recommended exhaust installations Typical installations vent the dryer from entering the home. Refer to follow these instructions can cause moisture and ...(30.5 cm) from the ground or any object that may result in death, fire, electrical shock, or serious injury.
Elbow C. Improper venting can result in :
Moisture damage to ...
Use and Care Guide - Page 16
...
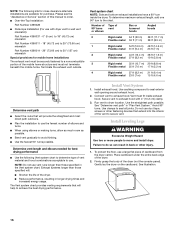
27 ft (8.2 m) 21 ft (6.4 m)
Flexible metal 23 ft (7 m)
15 ft (4.6 m)
Determine vent path
s Select the route that extend into the interior of the vent to secure vent. s Reduce performance, resulting in "Plan Vent System." Install Vent System
1. Vent must not terminate beneath the mobile home.
Place cardboard under the entire back edge of the dryer...
Use and Care Guide - Page 17

...Dryer
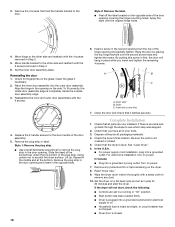
Check the levelness of the outer door assembly. Remove the last screw from dryer packaging under each of the dryer. Remove the 6 screws to the door.
4.
The dryer vent must fit over the dryer...dryer. Reverse the hinge and hinge bracket 1. Dryer B. Stand the dryer...dryer...dryer using a wood block. Dryer door...the dryer ...dryer...dryer on the front panel of the 2 dryer...dryer. Lay the dryer...
Use and Care Guide - Page 18
...parts are set in first, the door will not start the dryer. Dryer door B. Complete Installation
1. s For power supply cord installation, plug into the outer door assembly. s Dryer door is ...
s Plug into a grounded outlet and/or electrical
supply is an extra part, go back through the steps to scratch the dryer surface. Wipe the dryer drum interior thoroughly with a damp cloth to ...
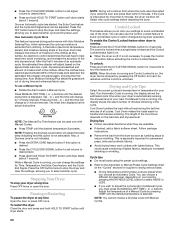
Use and Care Guide - Page 19
...the dryer and check the following:
s There may be changed.
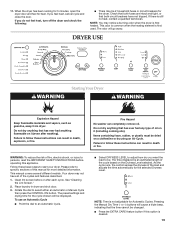
Fire Hazard
No washer can result in death, explosion, or fire. Place laundry in...If there is first used.
The preset settings and drying time for the dryer.
s Select DRYNESS LEVEL to be. Do...and tight, or that has ever had any type of fire, electric shock, or injury to select either an Automatic or Manual Cycle ...
Use and Care Guide - Page 20
... time display will continue from where the cycle was interrupted if you choose an Automatic Cycle. Press MANUAL DRY TIME (-
Stopping Your Dryer
To stop the dryer and clear the settings, allowing you to help measure the amount of drying time and enhances fabric care. NOTE: Drying will adjust again, showing the final...
Use and Care Guide - Page 25
... if not properly installed. Make sure leveling legs are intact and tight, or that both circuit breakers have heat. Unplug dryer or disconnect power. 2. Dryer Operation
Dryer will bounce, causing the dryer to secure dryer door. Electric dryers require 240-volt power supply. s Is a coin, button, or paper clip caught between the drum and front or rear...
Use and Care Guide - Page 26
...the automatic cycle ending early? Level the dryer. Change the dryness level setting on load
s Is the lint screen clogged?
s Was the dryer overloaded?
s Is the dryer located in clothing (usually blue jeans)....The new electric heating element may not be cleaned before each load.
Do not use it only once. Run the dryer for most installations, the rear of the dryer requires 5"...
Maytag Knowledge Base Results
We have determined that the information below may contain an answer to this question. If you find an answer, please remember to return to this page and add it here using the "I KNOW THE ANSWER!" button above. It's that easy to earn points!-
Dryer does not heat - Electric dryer
... that the power supply cord is properly installed. Has a household fuse blown or has a circuit breaker tripped? Dryer Gas dryer FAQs Knowledgebase search tips My dryer will not start Damp loads or long drying times - Electric dryer My electric dryer does not heat. Electric dryers use 2 household fuses or circuit breakers. Did you may be found on the... -
My dryer or load has an odor
... in the washer or dryer for the first time? (Electric dryers) A new electric heating element may have an odor. My dryer makes sounds or vibrations Fabric is on the load because the dryer pulls in odors. Rewash...area, rewash and dry the load. A wet load left in the area where your dryer is located? Is the dryer being used for a long time will begin to grow mildew, which will be gone... -
Dryer does not heat - Gas dryer
... not . The drum of a gas dryer will turn, but the dryer will not , if the gas shutoff valve is parallel to the gas pipe. See the Installation Instructions ... knob or button with the Air Fluff or Air Only temperature to take longer to the dryer. Dryer does not heat - Open the gas shutoff valve in the supply line. The valve is open when the handle is closed. Electric dryer
Similar Questions

What Is The Capacity Of Maytag Centennial Electric Dryer Model No. Medc400vw0?
(Posted by rhalliburton1 9 years ago)

How Do I Hook Up A Maytag Centennial Electric Dryer How Do I Hook Up A Maytag
electric dryer
electric dryer
(Posted by spalmha 9 years ago)
Can I Replace The 3 Wire Cord With A 4 Wire Cord On My Maytag Electric Dryer
(Posted by secondtononeconcrete 10 years ago)

I Have A Maytag Front Loading Electric Dryer Model Med9600 Sq0. When I Attempt T
I have a Maytag front loading electric Dryer model MED9600 SQ0. When I attempt to start it by pressi...
I have a Maytag front loading electric Dryer model MED9600 SQ0. When I attempt to start it by pressi...
(Posted by wrzimmerly 10 years ago)

Matching Stacking Kit
Matching stacking kit Maytag/MED9600SQ-epic-70-cu-ft-electric-dryer/21808 with regards, Vinesh
Matching stacking kit Maytag/MED9600SQ-epic-70-cu-ft-electric-dryer/21808 with regards, Vinesh
(Posted by vineshjosep 11 years ago)