Maytag MED6600TQ Support Question
Maytag MED6600TQ Support Question
Find answers below for this question about Maytag MED6600TQ - 27 Inch Electric Washer.Need a Maytag MED6600TQ manual? We have 1 online manual for this item!
Question posted by destinydelgado on December 6th, 2012
Cubic Ft
Can you tell me what the cubic feet for a maytag bravo dryer model MED6600TQ0 and for the maytag bravo washer model MTW6700TQ1
Current Answers
Related Maytag MED6600TQ Manual Pages
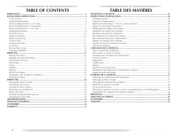
Use and Care Guide - Page 2
...¢
Cycles ...
24
Modifiers ...
25
Options ...
26
End of Cycle Signal ...26
Changing Cycles, Modifiers and Options 27
Drying Rack Option ...27
DRYER CARE...
28
Cleaning the Dryer Location 28
Cleaning the I.int Screen ...28
Cleaning the Dryer Interior 29
Removing Accumulated I 'ampoule d'6clairage du tambour 58
DI_PANNAGE ...
59
ASSISTANCE OU SERVICE...62
ACCESSOI RES...
Use and Care Guide - Page 3
..._i!__i!__ii__i_i_i_i_i_i_i_i_i_i_i_i_i_i_i_i_i_i_i_i_i_i_i_i_i_i_i_i_i_i_i_i_i_i_i_i_!ii_i_i_i_i_i_i_i_i_i_i_i_i_i_i_i_i_i_
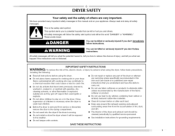
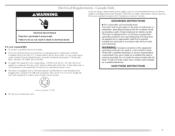
DRYER SAFETY
Your safety and the safety of injury, and tell you what the potential hazard is, tell you how to ... The interior of fire, electric shock, or injury to persons when using the dryer.
[] Do not place items exposed to play on your dryer. These words mean:
You...
Use and Care Guide - Page 4
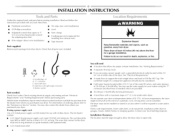
... be at least 18 inches (46 cm) above the floor for purchase from the dealer from dryer. Check code requirements. ...dryer door to 1" (2.5 cm) or hex-head socket wrench (for adjusting dryer feet)
• Wire stripper (direct wire installations/
• Vent clamps • Caulking gun and compound (for your washer using a power supply cord, a grounded electrical outlet located within 4 ft...
Use and Care Guide - Page 5
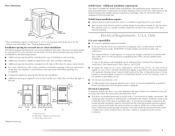
.... 2.
(315cm- 2"i _"
__ 3 I'*
(7.c6m)
24 in2.*
r' _1 b_ 29"_ I_1" -_lv'*l< 25,_"_5-"I
(2.5cm) (73.c7rn) (2.5crn) (2.5crn)(74.o3re)(12.c7rn)
A
B
C
* Required spacing
A. Electrical Connection
[b properly install your dryer, you must lye made in remodeling after 1996, and all local codes and ordinances. Mobile home installations
require:
• Metal exhaust system hardware...
Use and Care Guide - Page 6

... dryer must be connected to a grounded metal,
permanent wiring system, or an equipment-grounding conductor must have a proper outlet
installed by a white cover.
The 4-wire power supply cord, at least 4 ft (1.22 m) long. terminal or lead on the power
supply cord: if it will reduce the risk of electric shock by direct wire...
Use and Care Guide - Page 7
... equipped with the dryer: if it is recommended that the electrical connection is properly grounded.
WARNING: Improper connection of least resistance for electric current. .... _
•_
51
Electrical Shock Hazard
Plug into a standard 14-30R wall receptacle.
A time-delay fuse or circuit breaker is 5 ft (1.52 m) in length.
In the event of malfunction or breakdown, grounding...
Use and Care Guide - Page 8

...)ck cover
B. Ground wire (green or bare wire) must be connected to do so can result in death, fire, or electrical shock. 1. Failure to green ground connector.
Disconnect power before making electrical connections. Connect remaining 2 supply wires to center terminal (silver). Cc'nte¢; silver-colore'd terminal block scre'w
D. Power Supply Cord...
Use and Care Guide - Page 9
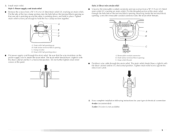
... screws from a 3/4" (1.9 cm) U].
Strain rt'lief tab pointing up and the other is not available
instructions for your type of electrical connection:
....
9 The strain relief should have a tight fit with the dryer cabinet and be in a horizontal position. marking on the power supply cord is inside the terminal block opening so that...
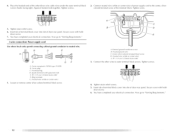
Use and Care Guide - Page 10

...ground conductor
CD
E
G
A. 4-wire receptacle" (NEMiA type 14-30R) B. 4-prong plug C. Tighten screw. Electrical Connection Options If your home has:
4-wire receptacle (NEMA type 14-30R)
__._._ 4-wire direct
(12.7 ... £xternal glound conductor scren,v B. listed, 120/240-volt minimum, 30-amp, dryer power supply cord*
3-wire connection: Power Supply Cord
A fused disconnect or circuit breaker...
Use and Care Guide - Page 11
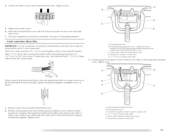
... block screw L Neutral wire (white or center wire) Tighten strain relief screws. 6. You have 5 ft (1.52 m) of wires into slot of power supply cord D. ¾" ( 1.9 cm) UL listed...your electrical connection. Remove center silver-colored terminal block screw.
2. down screw,
7. A. 4. Connetchteothewr irestooutetrerminablockscrewTs.ightesncrews.
!! !!
5. Shape ends of extra length so dryer ...
Use and Care Guide - Page 12
...!! !!
2. Tighten screw.
5. down screw. 6. Neutral prong D. You have completed your electrical connection. Squeeze hooked ends together. Connect neutral wire (white or center wire) of power supply...terminal [)lock screws. You have completed your electrical connection. Insert tab of terminal block cover into slot of dryer rear paneh Secure cover with hold -
4. ...
Use and Care Guide - Page 13
...g,round conductor screw B. Direct wire cable must have completed your electrical connection. Shape ends of dryer rear paneh Secure cover with outer covering.
Tighten screw.
1, koosen...together. Strip insulation back 1" (2.5 cm). Tighten strain relief screw. 5. block
4. You have 5 ft (1.52 rn) of power supply cord/_ able under center, silver-colored terminal block screw. down screw...
Use and Care Guide - Page 16
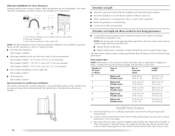
... metal
27 ft (8.2 m)
...
3
Rigid metal
35 ft (10.7 m)
Flexible metal
25 ft 17.6 m)
...
4
Rigid metal
27 ft (8.2 m)
Flexible metal
23 ft (7 m)
58 ft (17.7 m) 28 ft/8.5 m)
48 ft (14.6 m) 23 ft 17 m)
38 ft (11.6 m) I9 ft 15.8 m)
29 ft (8.8 m) 17 ft/5.2 m)
21 ft (6.4 m) 15 ft (4.6 m)
1. Alternate installations for close - Select the type best for your installation. Refer to dryer...
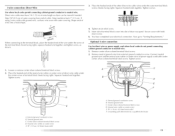
Use and Care Guide - Page 17
...to do so can be connected to "Y" connector.
7. Remove old rubber washer from dryer packaging under the entire back edge of the 2 dryer back corners. Screw on coupling
by hand until it is secured to its ...final location. Move dryer into the leg holes by hand until it is close to exhaust hood with Step 3.
3. Do not crush or kink vent.
3. (On gas models) Check that the ...
Use and Care Guide - Page 20

...dryer's heater from turning on the dryer.
Remove any dust. 12. If you have a protective film on power. See "Troubleshooting."
NOTE: Glass door models have all packaging materials. 4. Read "Dryer ...8226; Plug into an outlet and/or electrical supply is on.
• Household fuse is intact and tight, or circuit breaker has not tripped.
• Dryer door is closed.
[his odor is...
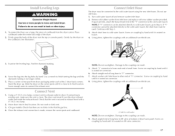
Use and Care Guide - Page 21
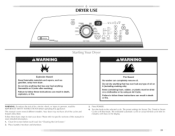
... laundry into dryer and shut door.
3. The estimated (automatic cycle) or actual (timed) cycle time {in death or tire. Do not dry anything flammable on it (even after washing).
Failure to specific sections of fire, electric shock, or injury to the selected cycle. [-he preset settings for more detailed information.
1.
Fire Hazard
No washer...
Use and Care Guide - Page 23
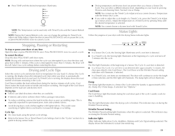
... the Wrinkle Prevent setting. The length of your is running , number of the cycle, laundry cools for ease in handling. Cycle tips • Dry most loads using the [)reset cycle...not detected after approximately 5 minutes, the
dryer goes directly into the cycle. Wet The Wet light illuminates at the beginning of all cycles.
the laundry
is selected. [his indicator
stays
Indicator lights...
Use and Care Guide - Page 28

...on a clothesline setting.
Temp. Place dryer at least 18 inches (46 era) above the floor for a garage installation. IMPORTANT: • Do not run the dryer with your fingers.
Rack Dry
Wool ... Dry
*(Minutes) Reset time to remove lint.
Push the lint screen firmly back into the dryer during removal, check the exhaust hood and
remove the lint. A screen blocked by using the...
Use and Care Guide - Page 30

... when you open the door. Plug in the lower right corner of the dryer. Disconnect separately. Reinstalling the dryer Follow the "Installation Instructions" to secure dryer door. Remove
the screw located in dryer or reconnect power. For direct-wired dryers:
Electrical Shock Hazard Disconnect power before operating. Replace all parts and panels before servicing. Disconnect wiring...
Use and Care Guide - Page 34

...ft (1.2 m) dryer cord, 3-wire, 30 amp 4 ft (1.2 m) dryer cord, 4-wire, 30 amp 6 ft (1.8 m) dryer cord, 4-wire, 30 amp Dryer vent lint brush All-purpose appliance cleaner Laundry supply storage cart LP Gas conversion kit
W10071550A W10044609A
Drying rack Steam hose kit
34 When calling, please know the purchase date and the complete model...check 'qroubleshooting."
Call Maytag Services, I .C ATTN...
Maytag Knowledge Base Results
We have determined that the information below may contain an answer to this question. If you find an answer, please remember to return to this page and add it here using the "I KNOW THE ANSWER!" button above. It's that easy to earn points!-
Water supply hookup - Top freezer
...) saddle-type shutoff valve, a union, and copper tubing. This will remain above freezing. Add 7 ft (2.1 m) to 3.18 cm) vertical cold-water pipe near the refrigerator. E. Pipe clamp &...refrigerator or reconnect the power. Slowly and evenly tighten the pipe clamp screws so the washer makes a watertight seal. Read all directions before installing the water connection, turn On ... -
Can I change the door-swing direction? - Front-load washer
... the door-swing direction? - Can I change the door-swing direction on my front-load washer? No. The washer door is not reversible. However, the dryer door can be reversed. See the Dryer Installation Instructions for details. Dryer Moving your dryer model number in the search tool below to find them online. Front-load... -
Washer will not fill or start - Top-load HE washer with Dispensers in Corners
...and load size to start . Check electrical source or call an electrician. NOTE: Both hot and cold water must be tightly packed. Remove any clothes in your Bravos Why is wet, there may notice during... up with only one inch. The washer may not start the washer, and let it , if necessary. If the problem continues to be as visible as it was in the washer, select the Rapid...
Similar Questions

How Many Cubic Feet Is The Tub In This Front Load Washer
(Posted by mggrev 1 year ago)

How Many Cubic Feet Does This Model Have For Washing?
How many cubic feet does Maytag model # MVWC400VW1 have for washing?
How many cubic feet does Maytag model # MVWC400VW1 have for washing?
(Posted by annkantor 5 years ago)

Cu Ft For My Maytag Washer,model# Mhwe450ww02 Front Load Washer
Hi, I want to know cu ft for my Maytag washer,Model# mhwe450ww02 front load washer
Hi, I want to know cu ft for my Maytag washer,Model# mhwe450ww02 front load washer
(Posted by rashmi3462 8 years ago)

How Many Cubic Feet Is The Maytag Centennial Washer Model Mvwc300vw1
(Posted by ticalek 10 years ago)
