
LiftMaster 8355 Support Question
LiftMaster 8355 Support Question
Find answers below for this question about LiftMaster 8355.Need a LiftMaster 8355 manual? We have 1 online manual for this item!
Question posted by rich8944 on May 9th, 2015
Programing 'homelink' In My 2005 Lexus Rx 330
I have been unable to program the HomeLink in my 2005 Lexus RX 330 with the Liftmaster 8355-267 in my new home. Do you have any advice on how to do this?
Current Answers
Related LiftMaster 8355 Manual Pages
8355 Manual - Page 1
... . . . . . 32 Maintenance 32 Troubleshooting 33-34 Accessories 35 Warranty 36 Repair Parts 37-38
www.liftmaster.com The Chamberlain Group, Inc.
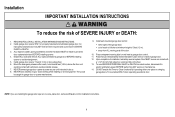
845 Larch Avenue Elmhurst, Illinois 60126-1196 Date of your garage door opener. ■ This garage door opener is ONLY compatible with MyQ® and Security✚ 2.0™
accessories. ■ ONLY enable the Timer-to ensure...
8355 Manual - Page 2
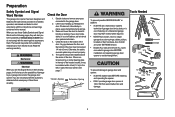
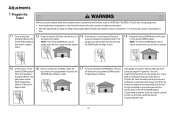
...ropes connected to garage door BEFORE installation and operating garage door opener to avoid entanglement.
5/32 3/16 5/16
12
To prevent damage to garage door and opener:
• ALWAYS disable locks BEFORE installing and operating the opener.
• ONLY operate garage door opener at 120 V, 60 Hz to the left or right of the door. If your garage door and/or the garage door opener if you...
8355 Manual - Page 3
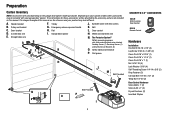
... reversing sensors with hex screws K. The instructions for reference and your garage door opener. Header bracket B.
Depending on the garage door opener model purchased. Door bracket D. Trolley G. White and red/white wire
N. Rail I
SECURITY✚ 2.0TM ACCESSORIES
882LM Multi-Function Door Control
893LM Remote Control
Hardware
Installation Hex Bolt 5/16"-18 x 7/8" (4) Lag...
8355 Manual - Page 4
... the top
of the garage door opener.
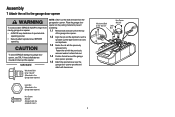
1.2 Align the rail and the styrofoam over the
garage door opener sprocket and attach with the previously
removed bolts. Assembly
1 Attach the rail to the garage door opener
To avoid possible SERIOUS INJURY to finger from moving garage door opener: • ALWAYS keep hand clear of the opener. Lock Nut (Mounted in the garage door opener)
NOTE: ONLY use...
8355 Manual - Page 6
... power BEFORE performing ANY service or maintenance. 14. Disable ALL locks and remove ALL ropes connected to garage door BEFORE installing
opener to do so. 8. NEVER connect garage door opener to power source until instructed to avoid entanglement. 5. Install garage door opener 7 feet (2.13 m) or more above the floor and
avoiding contact with
a 1-1/2" (3.8 cm) high object (or a 2x4...
8355 Manual - Page 7
....
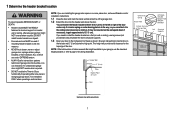
• NEVER try to loosen, move or adjust garage door, springs, cables, pulleys, brackets, or their hardware, ALL of which are installing the garage door opener on
the header wall 2" (5 cm) above the door. NOTE: If you are under EXTREME tension.
• ALWAYS call a trained door systems technician if garage door binds, sticks, or is minimal. (It may be...
8355 Manual - Page 9
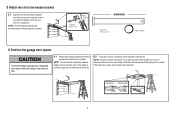
... (laid flat) under the rail.
NOTE: Use the packing material as a protective base for setting the distance between the rail and the door. NOTE: A 2x4 is ideal for the garage door opener. 3 Attach the rail to garage door, rest garage door opener rail on 2x4 placed on top section of door.
4.1 Remove the packing material and lift the
garage door opener onto a ladder.
8355 Manual - Page 10
... in
line with the header bracket if the bracket is not centered above the door).
5.7 Remove the 2x4. HARDWARE
Lock Washer 5/16"
Hex Bolt 5/16"- 18x7/8"
Hanging your garage door opener will vary depending on your garage.
Installation
5 Hang the garage door opener
To avoid possible SERIOUS INJURY from each side of the motor unit to
the structural...
8355 Manual - Page 13
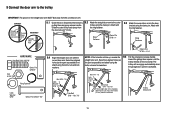
... the ring fastener. trolley will re-engage automatically when the garage door opener is hanging down too far, you may cut 6 inches (15 cm) from the curved door arm. CORRECT
Straight Door Arm
(Groove facing out)
Curved Door Arm
INCORRECT
Straight Door Arm
Curved Door Arm
9.1 Close the door. Nut 5/16" - 18 Lock Washer 5/16"
Lock
Washer 5/16"
Clevis...
8355 Manual - Page 14
....
7/16" (11 mm)
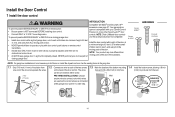
PRE-WIRED INSTALLATIONS: Choose
Wall
any other Security+ 2.0™ door controls. NOTE: Older LiftMaster door controls
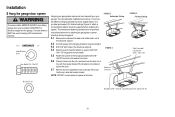
To prevent possible SERIOUS INJURY or DEATH from a closing garage door. Install the door control within sight of garage door, out of reach of children at the garage door opener in a later step.
1.4 Install the bottom screw, allowing 1/8 inch
(3 mm) to...
8355 Manual - Page 15
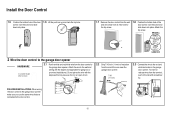
... Staple (Not shown)
2.1 Run the white and red/white wire from the end of the wire near the garage door opener.
7/16" (11 mm)
2.3 Connect the wire to the red and
white terminals on the garage door opener.
Do not pierce the wire with screwdriver tip. To insert or release wires from the terminal, push in...
8355 Manual - Page 17
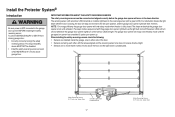
... an amber LED) transmits an invisible light beam to the receiving sensor (with the garage door opener light bulb; NOTE: For energy efficiency the garage door opener will not go into the sleep mode until activated. The garage door opener will enter sleep mode when the door is fully closed. Safety Reversing Sensor 6" (15 cm) max. If an obstruction breaks...
8355 Manual - Page 19

...the wires.
Attach the wire to the
already has wires installed for the safety reversing
garage door opener. To insert or remove the wires from the terminal, push in the sensor
bracket ...)
IGWnsaairdlalege
1.3C Slide the carriage bolt into the grey terminal on the garage door opener. The lens on
the garage door opener.
the wall and ceiling with the staples. Twist the white/black wires ...
8355 Manual - Page 23
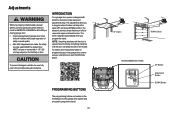
...) high object (or 2x4 laid flat) on programming your new garage door opener use your smartphone to read the QR Code below:
To prevent damage to program the travel , it will stop in the open door provides adequate clearance.
The adjustments allow you program the travel it will stop . PROGRAMMING BUTTONS
The programming buttons are located on contact with electronic controls...
8355 Manual - Page 24
... times during the steps for Program the Travel, the programming has timed out. The door
desired DOWN position
door travels to the programmed UP position, the
will
begin to flash. The
garage door opener
lights will flash twice
and the UP Button will travel limits will begin to the programmed DOWN position.
Adjustment Button. Programming is complete. When the
1.7 Press...
8355 Manual - Page 27
...shuts the garage door opener down direction.
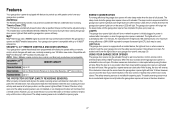
27 Light Feature The garage door opener is equipped with up . USING YOUR GARAGE DOOR OPENER The garage door opener can close from a remote control. Features
Your garage door opener is equipped with features to provide you with greater control over your garage door opener, see page 35. NOTE: Older LiftMaster remote controls, door controls...
8355 Manual - Page 28
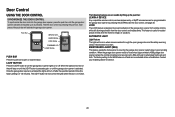
... setting for service.
28 LOCK
The LOCK feature is empty (i.e. vacation). When the garage door opener needs to be programmed to the garage door opener by pressing the push bar, each press of the garage door opener from remote controls while still allowing activation from the door control and keyless entry. When the lights are accessible by lifting up to 3 presses...
8355 Manual - Page 30
... Learn
button. Release the button when the garage door opener lights blink or two clicks are NOT compatible, see page 35 for 30 seconds. "cl"icckli"ck"
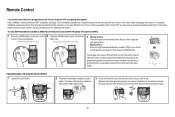
30 Remote Control
Your remote control has been programmed at the factory to operate with the accessory or visit www.liftmaster.com.
OR
1
2ABC
3DEF
4GHI
5JKL
6MNO...
8355 Manual - Page 33
...(es)
Down Arrow Flash(es)
1
1
1
2
1
3
1
4
1
5
1
6
2
1-5
3
2
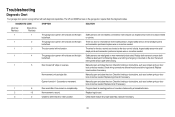
SYMPTOM
SOLUTION
The garage door opener will not function.
Inspect sensor wires for 1-2 seconds no movement. The wires for proper assembly, replace if necessary.
33 Replace logic board if necessary.
Manually open and close and the light bulbs flash. Program travel to set the travel module and at all...
8355 Manual - Page 34
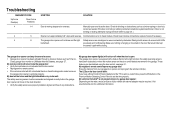
... the diagnostic codes to page 24 ). My remote control will not activate the garage door: • Verify the lock feature is open and close and the light bulbs flash.
Opener runs approximately 6-8", stops and reverses. Communication error to travel (refer to ensure
the garage door opener is not programming to a custom time, press the ON button on the...
Similar Questions

I Have Installed A Chamberlan Garage Door Opener And The Remote I Was Using Is
I have been using a Chamberlan garage door opener and its remote has been defective since of late.Pl...
I have been using a Chamberlan garage door opener and its remote has been defective since of late.Pl...
(Posted by donweera42 7 months ago)
Garage Door Opens After Shutting.
My Lift master 8550 inside keypad is Inside wall pad is model #880LM. outside keypad Model # is 877M...
My Lift master 8550 inside keypad is Inside wall pad is model #880LM. outside keypad Model # is 877M...
(Posted by BONNIECA92 2 years ago)

How Do I Program The Home Link System In My 2003 Honda And My 2004 Lexus To Work
I have a new liftmaster 8355
I have a new liftmaster 8355
(Posted by Drinehart2 9 years ago)

Liftmaster Garage Door Opener 8355 Manual
How Long If The Power Chord For This Model
How Long If The Power Chord For This Model
(Posted by VINCED 10 years ago)