
LiftMaster 8355 Support Question
LiftMaster 8355 Support Question
Find answers below for this question about LiftMaster 8355.Need a LiftMaster 8355 manual? We have 1 online manual for this item!
Question posted by philgerminario on April 27th, 2016
I Have A Model 8355 Opener And It Only Moves 6 Inches And Reverses.
I have a Model 8355 opener and it only moves 6 inches and reverses. I was told it is the RPM Sensor. Is that replacable on this model and if so what is the part #
Current Answers
Related LiftMaster 8355 Manual Pages
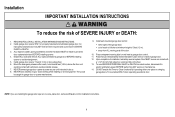
8355 Manual - Page 1
...-to-Close* or MyQ® remote operation feature* when
the garage door opener is installed on a sectional door. (*Not available on all models)
NOTE: If you are installing the garage door opener on a one-piece door, visit www.liftmaster.com for future reference: Serial Number:
. PREMIUM Series Belt Drive Garage Door Opener
Model 8355 - 1/2 hp
FOR RESIDENTIAL USE ONLY
■ Please read this...
8355 Manual - Page 2
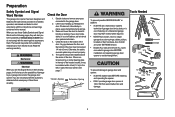
... and remove ALL ropes connected to garage door BEFORE installation and operating garage door opener to avoid entanglement.
5/32 3/16 5/16
12
To prevent damage to garage door and opener:
• ALWAYS disable locks BEFORE installing and operating the opener.
• ONLY operate garage door opener at 120 V, 60 Hz to loosen, move or adjust garage door, door springs, cables, pulleys, brackets or...
8355 Manual - Page 3
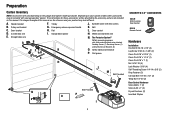
... specific model, other accessories may look different. A. Door control
M. White and red/white wire
N. Preparation
Carton Inventory
NOTE: Accessories will be included with your garage door opener. Header bracket B. Curved door arm E. Pulley and bracket C. Straight door arm
A
B
CF G
D E
F. Safety labels and literature P. Depending on the garage door opener model purchased...
8355 Manual - Page 4
... Bolt 5/16"-18x1/2" (Mounted in the garage door opener)
NOTE: ONLY use ONLY those bolts/fasteners mounted in the garage door opener)
Hex Screw #8x3/8" (Packed with hex screws. Cut the tape from moving garage door opener: • ALWAYS keep hand clear of the garage door opener.
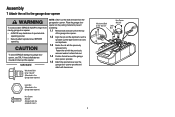
1.2 Align the rail and the styrofoam over the
garage door opener sprocket and attach with the sprocket cover...
8355 Manual - Page 6
... SERIOUS PERSONAL INJURY or DEATH from ALL moving parts of installation, test safety reversal system. Door MUST reverse on the floor. 13. Upon completion of the door.
10. ALL repairs to avoid accidental release. 7. They could result in garage door or opener mechanisms.
9. Mount the emergency release within sight of the garage door. • out of reach of children at...
8355 Manual - Page 7
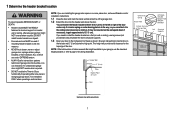
... or center bearing plate is in your garage, use lag screws (not provided) to securely fasten the 2x4 to structural supports.
1.3 Open your door to loosen, move or adjust garage door, springs, cables, pulleys, brackets, or their hardware, ALL of which are installing the garage door opener on a one -piece or swinging garage doors. This height will provide travel as shown...
8355 Manual - Page 11

... to pull door open door falling rapidly and/or unexpectedly. • NEVER use emergency release handle unless garage doorway is
CLOSED.
Weak or broken springs or unbalanced door could fall.
7.1 Insert one end of the emergency release rope
through the handle. Mount the emergency release within reach, but at least 1 inch (2.5 cm) from a falling garage door: • If...
8355 Manual - Page 13
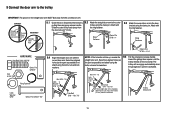
...: If the holes do not line up, reverse the 9.5 Pull the emergency release handle
straight door arm. trolley will re-engage automatically when the garage door opener is activated.
trolley using the clevis pin. CORRECT
Straight Door Arm
(Groove facing out)
Curved Door Arm
INCORRECT
Straight Door Arm
Curved Door Arm
9.1 Close the door.
Select two aligned holes (as far...
8355 Manual - Page 14
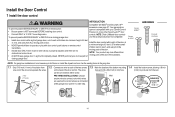
... the correct wires are connected
at the garage door opener in a later step.
1.4 Install the bottom screw, allowing 1/8 inch
(3 mm) to protrude from ALL moving parts of door.
can be connected to door travel.
NOTE: Your product may look different than
• ALWAYS keep garage door in the gang box.
1.1 Strip 7/16 inch (11 mm) of insulation from 1.2 Connect one...
8355 Manual - Page 15
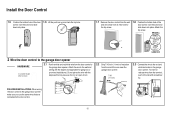
... from the door control to the garage door opener
HARDWARE
Insulated Staple (Not shown)
2.1 Run the white and red/white wire from the terminal, push in the tab with screwdriver tip. Attach the wire to the wall and ceiling with the staple as this may cause a short or an open circuit.
2.2 Strip 7/16 inch (11 mm...
8355 Manual - Page 17
...SAFETY REVERSING SENSORS
The safety reversing sensors must be disabled. • Install the safety reversing sensor so beam is unobstructed. The sleep mode shuts the garage door opener down direction. When installing the safety reversing sensors check the following: • Sensors are installed inside the garage, one on the sensor LEDs will move in the down until the garage door opener has...
8355 Manual - Page 19

... safety reversing
garage door opener. Insert the white/black wires into the grey terminal on both sensors should point toward each other.
the wall and ceiling with the wing nut. RED WHITE WHITE GREY
Insulated Staple (Not shown)
7/16" (11 mm)
19
Separate the wires. Twist the white wires together. HARDWARE
Staple
2.2A Strip 7/16 inch...
8355 Manual - Page 20
...®
OPTION B PRE-WIRED INSTALLATION
2.1B Cut the end of the safety
reversing sensor wire, making sure the colors correspond for each sensor. Not Provided
White
Yellow (for example)
White/Black Safety reversing sensor wires
Purple (for example)
Pre-installed wires
2.4B At the garage door opener, strip 7/16 inch (11 mm) of the wires previously chosen for each...
8355 Manual - Page 24
... DOWN position. When the
1.7 Press and release the DOWN Button. Programming is complete. If the garage door opener lights are flashing 5 times during the steps for Program the Travel, the safety reversing sensors are misaligned or obstructed (refer to operate the door up and down cycle using the remote control or the UP and DOWN buttons...
8355 Manual - Page 25
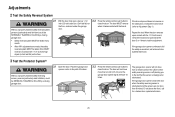
... MUST be tested. Without a properly installed safety reversing sensor, persons (particularly small children) could be SERIOUSLY INJURED or KILLED by a closing garage door.
• Safety reversal system MUST be tested every month.
• After ANY adjustments are no more than an inch (2.5 cm), and the garage door opener lights will not move more than 6 inches [15 cm] above the floor), call...
8355 Manual - Page 26
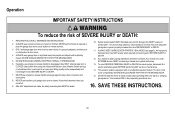
..., ALL of SEVERE INJURY or DEATH:
1. Garage door MUST reverse on the floor. ALWAYS KEEP GARAGE DOOR PROPERLY BALANCED (see page 2). NO ONE SHOULD CROSS THE PATH OF THE MOVING DOOR.
15. ALWAYS keep garage door in SEVERE INJURY or DEATH.
12. NO ONE SHOULD GO UNDER A STOPPED, PARTIALLY OPENED DOOR.
6. Safety reversal system MUST be enabled ONLY when operating...
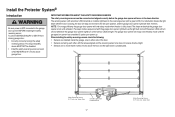
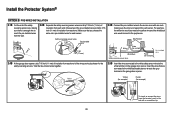
8355 Manual - Page 27
... to 1
THE PROTECTOR SYSTEM® (SAFETY REVERSING SENSORS) When properly connected and aligned, the safety reversing sensors will not close the door if you hold the button on the door control or keyless entry until the garage door opener has completed 5 cycles upon power up to 16 MyQ®
accessories.
The garage door opener will move in the path of the infrared beam...
8355 Manual - Page 33
...4
1
5
1
6
2
1-5
3
2
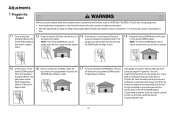
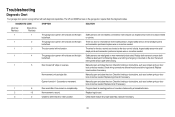
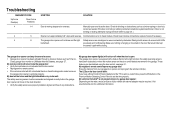
SYMPTOM
SOLUTION
The garage door opener will not close the door. Check for binding or obstructions, such as a broken spring or door lock, correct as needed . Replace logic board if necessary. Check travel module for a disconnected or cut . Inspect safety sensor wire at travel to set the travel module if necessary.
Door moves 6-8" stops or reverses.
8355 Manual - Page 34
...programming to my garage door opener: Depending on the make, model, and year of any obstructions. Make sure nothing is binding or sticking contact a trained door systems technician. These
features can beep for binding or obstructions, such as a broken spring or door lock, correct as Timer-to ensure
the garage door opener is moving stops and or reverses.
Safety sensors are steady...
8355 Manual - Page 38
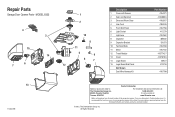
All Rights Reserved If you are calling about a Troubleshooting issue, it is recommended that you are ordering a repair part please have the model number of the garage door opener. MODEL 8355
4 3
15 14
6 7
13
114A4419E
1 2
10
8
11
5
9
6
7
12
Description 1 Cover with Screws 2 Gear and Sprocket 3 Drive and Worm Gear 4 Line Cord 5 Front End Panel 6 Light Socket 7 ...
Similar Questions

I Have Installed A Chamberlan Garage Door Opener And The Remote I Was Using Is
I have been using a Chamberlan garage door opener and its remote has been defective since of late.Pl...
I have been using a Chamberlan garage door opener and its remote has been defective since of late.Pl...
(Posted by donweera42 7 months ago)

Connecting Model 8355 Liftmaster To Wifi
Hi,I have two questions;1- Is the model 8355 from 2014 able to connect to wifi?2- This model has 11 ...
Hi,I have two questions;1- Is the model 8355 from 2014 able to connect to wifi?2- This model has 11 ...
(Posted by alatifyama 1 year ago)
Garage Door Opens After Shutting.
My Lift master 8550 inside keypad is Inside wall pad is model #880LM. outside keypad Model # is 877M...
My Lift master 8550 inside keypad is Inside wall pad is model #880LM. outside keypad Model # is 877M...
(Posted by BONNIECA92 2 years ago)

Liftmaster Garage Door Opener 8355 Manual
How Long If The Power Chord For This Model
How Long If The Power Chord For This Model
(Posted by VINCED 10 years ago)