
LiftMaster 8355 Support Question
LiftMaster 8355 Support Question
Find answers below for this question about LiftMaster 8355.Need a LiftMaster 8355 manual? We have 1 online manual for this item!
Question posted by Nasda03 on June 1st, 2014
Can The 2000sdr Opener Be Programmed For In Car Home Link System?
Can the 2000sdr opener be programmed for in car home link system?
Current Answers
Answer #1: Posted by tclinch on January 17th, 2015 3:26 PM
tclinch

Member since:
January 17th, 2015 Points: 0
Member since:
January 17th, 2015 Points: 0
I know this question has been asked 7 months ago, but I hope this answer helps someone that has wasted as much time as I have. I have tried every combination listed on the internet and homelink.com to setup my cars homelink with a Liftmaster SDR2000. I finally ran across this instruction found in the manual for the Liftmaster SDR2000.
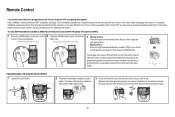
Adding a remote can also be done from the door control, as follows:
1. With the door closed, press and hold a remote push button
2. Press and hold the light button on the door control
3. Press and hold the door control push bar
4. After the opener lights flash, release all buttons
Test by pressing the remote push button.
Stating the obvious: The door control is your hardwired device installed inside the garage that you use to open and close the door.
Related LiftMaster 8355 Manual Pages
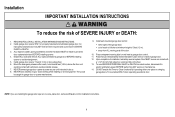
8355 Manual - Page 1
Write down the following information for installation instructions. PREMIUM Series Belt Drive Garage Door Opener
Model 8355 - 1/2 hp
FOR RESIDENTIAL USE ONLY
■ Please read this manual and the enclosed safety materials carefully! ■ Fasten the manual near the garage door after installation. ■ The door WILL NOT CLOSE unless the Protector System® is connected and properly...
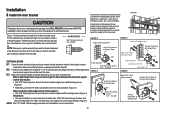
8355 Manual - Page 2
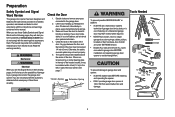
... tension.
• Disable ALL locks and remove ALL ropes connected to garage door BEFORE installation and operating garage door opener to avoid entanglement.
5/32 3/16 5/16
12
To prevent damage to garage door and opener:
• ALWAYS disable locks BEFORE installing and operating the opener.
• ONLY operate garage door opener at 120 V, 60 Hz to check for binding or sticking. If...
8355 Manual - Page 3
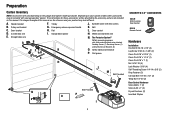
... be attached to the accessory and are not included in this manual are for these accessories will vary depending on your garage door opener. Rail I
SECURITY✚ 2.0TM ACCESSORIES
882LM Multi-Function Door Control
893LM Remote Control
Hardware
Installation Hex Bolt 5/16"-18 x 7/8" (4) Lag Screw 5/16"-9 x 1-5/8" (2) Clevis Pin 5/16" x 2-3/4" (1) Clevis Pin 5/16" x 1-1/4" (1) Clevis Pin...
8355 Manual - Page 4
... removed washer bolt and lock nut.
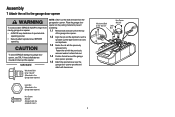
1.4 Position the belt around the garage
door opener sprocket.
1.5 Attach the sprocket cover over the
sprocket.
To avoid SERIOUS damage to garage door opener, use the bolts removed from moving garage door opener: • ALWAYS keep hand clear of sprocket while
operating opener. • Securely attach sprocket cover BEFORE
operating.
Cut the tape from...
8355 Manual - Page 6
... completion of SEVERE INJURY or DEATH:
1. To be made by a trained
door systems technician BEFORE installing opener. 4. Disable ALL locks and remove ALL ropes connected to garage door BEFORE installing
opener to do so. 8. Door MUST reverse on inside of the door.
10.
Install garage door opener ONLY on wall next to cables, spring assemblies and other hardware MUST be...
8355 Manual - Page 7
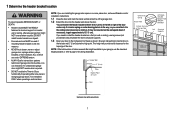
... NOT reverse when required.
• DO NOT enable the Timer-to loosen, move or adjust garage door, springs, cables, pulleys, brackets, or their hardware, ALL of which are installing the garage door opener on
the header wall 2" (5 cm) above the door.
This height will provide travel as shown. 1 Determine the header bracket location
To prevent possible...
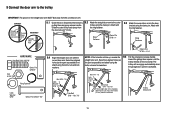
8355 Manual - Page 9
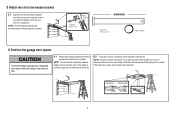
... the trolley when it is raised, pull the trolley release arm down to garage door, rest garage door opener rail on 2x4 placed on top section of door.
4.1 Remove the packing material and lift the
garage door opener onto a ladder. The trolley can remain disconnected until instructed. Ring Fastener
Clevis Pin 5/16" X 2-3/4"
HARDWARE
Clevis Pin 5/16" x 2-3/4"
Ring Fastener
4 Position...
8355 Manual - Page 10
... 5/16"- 18x1-7/8"
Hex Bolt 5/16"- 18x7/8", Lock Washer 5/16", Nut 5/16"-18
10 Operate the door manually. Yours may be different. Instructions below are for attaching the garage door opener directly to structural supports.
5.1 Measure the distance from a falling garage door opener, fasten it SECURELY to structural supports of each bracket to a support with 5/16"-
18x1-7/8" lag...
8355 Manual - Page 11

...bulbs as these may reduce the range or
• DO NOT use handle to pull door open door falling rapidly and/or unexpectedly. • NEVER use compact fluorescent light bulbs larger than... Arm Mount the emergency release within reach, but at least 1 inch (2.5 cm) from a falling garage door: • If possible, use halogen bulbs.
Make sure that "NOTICE" is
CLOSED.
bulbs as ...
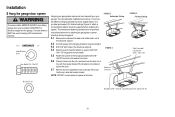
8355 Manual - Page 12
...the top panel.
In this case you will not need the door bracket; proceed to side door bracket holes. Installation
8 Install the door bracket
A horizontal and vertical reinforcement is to check with your garage door manufacturer for an opener installation door reinforcement kit. Contact your door's construction:
Metal or light weight doors using the self-threading screws. (Figure 4) Wood...
8355 Manual - Page 13
...). Select two aligned holes (as far apart as possible) and attach using the bolts, nuts and lock washers. Select two aligned holes (as
toward the garage door opener until the
far apart as possible) and attach using the
trolley release arm is horizontal.
Attach with the ring fastener.
trolley using the clevis pin...
8355 Manual - Page 14
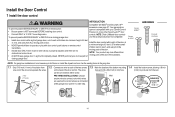
..., and away from the moving parts of any other Security+ 2.0™ door controls.
The wires
hole and drill a 5/32 inch (4 mm) hole. Install the door control within sight of garage door, out of reach of children at the garage door opener in sight until completely closed. closing garage door:
and third party products are connected
at a minimum height of...
8355 Manual - Page 23
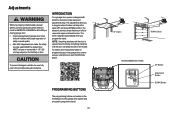
To watch a short instructional video on contact with electronic controls to make setup and adjustments easy. Door MUST reverse on programming your new garage door opener use your smartphone to read the QR Code below:
To prevent damage to program where the door will stop .
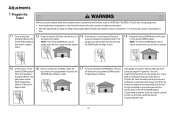
Adjustments
Without a properly installed safety reversal system, persons (particularly small children) could be...
8355 Manual - Page 24
... and down cycle using the remote control or the UP and DOWN buttons. If the garage door opener lights are flashing 5 times during the steps for Programming the Travel.
24
Programming is complete. Programming is complete.
The
garage door opener
lights will flash twice
and the UP Button will interfere with 1-1/2" (3.8 cm) high object (or 2x4 laid flat) on...
8355 Manual - Page 27
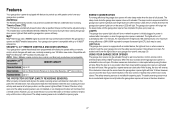
... codes. SECURITY+ 2.0™ REMOTE CONTROLS AND DOOR CONTROLS Your garage door opener has already been programmed at the factory to provide two-way communication between the garage door opener and MyQ® enabled accessories. If an obstruction breaks the infrared beam while the door is initially plugged in; The sleep mode shuts the garage door opener down direction.
27 as the light...
8355 Manual - Page 28
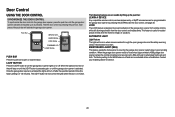
... in motion. LOCK
The LOCK feature is 4-1/2 minutes). AUTOMATIC LIGHT
Light Feature
The lights will begin to be programmed to open garage door and the safety reversing sensor infrared beam is pressed again, or until the garage door opener activates (it may take up the push bar: LEARN A DEVICE Any compatible remote controls, wireless keyless entry, or...
8355 Manual - Page 30
... or two clicks are NOT compatible, see page 35 for 30 seconds. Visit www.homelink.com for programming additional remote controls or keyless entry devices.
Older LiftMaster remote controls are heard.
PIN
PROGRAM USING THE GARAGE DOOR OPENER
1 Locate the Learn Button.
2 Press and immediately release the Learn
button. The Learn LED will be done...
8355 Manual - Page 33
... Flash(es)
Down Arrow Flash(es)
1
1
1
2
1
3
1
4
1
5
1
6
2
1-5
3
2
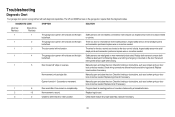
SYMPTOM
SOLUTION
The garage door opener will not function. No movement or sound.
The UP and DOWN arrows on the door that would interrupt the sensors path while closing. Safety sensors are shorted or the door control is programmed with self-diagnostic capabilities. Check for binding or obstructions...
8355 Manual - Page 34
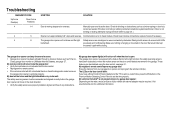
...; Verify the safety sensors are properly installed, aligned and free of your garage door opener and reprogram the remote control(s). Communication error to page 24 ). The garage door opener will still not activate the door check the diagnostic codes to ensure
the garage door opener is not programming to - Make sure nothing is not binding or sticking attempt to reprogram travel...
8355 Manual - Page 35
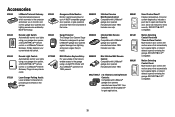
...Surge Protector: The Garage Door Opener Surge Protector is designed to precisely park vehicles in the home.
895MAX
3-Button Premium MAX Remote Control: Compatible with LiftMaster® garage door openers manufactured since 1997. Includes visor clip.
881LM
MAX Wireless Keyless Entry: For use outside of the home to enable access to the garage using your garage door opener, a SECURITY✚...
Similar Questions

Garage Door Opens After Shutting.
My Lift master 8550 inside keypad is Inside wall pad is model #880LM. outside keypad Model # is 877M...
My Lift master 8550 inside keypad is Inside wall pad is model #880LM. outside keypad Model # is 877M...
(Posted by BONNIECA92 2 years ago)

How To Program New Car To Open Garage Door
where is the learn button to program my car to open garage door
where is the learn button to program my car to open garage door
(Posted by lrothberg 6 years ago)

How Do I Program The Home Link System In My 2003 Honda And My 2004 Lexus To Work
I have a new liftmaster 8355
I have a new liftmaster 8355
(Posted by Drinehart2 9 years ago)

Liftmaster Garage Door Opener 8355 Manual
How Long If The Power Chord For This Model
How Long If The Power Chord For This Model
(Posted by VINCED 10 years ago)