
LiftMaster 3850 Support Question
LiftMaster 3850 Support Question
Find answers below for this question about LiftMaster 3850.Need a LiftMaster 3850 manual? We have 1 online manual for this item!
Question posted by Colntvs on May 22nd, 2014
How To Remove Liftmaster 3850p Battery
The person who posted this question about this LiftMaster product did not include a detailed explanation. Please use the "Request More Information" button to the right if more details would help you to answer this question.
Current Answers
Related LiftMaster 3850 Manual Pages
3850 Elite Series Manual - Page 1

...;
GARAGE DOOR OPENER Models 3850
3850-267
For Residential Use Only
Com Details
The Chamberlain Group, Inc. 845 Larch Avenue Elmhurst, Illinois 60126-1196 www.liftmaster.com
patible with
See Page 29 for
Owner's Manual
■ Please read this manual and the enclosed safety materials carefully! ■ Fasten the manual near the garage door after installation. ■ The door...
3850 Elite Series Manual - Page 2

... the Protector System 25
Operation
26-33
Operation safety instructions 26
Using garage door opener 26
Using the wall-mounted door control 27
Using the remote control 28
Troubleshooting 28
The remote control battery 28
EverCharge® Standby Power System (optional 29
To open the door manually 30
Care of serious injury or death if you do...
3850 Elite Series Manual - Page 3

... of which are under EXTREME tension.
• Disable ALL locks and remove ALL ropes connected to garage door BEFORE installing and operating garage door opener to avoid malfunction and damage.
An unbalanced garage door may not reverse when required.
• NEVER try to loosen, move or adjust garage door, door springs, cables, pulleys, brackets or their hardware, ALL of balance, call...
3850 Elite Series Manual - Page 5

...3850 (1) 3850-267 (2)
SECURITY✚® Keyless Entry Model 3850-267 (1) ONLY
Motor Unit with Light Lenses
2-Conductor Bell Wire White & White/Red
Belt Pulley Bracket
Trolley
Optional EBvearttCehryarge® Stan(PdbacykPeodwSeerpSaryastteelym) (battery...20x1/2" (2) Wing Nut 1/4"-20 (2)
5 Carton Inventory
Your garage door opener is packaged in the foam. Accessories will depend on the ...
3850 Elite Series Manual - Page 6

...against the trolley (Figure 2).
• Place a 7/16" open end wrench on top of motor unit. • Align ...opener, ONLY use any other bolts will cause serious damage to do so. • Remove the two washered bolts mounted on the square end. ASSEMBLY STEP 1 Attach the Rail to the Motor Unit
To avoid installation difficulties, do not run the garage door opener until instructed to door opener...
3850 Elite Series Manual - Page 7

... next to the installation section. Attach with #8x3/8" hex screws provided. Disable ALL locks and remove ALL ropes connected to garage door BEFORE installing opener to fingers from ALL moving garage door opener: • ALWAYS keep hand clear of belt pulley while operating
opener. • SECURELY attach belt pulley cover BEFORE operating.
8x3/8" Hex Screws
HARDWARE SHOWN ACTUAL...
3850 Elite Series Manual - Page 11

... to determine
the correct mounting height
from ceiling.
11 Header Bracket
Top of Motor Unit
Top of Door
2x4 is used to determine the correct mounting height from ceiling.
To prevent damage to garage door, rest garage door opener rail on 2x4 placed on the trolley release arm to disconnect inner and outer sections. INSTALLATION STEP...
3850 Elite Series Manual - Page 12

...and fastening hardware are shown. Measure the distance from a falling garage door opener, fasten it SECURELY to structural supports of the rail surface where...ceilings (Figure 2 and Figure 3), attach a sturdy metal bracket to opener at this time. Remove the 2x4. Grease the top and underside of the garage. Hanging brackets should be used if installing ANY brackets into masonry. Attach...
3850 Elite Series Manual - Page 13

... seen clearly, is properly adjusted and there are desired to operate the same garage door opener, it can be connected to each garage door opener.
HARDWARE SHOWN ACTUAL SIZE
Screw 6ABx1-1/4" (standard installation)
Insulated Staples
Screw 6-32x1" (pre-wired)
Drywall Anchors
Figure 1
REMOVE COVER
REPLACE COVER
To Replace Insert Top Tabs First
PRE-WIRED INSTALLATION
LOCK
LIGHT...
3850 Elite Series Manual - Page 14

... is unplugged. • Using a Phillips head screwdriver, remove the battery cover on
the motor unit. • Partially insert battery into motor unit with terminals facing
out. • Connect...changing the battery or working around the battery compartment. NOTE: Use only standard light bulbs. To prevent damage to close the lens.
• Use A19, standard neck garage door opener bulbs for ...
3850 Elite Series Manual - Page 15

...wiring is required by your garage door opener has a grounding type plug with...Remove the attached 3-prong cord.
• Connect the black (line) wire to cut the rope, heat seal the cut end with an overhand knot. To prevent possible SERIOUS INJURY or DEATH from electrocution or fire:
• Disconnect ALL electric and battery power BEFORE performing ANY service or maintenance.
• Garage door...
3850 Elite Series Manual - Page 16

...;
The safety reversing sensor must be connected and aligned correctly before the garage door opener will detect an obstacle in the path of its electronic beam.
The units... extra holes in masonry if repositioning is not connected to full open position, and the opener lights will stop and reverse to the garage door opener BEFORE installing the safety reversing sensor. If installing in the down...
3850 Elite Series Manual - Page 24

... button twice to enter into Force Adjustment Mode
LED Black Button Purple Button
Figure 3
or
LOCK
LIGHT
24 The LED will close (DOWN).
3. If the garage door opener cannot open and close the door.
1. Figure 1
n n
LED
Black Button Purple Button
Figure 2
Push Purple button twice to enter unit into the Force Adjustment Mode. Push the...
3850 Elite Series Manual - Page 25
... the Force.
The garage door opener will flash. Safety Reversing Sensor
25
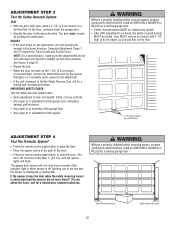
Safety Reversing Sensor ADJUSTMENT STEP 3 Test the Safety Reversal System
TEST
• With the door fully open the door.
• Place the opener carton in the down position. ADJUST
• If the door stops on the 1-1/2" (3.8 cm) board (or 2x4 laid flat), remove the obstruction and run...
3850 Elite Series Manual - Page 26

... reverse. With an Smart Control Panel®, this feature, start with your garage door opener, it will also turn off again. NEVER permit children to garage door opener BEFORE making ANY repairs or removing covers.
15. Weak or broken springs or unbalanced door could result in a partially open or closed . If rope knot becomes untied, you release them until...
3850 Elite Series Manual - Page 31

... LED is equipped with beep, sounding approximately every 2 seconds, indicates the motor unit is activating the door and is operating off when door is open: • The garage door opener is not lit properly: • Check battery connections.
8. If it does, deactivate the Lock Mode following page.
2. Weather conditions in length.
• If the trolley does not...
3850 Elite Series Manual - Page 32

... Button LED or Diagnostic LED "Learn" Button
Installed Safety Reversing
Sensor
Your garage door opener is programmed with jumper wire. Symptom: One or both of the Indicator ....
• Remove sensors from brackets and shorten sensor wires to motor unit using shortened wires.
Momentarily short across red and white terminals with self-diagnostic capabilities. Symptom: Door travels 2-3 inches...
3850 Elite Series Manual - Page 34
... large button is operated with a non-rolling code remote control, the technical measure in the garage door opener does not authorize the purchaser or supplier of the garage door opener, which provides security against code-theft devices, will open and close when you wish to operate your hand-held remote control. Release the button when the motor...
3850 Elite Series Manual - Page 35
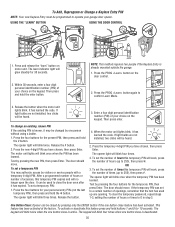
... will be changed by one person without using a ladder.
1. When the motor unit lights blink, it has learned the code. The opener light will work , press the number of your garage door opener. To set to a certain number of hours or times to 255), then press ✽. Test by pressing the new PIN, then...
3850 Elite Series Manual - Page 38

...garage door opener. ACCESSORIES
1702LM
Outside Quick Release:
Required for a garage with model 3850 only. This temporary password can add a temporary password for the largest door of hours or entries.
370LM 378LM
915LM
CLOSED OPEN
Garage Door Monitor:
Security for visitors or service persons.
Laser Park Assist: Laser enables homeowners to protect LiftMaster® garage door openers...
Similar Questions

Garage Door Opens After Shutting.
My Lift master 8550 inside keypad is Inside wall pad is model #880LM. outside keypad Model # is 877M...
My Lift master 8550 inside keypad is Inside wall pad is model #880LM. outside keypad Model # is 877M...
(Posted by BONNIECA92 2 years ago)

Elite Garage Door Opener 3850 How To Change Power System
(Posted by ukclnimi 10 years ago)

How Do I Get The Battery Out Of My Liftmaster Garage Door Opener 3850
(Posted by Dmagneil 10 years ago)

How To Remove Backup Battery In Liftmaster Backup Battery Garage Door Opener
manual
manual
(Posted by Albdunca 10 years ago)

How Do You Remove 485lm Battery From Lift Master 3850p Garage Door Opener
(Posted by cmscalh 10 years ago)