
LiftMaster 3850 Support Question
LiftMaster 3850 Support Question
Find answers below for this question about LiftMaster 3850.Need a LiftMaster 3850 manual? We have 1 online manual for this item!
Question posted by uzusierr on August 20th, 2014
How To Remove Battery From Liftmaster Unit
The person who posted this question about this LiftMaster product did not include a detailed explanation. Please use the "Request More Information" button to the right if more details would help you to answer this question.
Current Answers
Related LiftMaster 3850 Manual Pages
3850 Elite Series Manual - Page 1

...;
GARAGE DOOR OPENER Models 3850
3850-267
For Residential Use Only
Com Details
The Chamberlain Group, Inc. 845 Larch Avenue Elmhurst, Illinois 60126-1196 www.liftmaster.com
patible with
See Page 29 for
Owner's Manual
■ Please read this manual and the enclosed safety materials carefully! ■ Fasten the manual near the garage door after installation. ■ The door...
3850 Elite Series Manual - Page 2

... 28
The remote control battery 28
EverCharge® Standby Power System (optional 29
To open the door manually 30
Care of your garage door and/or the garage door opener if you do not comply with the cautionary statements that accompany them carefully.
2 Read them . The hazard may come from something mechanical or from motor unit memory 34
3-Button...
3850 Elite Series Manual - Page 3

... of which are under EXTREME tension.
• Disable ALL locks and remove ALL ropes connected to garage door BEFORE installing and operating garage door opener to avoid malfunction and damage. An unbalanced garage door may not reverse when required.
• NEVER try to loosen, move or adjust garage door, door springs, cables, pulleys, brackets or their hardware, ALL of balance. Raise...
3850 Elite Series Manual - Page 5

...3850-267 (1) ONLY
Motor Unit with Light Lenses
2-Conductor Bell Wire White & White/Red
Belt Pulley Bracket
Trolley
Optional EBvearttCehryarge® Stan(PdbacykPeodwSeerpSaryastteelym) (battery)
Belt
RReemmootteeCCoonnttrrooll VVisisoorrCClilpip
: Styrofoam
Belt Cap Retainer
One-Piece Rail
CEYILING MOUNT ONL UP
Header Bracket
Door Bracket
Curved Door...Inventory
Your garage door opener is ...
3850 Elite Series Manual - Page 6

... cause serious damage to do so. • Remove the two washered bolts mounted on the square end.
This extends the spring for optimum belt tension. ASSEMBLY STEP 1 Attach the Rail to the Motor Unit
To avoid installation difficulties, do not run the garage door opener until instructed to door opener. • Position belt over belt pulley.
Rotate...
3850 Elite Series Manual - Page 7

... and lubricated garage door. Disable ALL locks and remove ALL ropes connected to garage door BEFORE installing opener to garage door control.
11. Door MUST reverse on contact with #8x3/8" hex screws provided. Attach with a 1-1/2" (3.8 cm) high object (or a 2x4 laid flat) on the floor.
13.
ALL repairs to fingers from electrocution, disconnect ALL electric and battery power BEFORE...
3850 Elite Series Manual - Page 11

... sections. To prevent damage to garage door, rest garage door opener rail on 2x4 placed on the trolley release arm to -rail distance.
• Raise the opener onto a stepladder. Slide the outer trolley toward the motor unit.
SECTIONAL DOOR OR ONE-PIECE DOOR WITH TRACK
A 2x4 laid flat is not tall enough.
• Open the door all the way and place...
3850 Elite Series Manual - Page 12

... 5/16"-18x7/8" Lock Washer 5/16" Nut 5/16"-18
12 Remove the 2x4.
FINISHED CEILING - On finished ceilings (Figure 2 and Figure 3), attach a sturdy metal bracket to required lengths. 3. If the door hits the rail, raise the header bracket. 8. Measure the distance from a falling garage door opener, fasten it SECURELY to make sure the rail is not...
3850 Elite Series Manual - Page 13

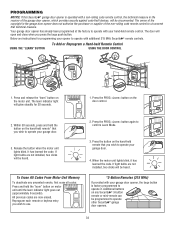
... one end of bell wire and connect to the two screw terminals on the motor unit: white to white and white/red to each garage door opener.
INSTALLATION STEP 6
Install the Smart Control Panel®
Locate door control within sight of garage door, out of reach
of children at a minimum height of 5 feet (1.5 m) and away from ALL...
3850 Elite Series Manual - Page 14

... OFF.
• Reverse the procedure to close the lens.
• Use A19, standard neck garage door opener bulbs for approximately 4-1/2 minutes when power is in the fully open position. To prevent damage to
corresponding terminals on battery. • Verify the battery wires are seated in each socket. ALWAYS wear protective gloves and eye protection when changing...
3850 Elite Series Manual - Page 15

... motor unit:
• Remove the motor unit cover screws and set the cover aside.
• Remove the attached...door open door falling rapidly and/or unexpectedly. • NEVER use emergency release handle to disengage
trolley ONLY when garage door is 6 feet (1.8 m) above the floor. To prevent possible SERIOUS INJURY or DEATH from electrocution or fire:
• Disconnect ALL electric and battery...
3850 Elite Series Manual - Page 16

... securely fastened to full open position, and the opener lights will detect an obstacle in masonry if repositioning is not connected to mount the units on the left or right of sectional garage doors without additional hardware. If it is closing, the door will move in masonry construction, add a piece of the garage door (or door tracks, springs, hinges...
3850 Elite Series Manual - Page 24

... Purple Button
Figure 2
Push Purple button twice to enter unit into the Force Adjustment Mode. Push the purple button twice to enter into Force Adjustment Mode
LED Black Button Purple Button
Figure 3
or
LOCK
LIGHT
24 The door will open (UP).
4.
If the garage door opener cannot open and close (DOWN).
3. Without a properly installed safety reversal system...
3850 Elite Series Manual - Page 25
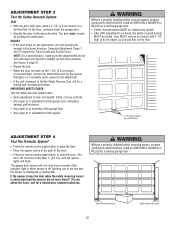
... flat) on the 1-1/2" (3.8 cm) board (or 2x4 laid flat), remove the obstruction and run the opener through 3 or 4 complete travel cycles to test adjustment.
• If the unit continues to close from a remote if the indicator light in the path of the opener.
NOTE: On a sectional door, make sure limit adjustments do not force the...
3850 Elite Series Manual - Page 26

... constant light when the Light feature on , then press and hold the light button for 10 seconds, until the door starts to door travel.
4. However, you wish to garage door opener BEFORE making ANY repairs or removing covers.
15.
WARNING
OPERATION
IMPORTANT SAFETY INSTRUCTIONS
WARNING
To reduce the risk of which changes with up to operate...
3850 Elite Series Manual - Page 31

... motor unit is activating the door and is operating off when door is open: • The garage door opener is normal. My door will not turn off of any binding problems.
• Refer to Adjustment Step 1, Program the Travel Limits.
Decrease down direction. • Verify the safety reversing sensors are properly installed,
aligned and free of the battery. •...
3850 Elite Series Manual - Page 32

... unit activates, replace door control wires. Symptom: One or both of motor unit.
• Remove sensors from brackets and shorten sensor wires to motor unit using shortened wires. Symptom: The door...Sensor
Diagnostic Chart
Diagnostics Located On Motor Unit
"Learn" Button LED or Diagnostic LED "Learn" Button
Installed Safety Reversing
Sensor
Your garage door opener is dim or flashing. • ...
3850 Elite Series Manual - Page 34
... 30 seconds.
2. LOCK
LIGHT
LOCK
LIGHT
4. Additional buttons on any unwanted remote, first erase all codes: Press and hold the button on the motor unit. Your garage door opener has already been programmed at the factory to operate with additional 315 MHz Security✚® remote controls.
The learn indicator light will be heard...
3850 Elite Series Manual - Page 35
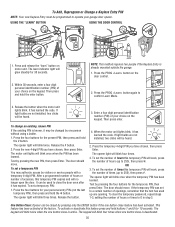
... blink four times when one person without using a ladder.
1. LOCK
LIGHT
3. Then press enter.
When the motor unit lights blink, it has expired.
The door should move . OR
3. Press the four buttons for your garage door opener. If light bulbs are not installed, two clicks will be used up to 255), then press ✽. The...
3850 Elite Series Manual - Page 38

...; Standby Power System: Provides backup power to protect LiftMaster® garage door openers against damage from lightning and power surges.
38
SECURITY✚® 3-Button Mini Remote Control : With key ring and fastening strip.
Includes battery. Surge Protector: The Garage Door Opener Surge Protector is open garage door manually from outside by disengaging trolley.
373P
41A5281...
Similar Questions


Elite Garage Door Opener 3850 How To Change Power System
(Posted by ukclnimi 9 years ago)

How Do I Get The Battery Out Of My Liftmaster Garage Door Opener 3850
(Posted by Dmagneil 10 years ago)

Does Battery Backup Garage Door Opener Still Work After Battery Needs Replacing
(Posted by smkllb 10 years ago)

Replacing Backup Battery In Garage Door Opener.
How do I replace the backup battery in the LiftMaster 3850 garage door opener? Are there instruction...
How do I replace the backup battery in the LiftMaster 3850 garage door opener? Are there instruction...
(Posted by melindanannin 12 years ago)