
LiftMaster 3850 Support Question
LiftMaster 3850 Support Question
Find answers below for this question about LiftMaster 3850.Need a LiftMaster 3850 manual? We have 1 online manual for this item!
Question posted by cdwgbhrow on October 31st, 2013
How To Remove Battery From Lift Master Elite Series Model 3850
The person who posted this question about this LiftMaster product did not include a detailed explanation. Please use the "Request More Information" button to the right if more details would help you to answer this question.
Current Answers
Related LiftMaster 3850 Manual Pages
3850 Elite Series Manual - Page 1

...;
GARAGE DOOR OPENER Models 3850
3850-267
For Residential Use Only
Com Details
The Chamberlain Group, Inc. 845 Larch Avenue Elmhurst, Illinois 60126-1196 www.liftmaster.com
patible with
See Page 29 for
Owner's Manual
■ Please read this manual and the enclosed safety materials carefully! ■ Fasten the manual near the garage door after installation. ■ The door...
3850 Elite Series Manual - Page 2

... 25
Operation
26-33
Operation safety instructions 26
Using garage door opener 26
Using the wall-mounted door control 27
Using the remote control 28
Troubleshooting 28
The remote control battery 28
EverCharge® Standby Power System (optional 29
To open the door manually 30
Care of your opener 30
Having a problem? (Troubleshooting 31
Diagnostic chart 32
Smart...
3850 Elite Series Manual - Page 3

... BEFORE installing and operating the opener.
• ONLY operate garage door opener at 120V, 60 Hz to make sure your door binds, sticks, or is out of which are under EXTREME tension.
• Disable ALL locks and remove ALL ropes connected to garage door BEFORE installing and operating garage door opener to loosen, move or adjust garage door, door springs, cables, pulleys, brackets or...
3850 Elite Series Manual - Page 5

... contain the motor unit and all parts illustrated below . Carton Inventory
Your garage door opener is also listed below . LOCK
LIGHT
SLmCaDrtMCootniotrnolDPeatencetli®ng Door Control Console
SECURITY✚® 3-Button Remote Control
Models 3850 (1) 3850-267 (2)
SECURITY✚® Keyless Entry Model 3850-267 (1) ONLY
Motor Unit with Light Lenses
2-Conductor Bell Wire White...
3850 Elite Series Manual - Page 6

...it firmly against the trolley (Figure 2).
• Place a 7/16" open end wrench on the threaded shaft until the spring releases and snaps the ...REMOVE STYROFOAM. • Insert both washered bolts through the rail into one of motor unit. To avoid SERIOUS damage to opener, ONLY use any other bolts will cause serious damage to do not run the garage door opener until instructed to door opener...
3850 Elite Series Manual - Page 7

You have now finished assembling your garage door opener. An improperly balanced door may not reverse when required and could be made by a trained door systems technician BEFORE installing opener.
4. Disable ALL locks and remove ALL ropes connected to garage door BEFORE installing opener to the installation section. NEVER wear watches, rings or loose clothing while installing or servicing ...
3850 Elite Series Manual - Page 12

...the door (or in the structural supports. 4. If the door hits the rail, raise the header bracket. 8.
Drill 3/16" pilot holes in line
with rail grease. Remove the ... brackets should be angled (Figure 1) to opener at this time. Attach one end of the garage. FINISHED CEILING - Measure the distance from a falling garage door opener, fasten it SECURELY to structural supports of each...
3850 Elite Series Manual - Page 13

... Grey Red White Grey
13 The trolley will not return to each garage door opener. If installing into gang box) as the secondary door control.
1. HARDWARE SHOWN ACTUAL SIZE
Screw 6ABx1-1/4" (standard installation)
Insulated Staples
Screw 6-32x1" (pre-wired)
Drywall Anchors
Figure 1
REMOVE COVER
REPLACE COVER
To Replace Insert Top Tabs First
PRE-WIRED INSTALLATION...
3850 Elite Series Manual - Page 14

... close the lens.
• Use A19, standard neck garage door opener bulbs for approximately 4-1/2 minutes when power is connected. Use ONLY incandescent. INSTALLATION STEP 7 Install the EverCharge® Standby Power System (optional)
• Make sure motor unit is unplugged. • Using a Phillips head screwdriver, remove the battery cover on
the motor unit. • Partially insert...
3850 Elite Series Manual - Page 15

... opener at least 1" (2.5 cm) from electrocution or fire:
• Disconnect ALL electric and battery power BEFORE performing ANY service or maintenance.
• Garage door ...Remove the motor unit cover screws and set the cover aside.
• Remove the attached 3-prong cord.
• Connect the black (line) wire to install the proper outlet.
and the ground wire to pull door open...
3850 Elite Series Manual - Page 25
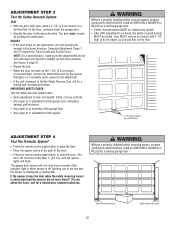
...remove the obstruction and run the opener through 3 or 4 complete travel cycles to test adjustment.
• If the unit continues to or adjustment of the opener.
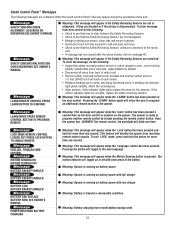
If the opener closes the door... or KILLED by a closing garage door. • Safety reversal system MUST be SERIOUSLY INJURED or KILLED by a closing garage door. The garage door opener will flash. Complete Adjustment Steps...
3850 Elite Series Manual - Page 26

... fall.
9. NEVER use emergency release handle to a matching code which are made by a trained door systems technician.
14. Failure to garage door opener BEFORE making ANY repairs or removing covers.
15. SAVE THESE INSTRUCTIONS. Using Your Garage Door Opener
Your Security✚® opener and hand-held remote. If you purchase a new remote, or if you can be tested...
3850 Elite Series Manual - Page 28
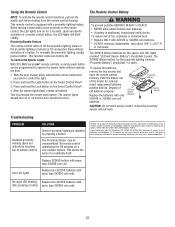
... possible SERIOUS INJURY or DEATH: • NEVER allow small children near batteries. • If battery is equipped with only 3V2016 or 3V2450 coin cell batteries. The 3V2016 lithium batteries for removal.
LED and Opener Batteries
Proximity Battery
Spring Contact
CAUTION: Do not bend spring contact. Replace 3V2450 battery with FCC Standards FOR HOME OR OFFICE USE. NOTICE: To comply...
3850 Elite Series Manual - Page 29
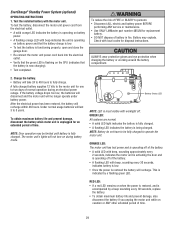
... with local codes for an extended period of normal operation during battery mode. Test the installed battery with beep indicates the unit is operating on battery power and that the battery charge is low.
• To test the battery is functioning properly, open and close the garage door.
• Re-connect the motor unit power cord back into...
3850 Elite Series Manual - Page 30
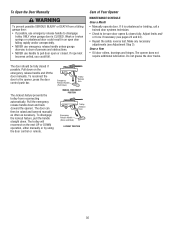
... necessary (see Adjustment Step 3). Do not grease the door tracks. Once a Year • Oil door rollers, bearings and hinges. To reconnect the door to be sure door opens & closes fully. Emergency Release Handle (Pull Down)
Trolley Release Arm
NOTICE
The lockout feature prevents the trolley from a falling garage door: • If possible, use handle to disengage
trolley...
3850 Elite Series Manual - Page 31

... my motor
unit: The safety reversing sensor must be connected and aligned correctly before the garage door opener will not activate the door: • Verify your door, check diagnostic LED for balance or any obstructions. If it does, deactivate the Lock Mode following page.
If battery status LED is approximately 1-1/4" (3.18 cm) in particular can affect...
3850 Elite Series Manual - Page 32

...needed .
• Disconnect all wires from back of motor unit.
• Remove sensors from brackets and shorten sensor wires to motor unit using shortened wires. If...door control, touch wires together. Bell Wire
Safety Reversing Sensor
Diagnostic Chart
Diagnostics Located On Motor Unit
"Learn" Button LED or Diagnostic LED "Learn" Button
Installed Safety Reversing
Sensor
Your garage door opener...
3850 Elite Series Manual - Page 33
...Remove safety reversing sensors from brackets and shorten sensor wires to
1-2 feet (30-60 cm) from receiving remote control signals. The motion detector will toggle on battery power with low charge. Meaning: Opener ...misaligned. • Realign receiving eye sensor, clean lens and secure brackets. • Verify door track is firmly secured to wall and does not move. • Check to see that...
3850 Elite Series Manual - Page 38

... homeowner to protect LiftMaster® garage door openers against damage from car, bedside, or anywhere in the garage. SECURITY✚® 4-Button Remote Control : Includes visor clip.
Enables homeowner to open or closed.
ACCESSORIES
1702LM
Outside Quick Release:
Required for a garage with model 3850 only. Monitors up to 4 garage doors by disengaging trolley.
373P
41A5281...
3850 Elite Series Manual - Page 40
...:
• PART NUMBER • PART NAME • MODEL NUMBER ADDRESS ORDERS TO: THE CHAMBERLAIN GROUP, INC.
Then ...BATTERIES IN REMOTE CONTROL TRANSMITTERS AND LIGHT BULBS OR UNITS INSTALLED FOR NON-RESIDENTIAL USE. THIS LIMITED WARRANTY DOES NOT COVER ANY PROBLEMS WITH, OR RELATING TO, THE GARAGE DOOR OR GARAGE DOOR HARDWARE, INCLUDING BUT NOT LIMITED TO THE DOOR SPRINGS, DOOR ROLLERS, DOOR...
Similar Questions

How To Remove Battery From Liftmaster Elite Series Model 3850
(Posted by CaMatchM 10 years ago)

How To Change Battery In Lift Master Elite Series Garage Door Opener
(Posted by Tomcja 10 years ago)

What Is The Horsepower Of The Liftmaster Elite Series Model 3850 Specification
(Posted by wan2drag 10 years ago)
How To Remove The Battery From A Lift Master Elite Series Garage Door Opener
(Posted by djamissy 10 years ago)
Where To Buy 485lm Battery For Lift Master Elite Series Garage Door Opener
(Posted by erjosham 10 years ago)