
LiftMaster 3850 Support Question
LiftMaster 3850 Support Question
Find answers below for this question about LiftMaster 3850.Need a LiftMaster 3850 manual? We have 1 online manual for this item!
Question posted by kentwri on July 31st, 2011
Battery Replacement
How do I get to the battery in my 3850 to replace it?
Current Answers
Answer #2: Posted by juancabrer on October 16th, 2011 1:12 PM
juancabrer

Member since:
October 16th, 2011 Points: 140
Member since:
October 16th, 2011 Points: 140
I also was having trouble removing the backup battery. I didn't want to pay $18 for some liftmaster technician to tell me how to do it over the phone, so I went ahead and applied more force to remove the battery and it worked! I realized that around the upper part of the battery there is a groove that makes it hard for the battery to slide out. Once I removed the battery, I also realized that there was nothing I could have damaged by applying more force. I hope this helps everone:
Steps are:
1. Remove light cover, pushing the button on each side of the cover.
2. Remove battery cover with screw driver.
3. Unplug the cables from the battery.
4. Slide the battery out of the compartment by applying necessary force.
Answer #3: Posted by colyerdale on June 14th, 2012 12:19 PM
colyerdale

Member since:
June 14th, 2012 Points: 20
Member since:
June 14th, 2012 Points: 20
For the life of me I just could not “force” the battery out. Here are the steps I used.
1. Remove light cover, pushing the button on each side of the cover.
2. Remove battery cover with Phillips screw driver.
3. Take about 6 inches of duct tape and apply the first 3 inches to the back of the battery, leaving about 3 inches from the other end hanging loose.
4. Pull the loose end of the duct tape and the battery should slide straight out.
4. Unplug the 2 electrical connectors and you are all done.
Related LiftMaster 3850 Manual Pages
3850 Elite Series Manual - Page 1

®
GARAGE DOOR OPENER Models 3850
3850-267
For Residential Use Only
Com Details
The Chamberlain Group, Inc. 845 Larch Avenue Elmhurst, Illinois 60126-1196 www.liftmaster.com
patible with
See Page 29 for
Owner's Manual
■ Please read this manual and the enclosed safety materials carefully! ■ Fasten the manual near the garage door after installation. ■...
3850 Elite Series Manual - Page 2

...
Operation
26-33
Operation safety instructions 26
Using garage door opener 26
Using the wall-mounted door control 27
Using the remote control 28
Troubleshooting 28
The remote control battery 28
EverCharge® Standby Power System (optional 29
To open the door manually 30
Care of your garage door and/or the garage door opener if you see these Safety Symbols and...
3850 Elite Series Manual - Page 3

... see if there is any ropes connected to garage door.
• Complete the following test to make sure your garage door is balanced and is not sticking or binding:
1.
To prevent damage to garage door and opener:
• ALWAYS disable locks BEFORE installing and operating the opener.
• ONLY operate garage door opener at 120V, 60 Hz to avoid entanglement. Release...
3850 Elite Series Manual - Page 5

...Door Control Console
SECURITY✚® 3-Button Remote Control
Models 3850 (1) 3850-267 (2)
SECURITY✚® Keyless Entry Model 3850-267 (1) ONLY
Motor Unit with Light Lenses
2-Conductor Bell Wire White & White/Red
Belt Pulley Bracket
Trolley
Optional EBvearttCehryarge® Stan(PdbacykPeodwSeerpSaryastteelym) (battery... Carton Inventory
Your garage door opener is packaged in ...
3850 Elite Series Manual - Page 6

...on the threaded shaft until it firmly against the trolley (Figure 2).
• Place a 7/16" open end wrench on top of motor unit. This extends the spring for optimum belt tension.
Use of any.... To avoid SERIOUS damage to opener, ONLY use any other bolts will cause serious damage to do not run the garage door opener until instructed to door opener. • Position belt over belt pulley....
3850 Elite Series Manual - Page 7

..., disconnect ALL electric and battery power BEFORE performing ANY service or maintenance.
7 Place entrapment warning label on inside of installation, test safety reversal system. Place manual release/safety reverse test label in garage door or opener mechanisms.
9. Door MUST reverse on contact with #8x3/8" hex screws provided.
Install garage door opener ONLY on the floor.
13...
3850 Elite Series Manual - Page 11

...; If the top section or panel hits the trolley when you raise the door, pull down on the trolley release arm to garage door, rest garage door opener rail on 2x4 placed on top section of the motor unit. Do not position the opener more than 4" (10 cm) above this point if the ladder is used to...
3850 Elite Series Manual - Page 12

... are not provided. 1. Hanging brackets should be angled (Figure 1) to structural supports of the hanging bracket to structural supports before installing the opener. Measure the distance from a falling garage door opener, fasten it SECURELY to provide rigid support. Attach one end of each side
of the rail surface where the trolley slides with
5/16...
3850 Elite Series Manual - Page 13

... care to each garage door opener. NOTE: If you have any trouble with a small flat-head screwdriver (Figure 1). NOTE: The functional temperature range of the cover with the operation of the door control to temperatures below -22° F (-30° C) may be connected to avoid cracking plastic housing. DO NOT overtighten.
• Replace cover by...
3850 Elite Series Manual - Page 14

...bulbs. Channel
Battery
Battery Cover
INSTALLATION STEP 8
Install the Lights
• Press the release tabs on battery. • Verify the battery wires are seated in the channel. • Replace battery cover. ...battery or working around the battery compartment. Then the lights will turn OFF.
• Reverse the procedure to close the lens.
• Use A19, standard neck garage door opener...
3850 Elite Series Manual - Page 15

... a permanent connection through the 7/8" (2 cm) hole in an open or closed. Weak or broken springs or unbalanced door could fall.
To prevent possible SERIOUS INJURY or DEATH from electrocution or fire:
• Disconnect ALL electric and battery power BEFORE performing ANY service or maintenance.
• Garage door installation and wiring MUST be grounded.
• Reinstall...
3850 Elite Series Manual - Page 16

... will move in the down direction. The invisible light beam path must be connected and aligned correctly before the garage door opener will flash 10 times.
Either can be securely fastened to the receiving eye (with an amber indicator light) transmits an invisible light beam to a solid ...
3850 Elite Series Manual - Page 24

... LED will stop flashing when the force has been programmed. The door will close the door fully, inspect the door to ensure that it , repeat Program the Travel Limits.
If the garage door opener cannot open and close (DOWN).
3.
Push the door control or programmed remote control. The door must travel through a complete cycle, up and down, in order...
3850 Elite Series Manual - Page 25
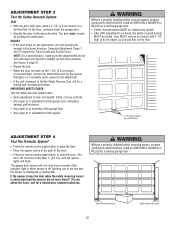
....
• Repeat the test.
• When the door reverses on the 1-1/2" (3.8 cm) board (or 2x4 laid flat), remove the obstruction and run the opener through 3 or 4 complete travel cycles to test adjustment.
• If the unit continues to or adjustment of the opener.
Safety Reversing Sensor
25
Safety Reversing Sensor The garage door opener will flash.
3850 Elite Series Manual - Page 26

... after interruption; Failure to pull garage door open .
2. When the opener is misaligned, the door won't close . If open , the door will blink for 10 seconds until the door starts to operate or play with garage door control push buttons or remote controls.
3. If closed . If obstructed while opening , the door will operate with the opener lights on contact with the safety...
3850 Elite Series Manual - Page 31

...the battery. • A flashing LED with beep, sounding approximately every 2 seconds, indicates the motor unit is activating the door and is operating off when door is open: • The garage door opener is ...Door Control. • Reprogram remotes following page.
2. Refer to a closed position. • Loosen the belt by a beep sounding every 30 seconds, replace the battery.
31 My door ...
3850 Elite Series Manual - Page 32

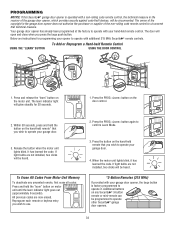
... LED or Diagnostic LED "Learn" Button
Installed Safety Reversing
Sensor
Your garage door opener is dim or flashing. • Realign receiving eye sensor, clean lens and secure brackets. Consult Diagnostic Chart below.
1 FLASH
Safety reversing sensors wire open (broken or disconnected). If motor unit activates, replace
door control. • If motor unit does not activate, disconnect...
3850 Elite Series Manual - Page 34
... and hold the button on the hand-held remote control. Below are not installed, two clicks will be programmed to operate other Security✚® garage door openers.
34 If light bulbs are instructions for 30 seconds.
2. To Erase All Codes From Motor Unit Memory
To deactivate any Security✚® 3-button remote...
3850 Elite Series Manual - Page 35
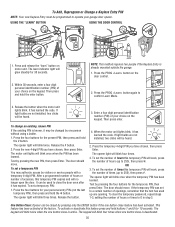
... hold buttons 1 and 9 for 30 seconds. Press the temporary 4-digit PIN you have chosen, then press Enter. To set to a certain number of your garage door opener. The opener light will blink four times.
3. To activate or deactivate this temporary PIN will blink three times.
Press the PROG button again to 0 in step 3. Enter...
3850 Elite Series Manual - Page 38

...door of your garage door is designed to protect LiftMaster® garage door openers against damage from lightning and power surges.
38 SECURITY✚® 4-Button Remote Control : Includes visor clip. Includes battery.
Wireless Door... 3-Button Remote Control with model 3850 only. Laser Park Assist: Laser enables homeowners to the garage door opener. For use with SECURITY✚&#...
Similar Questions

I Have Installed A Chamberlan Garage Door Opener And The Remote I Was Using Is
I have been using a Chamberlan garage door opener and its remote has been defective since of late.Pl...
I have been using a Chamberlan garage door opener and its remote has been defective since of late.Pl...
(Posted by donweera42 8 months ago)
Garage Door Opens After Shutting.
My Lift master 8550 inside keypad is Inside wall pad is model #880LM. outside keypad Model # is 877M...
My Lift master 8550 inside keypad is Inside wall pad is model #880LM. outside keypad Model # is 877M...
(Posted by BONNIECA92 2 years ago)

Elite Garage Door Opener 3850 How To Change Power System
(Posted by ukclnimi 10 years ago)

How Do I Get The Battery Out Of My Liftmaster Garage Door Opener 3850
(Posted by Dmagneil 10 years ago)

Replacing Backup Battery In Garage Door Opener.
How do I replace the backup battery in the LiftMaster 3850 garage door opener? Are there instruction...
How do I replace the backup battery in the LiftMaster 3850 garage door opener? Are there instruction...
(Posted by melindanannin 12 years ago)