
LiftMaster 3265 Support Question
LiftMaster 3265 Support Question
Find answers below for this question about LiftMaster 3265.Need a LiftMaster 3265 manual? We have 1 online manual for this item!
Question posted by Bigjeezy51 on August 9th, 2018
Doesn't Close
makes a clicking noise 1x and then a thump or clucking sound. Garage and chain does not move. Garage does not close
Current Answers
Answer #1: Posted by BusterDoogen on August 9th, 2018 8:56 AM
BusterDoogen

Member since:
October 30th, 2011 Points: 28,565,407

Member since:
October 30th, 2011 Points: 28,565,407
Go to page 29 for the process of aligning the sensors.
I hope this is helpful to you!
Please respond to my effort to provide you with the best possible solution by using the "Acceptable Solution" and/or the "Helpful" buttons when the answer has proven to be helpful. Please feel free to submit further info for your question, if a solution was not provided. I appreciate the opportunity to serve you!
Related LiftMaster 3265 Manual Pages
3265M Manual - Page 1
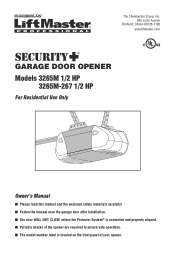
..., Illinois 60126-1196 www.liftmaster.com
®
GARAGE DOOR OPENER Models 3265M 1/2 HP
3265M-267 1/2 HP
For Residential Use Only
Owner's Manual
■ Please read this manual and the enclosed safety materials carefully! ■ Fasten the manual near the garage door after installation. ■ The door WILL NOT CLOSE unless the Protector System® is connected and...
3265M Manual - Page 2
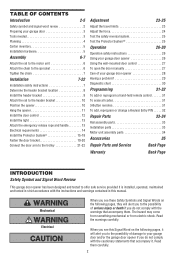
... your garage door 3 Tools needed 3 Planning 4 Carton inventory 5 Installation hardware 5
Assembly
6-7
Attach the rail to the motor unit 6 Attach the chain to the sprocket 6 Tighten the chain 7
Installation
7-22
Installation safety instructions 7 Determine the header bracket location 8 Install the header bracket 9 Attach the rail to the header bracket 10 Position the opener 10...
3265M Manual - Page 3
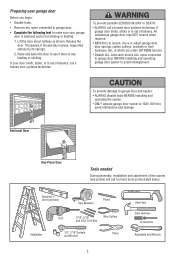
... Wrench Raise and lower the door to see if there is any ropes connected to garage door.
• Complete the following test to make sure your door binds, sticks, or is ...locks and remove ALL ropes connected to garage door BEFORE installing and operating garage door opener to avoid malfunction and damage. Release the door. Preparing your garage door
Before you begin:
• Disable locks...
3265M Manual - Page 5
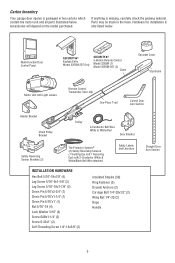
...garage door opener is packaged in the foam.
Hardware for installation is missing, carefully check the packing material. Parts may be stuck in two cartons which contain the motor unit and all parts illustrated below . LOCK LIGHT
Multi-Function Door...T-rail
Curved Door Arm Section
Header Bracket
Chain Pulley Bracket
Trolley
2-Conductor Bell Wire White & White/Red
Door Bracket
Safety ...
3265M Manual - Page 6
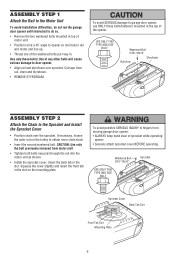
... Bolt 5/16"-18x12"
Rail Hole
Styrofoam
ASSEMBLY STEP 2
Attach the Chain to fingers from moving garage door opener:
• ALWAYS keep hand clear of sprocket while operating opener.
• Securely attach sprocket cover BEFORE operating. CAUTION: Use only the bolt previously removed from
rail, chain and styrofoam. • REMOVE STYROFOAM. To avoid possible SERIOUS INJURY...
3265M Manual - Page 7
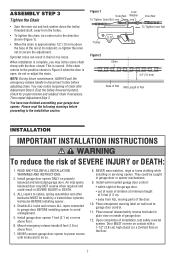
.../safety reverse test label in the direction shown (Figure 1).
• When the chain is normal. Upon completion of SEVERE INJURY or DEATH:
1. Install garage door opener 7 feet (2.1 m) or more above floor.
7. Sprocket noise can result if chain is too loose. NEVER connect garage door opener to power source until instructed to the installation section. Please read the following...
3265M Manual - Page 10
...
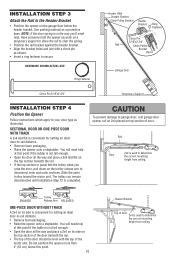
Ring Fastener
Clevis Pin
5/16"x2-3/4"
Rail
Chain Pulley
Bracket
Rail
Garage Door
Clevis Pin 5/16"x2-3/4"
Temporary Support
INSTALLATION STEP 4
Position the Opener
Follow instructions which apply to -rail distance. • Remove foam packaging. • Raise the opener onto a stepladder.
ENGAGED
Trolley Release Arm RELEASED
ONE-PIECE DOOR WITHOUT TRACK
A 2x4 on its side on...
3265M Manual - Page 13
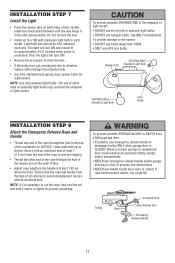
... garage door opener bulbs for approximately 4-1/2 minutes when power is clear of persons and obstructions.
• NEVER use of the rope through the hole in each socket.
Trolley
Overhand Knot
Rope
NOTICE
Trolley Release Arm
Emergency Release Handle
13 The use handle to pull door open position. NOTE: If it is in the fully open or closed...
3265M Manual - Page 15
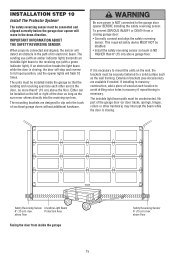
... safety device MUST NOT be securely fastened to full open position, and the opener lights will detect an obstacle in the path of the garage door (or door tracks, springs, hinges, rollers or other across the door, no more than 6" (15 cm) above floor
Facing the door from a closing garage door: • Correctly connect and align the safety reversing
sensor...
3265M Manual - Page 18
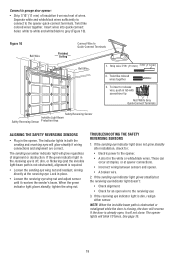
...wing nut and adjust sensor until it will not close.
See page 15.
18 Twist like colored wires together
3. Lock in the opener. If the door is dim, realign either sensor. If the sending..." (11 mm)
2. If the green indicator light in the white or white/black wires. Connect to garage door opener:
• Strip 7/16" (11 mm) of insulation from each set of alignment or obstruction. The...
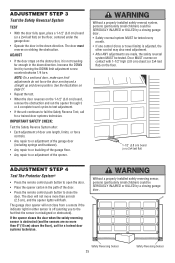
3265M Manual - Page 23
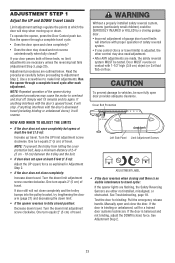
...; If the door reverses when closing garage door. • Incorrect adjustment of travel . Manually open completely but opens at least five feet (1.5 m):
Increase up or down travel. If the door is no limit...carefully before proceeding to make limit adjustments. Simply wait 15 minutes and try lengthening the door arm (page 21) and decreasing the down travel . Door MUST reverse on ...
3265M Manual - Page 24
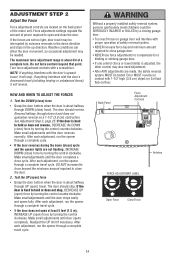
...the opener through DOWN (close ) force by a closing garage door.
• Too much force on floor. The door should reverse. After each adjustment, run the opener through a complete travel cycle. Make small adjustments until the door reverses normally. After each adjustment, run the opener through a complete travel cycle.
• If the door does not open at ) on garage door...
3265M Manual - Page 25
... flat) on striking the obstruction. The garage door opener will flash.
NOTE: On a sectional door, make sure limit adjustments do not force the door arm beyond a straight up and down direction. The door will not move more than an inch (2.5 cm), and the opener lights will not close the door. The door must reverse on the floor, centered...
3265M Manual - Page 26

..., ALL of children. SAVE THESE
obstructions. 8.
If rope knot becomes untied, you release them until down until completely closed. Your Security✚® opener and hand-held remote. See Programming.
If fully open . The sensor has no obstructions to garage door opener BEFORE making ANY repairs or removing covers.
7.
However, you activate them too soon, the...
3265M Manual - Page 27
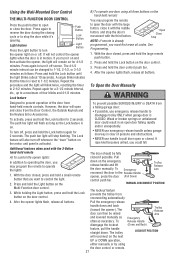
... button, press and hold the Lock button on for a 3-1/2 minute interval,
etc., up to a maximum of the door from reconnecting automatically.
4. Repeat again for 4-1/2
minutes. The door can be changed to pull door open or close from a falling garage door:
• If possible, use handle to 1-1/2, 2-1/2, or 3-1/2
minutes as follows: Press and hold the Light button on...
3265M Manual - Page 28
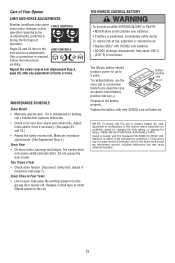
...chain tension. Every Three to Four Years • Use a rag to pry open...door. To replace battery, use the visor clip or screwdriver blade to wipe away the existing grease from the garage door opener...for up (+). Tested to be sure door opens and closes fully. To reduce risk of fi...door operation requiring some re-adjustments, particularly during the first year of operation. Make...
3265M Manual - Page 29

... blinking. Weather conditions in the down limit adjustment screw clockwise.
5. Refer to Programming.
• If remotes will not turn off when door is open:
• The garage door opener is reconnected and closed position.
• Loosen the chain by adjusting the outer nut 4 to disengage.
• Decrease the UP travel limits. Weather conditions in particular can affect...
3265M Manual - Page 31
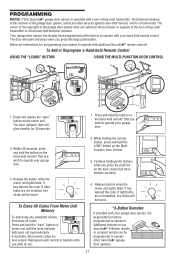
The door will open and close when you wish to operate with your garage door.
3. Below are not installed, two clicks will be heard. If light bulbs are instructions for 30 seconds.
1.
LOCK
LIGHT
4. Release buttons when the motor unit lights blink. Additional buttons on motor ...
3265M Manual - Page 32
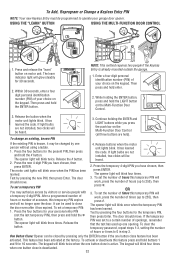
... for your garage door opener. The door should move . Release buttons when the motor unit lights blink. The opener light will blink...clicks will blink twice when the one opening. Press the temporary 4-digit PIN you have chosen, then press ENTER. To set a temporary PIN
You may be heard. To set a temporary PIN: 1. The opener light will blink four times when one button close the door...
3265M Manual - Page 35
... a password on the unit makes a numeric template of hours or entries. CLOSED
CLOSED
OPEN
OPEN
CLOSED
OPEN
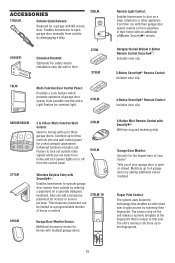
4-Button Security✚® Remote Control: Includes visor clip.
902LM/903LM 377LM
2 & 3 Door Multi-Function Wall Control:
Ideal for visitors or service persons. Also can add a temporary password for homes with up to operate garage door opener from the control panel.
370LM...
Similar Questions

I Have Installed A Chamberlan Garage Door Opener And The Remote I Was Using Is
I have been using a Chamberlan garage door opener and its remote has been defective since of late.Pl...
I have been using a Chamberlan garage door opener and its remote has been defective since of late.Pl...
(Posted by donweera42 8 months ago)
Garage Door Opens After Shutting.
My Lift master 8550 inside keypad is Inside wall pad is model #880LM. outside keypad Model # is 877M...
My Lift master 8550 inside keypad is Inside wall pad is model #880LM. outside keypad Model # is 877M...
(Posted by BONNIECA92 2 years ago)

Noise From Garage Door Opener
I have a liftmaster garage door opener. It makes a loud screeching noise when the door is lowered....
I have a liftmaster garage door opener. It makes a loud screeching noise when the door is lowered....
(Posted by tom19097 11 years ago)

Chamberlin Liftmaster Garage Door Opener Model # 3265-267
Where do I put the trolley before I attach the chain to the sprocket?
Where do I put the trolley before I attach the chain to the sprocket?
(Posted by garretmegan 11 years ago)

Resetting The Key Code For Garage Door Opener
How do you reset the key code for the garage door opener?
How do you reset the key code for the garage door opener?
(Posted by khiggins69 12 years ago)