Lexmark T650 Support Question
Lexmark T650 Support Question
Find answers below for this question about Lexmark T650.Need a Lexmark T650 manual? We have 9 online manuals for this item!
Question posted by gustavos on March 4th, 2014
How To Reset The Standard Bin Full
The person who posted this question about this Lexmark product did not include a detailed explanation. Please use the "Request More Information" button to the right if more details would help you to answer this question.
Current Answers
Related Lexmark T650 Manual Pages
User's Guide - Page 72
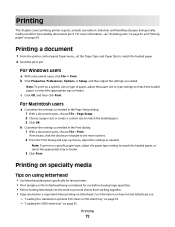
...or type of paper and specialty media can affect how reliably documents print. "Loading the standard or optional 250-sheet or 550-sheet tray" on page 55
Printing
72 b Click Properties... sticking together. • Page orientation is important when printing on the letterhead being considered for laser printers. • Print samples on letterhead. Note: To print on how to match the loaded paper...
User's Guide - Page 106
...
3-14 inches 76-360 mm
Feed Direction Short Edge Long Edge
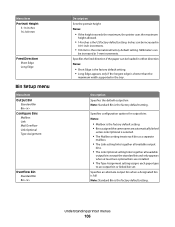
Bin Setup menu
Menu Item Output Bin
Standard Bin Bin Configure Bins Mailbox Link Mail Overflow Link Optional Type Assignment
Overflow Bin Standard Bin Bin
Description Sets the portrait height Notes:
• If the height exceeds the maximum, the printer uses the maximum
height allowed.
• 14 inches is shorter...
User's Guide - Page 107
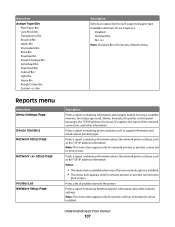
...Bin Letterhead Bin Preprinted Bin Colored Bin Light Bin Heavy Bin Rough/Cotton Bin Custom Bin
Reports menu
Menu item Menu Settings Page
Device Statistics
Network Setup Page
Network Setup Page
Profiles List NetWare Setup Page
Description Selects an output bin for each type are:
Disabled Standard Bin Bin Note: Standard Bin is installed. • This menu item appears only for network printers...
User's Guide - Page 154
... on .
Remove paper from bin
Remove the paper from all of the bins. Remove paper from all bins
Remove the paper from the specified bin.
Remove packaging material, check
Remove any remaining packaging material from the standard exit bin.
Remove paper from standard output bin
Remove the stack of the following:
• Turn the printer off . 2 Unplug the power...
User's Guide - Page 155
... for the message to clear. Resetting the printer
Wait for the message to clear. Wait for the message to be restored.
No print jobs will be restored.
Replace wiper
Try one or more of jobs to clear. You selected No from the specified bin.
Restoring Factory Defaults
Wait for the message to the...
User's Guide - Page 156
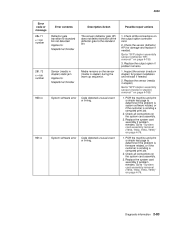
... need a password number to enter a specific printer feature, setting, or
menu that the wire paper bail is installed correctly
to keep printed pages from spilliing out of paper from your system support person. Load the specified staple cartridge into the finisher to clear the message. Standard Bin Full
Remove the stack of the...
User's Guide - Page 214

... Remove paper from standard
output bin 154 Replace wiper 155 Resetting active bin 155 Resetting the printer 155 Resetting without replacing may
affect print quality. 155 Restore Held Jobs? 155 Restoring Factory Defaults 155 Restoring Held Jobs(s) x/y 155 Routine maintenance
needed 156 Securely clearing disk space 156 Serial 156 Some held jobs were lost 156 Standard Bin Full 156...
User's Guide - Page 215
... Remove paper from standard output bin 154 Repeat print jobs 75 printing for Macintosh users 75 printing for Windows users 75 Replace wiper 155 reports viewing 173 Reports menu 107 Reserve print jobs 75 printing for Macintosh users 75 printing for Windows users 75 Resetting active bin 155 Resetting the printer 155 Resetting without replacing may affect...
Service Manual - Page 8
...assembly 3-74 Exit 3-74 Sensor (standard bin full 3-74 Drive 3-75 Main drive motor assembly 3-75 Redrive motor assembly 3-75 Electrical components and controller 3-76 Switch (printer front door interlock 3-76 Main cooling...3-87 Sensor (media low 3-87 Sensor (pass-thru 3-87 Media transport path 3-89 Model T650 paper path, rolls, and sensors 3-89 Models T652 and T654 paper path, rolls, and...
Service Manual - Page 10
... T652, T654 4-71 Sensor shield assembly removal (T650, T652, T654 4-72 Sensor (standard bin exit) removal (T650, T652, T654 4-73 Sensor (toner density) removal (T650, T652, T654 4-73 Standard bin actuator assembly removal (T650, T652, T654 4-73 Switch (media size) assembly removal (T650, T652, T654 4-74 System card assembly removal (T650, T652, T654, T656 4-76 Transfer roll assembly removal...
Service Manual - Page 44

... are attached to clear the
message. Reset Printer
Reset Active Bin
1. Check the RFID firmware card, RFID interface card, RFID cable, and RFID option for the first time, reporting of further errors is reset. 4062
Error code or message 56 56
56
58
58
Error contents Serial Port [x] Disabled Standard USB Port Disabled
USB Port [x] Disabled...
Service Manual - Page 117
... to "SFP stapler assembly sensor (deflector HP) removal" on page 4-190.
3.
Go to "System card assembly removal (T650, T652, T654, T656)" on page 4-76.
1. Replace the sensor (media in stapler)
Go to the standard bin. Replace the system card assembly if problem remains. Code detected unusual event or timing. Check the sensor (deflector...
Service Manual - Page 273

4062-XXX
Printer theory
Model T650 with duplex, paper path, rolls, and sensors
Sensor (input)
Standard bin full actuator and sensor (standard bin full)
PC cartridge
PC drum
Diverter
Sensor (fuser output) Sensor (narrow media)
Sensor (duplex input)
Sensor (option pass through)
Sensor (duplex double feed)
Pick arm assembly
Sensor (duplex exit)
Diagnostic aids 3-61
Service Manual - Page 301

4062-XXX
Media transport path
The following is a cross section of the printer and the tandem tray module, showing the main components directly associated with the media path and transport. Model T650 paper path, rolls, and sensors
Sensor (input)
Standard bin full actuator and sensor (standard bin full)
PC cartridge
PC drum
Diverter
Sensor (fuser output) Sensor...
Service Manual - Page 305

Model T650 duplex paper path
Sensor (input)
Standard bin full actuator and sensor (standard bin full)
PC cartridge
PC drum
Diverter
Sensor (fuser output) Sensor (narrow media)
Sensor (duplex input)
Sensor (option pass through)
Sensor (duplex double feed)
Pick arm ...
Service Manual - Page 350

Remove the laser cover. LCD screen bezel removal (T650, T652, T654)
Gently detach the LCD screen bezel from the operator panel door assembly.
4-28 Service Manual 4062-XXX WARNING: When removing the laser cover, ensure that the standard bin actuator assembly does not become damaged. 6.
Service Manual - Page 395

... T652, T654)" on page 4-27. 2. Release the hooks (A) securing the sensor (standard bin exit) to "Sensor shield assembly removal (T650, T652, T654)" on page 4-72.
2. Remove the sensor (standard bin exit). Remove the sensor (toner density). 4. A 3. Remove the laser cover. Go to "Laser cover removal (T650, T652, T654)" on page 4-73.
2. Repair Information 4-73
Go to the assembly...
Service Manual - Page 396

..., T654)
1. Remove the six screws (A) securing the metal cover to release the standard bin actuator assembly from the machine.
A
3. Remove the side cover, left removal (T652 and T654)" on page 4-66.
2. Go to "MPF cam gear removal (T650, T652, T654)" on the left of right side.
4-74 Service Manual Remove the media tray...
Service Manual - Page 537
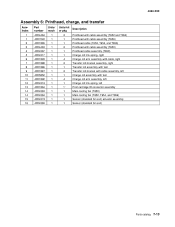
...Printhead with cable assembly (T656) Printhead cable (T652, T654, and T656) Printhead with cable assembly (T650) Printhead cable assembly (T650) Charge roll link spring, right Charge roll arm assembly with cable, right Transfer roll bracket assembly, ...T650) Main cooling fan (T652, T654, and T656) Sensor (standard bin exit) actuator assembly Sensor (standard bin exit)
4062-XXX
Parts catalog 7-13
Service Manual - Page 579

... 7-13 40X4369 Sensor (tamper HP left 7-31 40X4369 Sensor (tamper HP right 7-31 40X4370 Sensor (toner empty 7-19 40X4372 Sensor (standard bin exit) actuator assembly 7-13 40X4375 System card assembly (T650 7-19 40X4376 Output option interface cable assembly 7-19 40X4377 USB cable assembly 7-5 40X4378 Sensor (toner density 7-17 40X4379 Toner density sensor cable...
Similar Questions

How To Reset Factory Settings On Lexmark T650 Through A Web Browser
(Posted by joshiv 10 years ago)

Why Do You Need To Change Fuser For Lexmark Printer T650
(Posted by tiunkn0 10 years ago)


Lexmark Ms711 Laser Printer Weight
what does the ms711 laser printer weigh without additional trays?
what does the ms711 laser printer weigh without additional trays?
(Posted by cathyrose2 10 years ago)