Lexmark E460DN Support Question
Lexmark E460DN Support Question
Find answers below for this question about Lexmark E460DN - Taa Govt Compliant.Need a Lexmark E460DN manual? We have 12 online manuals for this item!
Question posted by pltapan on April 19th, 2014
Where Is The Button To Reset Page Count For E460dn Printer
The person who posted this question about this Lexmark product did not include a detailed explanation. Please use the "Request More Information" button to the right if more details would help you to answer this question.
Current Answers
Related Lexmark E460DN Manual Pages
Wireless Setup Guide - Page 5
... not connect cables until instructed.
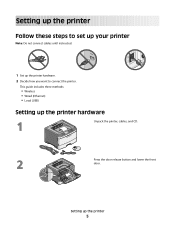
1 Set up the printer hardware
Unpack the printer, cables, and CD. This guide includes three methods:
• Wireless • Wired (Ethernet) • Local (USB)
Setting up the printer hardware. 2 Decide how you want to connect the printer. Press the door release button and lower the front door.
2 1
Setting up the...
Wireless Setup Guide - Page 6

Press the button on the base of the photoconductor kit and the toner cartridge from the unit.
Pull the toner cartridge up the printer
6
Setting up and out using the handle. Remove the tape and packaging material from the printer. Remove the unit consisting of the photoconductor kit.
Firmly shake the cartridge side-to...
User's Guide - Page 11

Printer configurations
Basic model
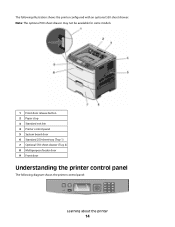
The following illustration shows the printer front with its basic features or parts:
1 Front door release button 2 Paper stop 3 Standard exit bin 4 Printer control panel 5 System board door 6 Standard 250-sheet tray (Tray 1) 7 Multipurpose feeder door 8 Front door
Learning about the printer
11
User's Guide - Page 13

Configured models
The following illustration shows the printer configured with a second, standard or optional, 250-sheet drawer:
1 Front door release button 2 Paper stop 3 Standard exit bin 4 Printer control panel 5 System board door 6 Standard 250-sheet tray (Tray 1) 7 Standard 250-sheet tray (Tray 2)
or Optional 250-sheet drawer (Tray 2) 8 Multipurpose feeder door 9 Front ...
User's Guide - Page 14
... drawer may not be available for some models.
1 Front door release button 2 Paper stop 3 Standard exit bin 4 Printer control panel 5 System board door 6 Standard 250-sheet tray (Tray 1) 7 Optional 550-sheet drawer (Tray 2) 8 Multipurpose feeder door 9 Front door
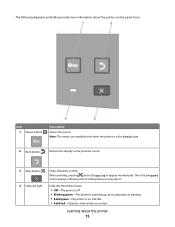
Understanding the printer control panel
The following diagram shows the printer control panel:
Learning about the...
User's Guide - Page 15
... power is off. • Blinking green-The printer is warming up, processing data, or printing. • Solid green-The printer is on, but idle. • Solid red-Operator intervention is in the Ready state.
2 Back button ( ) Returns the display to the previous screen
3 Stop button ( ) Stops all printer activity
When printing, pressing causes Stopping to...
User's Guide - Page 16

... (called values or options), or to scroll between screens and menu options. Note: Each press of the up or down arrow buttons moves you how to another screen.
Learning about the printer
16 The current user
default setting is indicated by an asterisk (*).
• Saves the displayed menu item as the user...
User's Guide - Page 36

To restore the factory default settings, see "Restoring the factory default settings" on and Ready appears. 2 From the printer control panel, press . 3 Press the down arrow button until you have not made any menu item settings changes yet, then the menu settings page lists all the factory default settings. Menu Settings Page ...
User's Guide - Page 37
... you want is on and Ready appears. 2 From the printer control panel, press . Paper Menu appears.
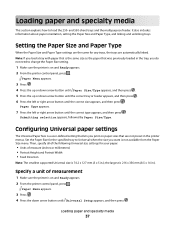
3 Press . 4 Press the up or down arrow button until Paper Size/Type appears, and then press . 5 ... specialty media
This section explains how to change the Paper Size setting.
1 Make sure the printer is the same size as the paper that are automatically linked. It also includes information about ...
User's Guide - Page 38

... Universal Setup menu.
3 From the Universal Setup menu, press the down arrow button until Short Edge or Long Edge appears, and then press . The Feed Direction menu will enter the printer first.
1 From the Universal Setup menu, press the down arrow button until Feed Direction appears, and then press
.
2 Press the down arrow...
User's Guide - Page 47
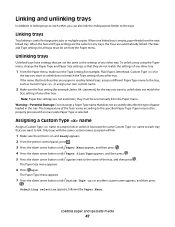
... to the specified Paper Type. Only trays with the same custom names assigned will link.
1 Make sure the printer is used by Paper Menu.
The Paper Type menu appears.
7 Press the down arrow button until Custom Type or another custom name appears, and then press
. Note: Paper Size settings are automatically linked...
User's Guide - Page 48

... correct Paper Type is the factory default Paper Type associated with the custom name.
b Press the down arrow button until Custom Types appears, and then press . To change a Custom Type name:
1 Type the printer IP address into the address field of Custom Type . Note: This custom name will replace a custom type name...
User's Guide - Page 60
... job, also enter a four-digit PIN.
4 Click Print, and then go to the printer to release the job. 6 From the printer control panel, press the down arrow button until Held jobs appears, and then press . 7 Press the down arrow button until appears next to your user name, and then press . 8 Press the down arrow...
User's Guide - Page 61

... list prints, Ready appears. After the directory list prints, Ready appears.
Printing a font sample list
To print samples of the fonts currently available for your printer:
1 Make sure the printer is on . 3 Release the buttons when the clock appears, and wait for more information on and Ready appears. 2 From the...
User's Guide - Page 62

... then press . Resetting the Printer appears briefly, followed by a clock, and then Ready appears.
A list of the following:
For Windows users
1 Click , or click Start and then click Run. 2 In the Start Search or Run box, type control printers. 3 Press Enter, or click OK. A list of jobs appears.
2 Press the arrow buttons until Cancel...
User's Guide - Page 87

...a report, use the arrow buttons to navigate to print servers.
Sets the portrait height Notes:
• If the height exceeds the maximum, then the printer uses the
maximum height allowed....report containing information about paper loaded into trays, installed memory, the total page count, alarms, timeouts, the printer control panel language, the TCP/IP address, the status of supplies, the ...
User's Guide - Page 106

...default setting. • To set as fonts and macros stored in RAM, when the printer receives a job that requires more memory than is available Notes:
• Off is ... the factory default setting. Off sets the printer to process print jobs.
• The On setting retains the downloads during language
changes and printer resets. Downloads are not deleted. Description Specifies whether...
User's Guide - Page 125

...; Cancel the current print job.
51 Defective flash detected
Try one or more of the following:
• Press the down arrow button until Continue appears, and then press to reset the printer. • Upgrade (flash) the network firmware in flash memory for resources
Try one or more of the following:
• Press the...
User's Guide - Page 146
... the printer control panel, press . 2 Press the down arrow button until Settings appears, and then press . 3 Press the down arrow button until General Settings appears, and then press . 4 Press the down arrow button until ..., and the number of the following :
RESET THE PRINTER
Turn the printer off, wait for about 10 seconds, and then turn the printer on.
Solving option problems
Option does not ...
User's Guide - Page 149
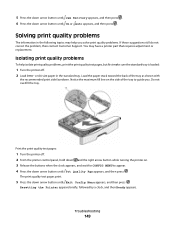
... toward the back of the tray to appear. 4 Press the down arrow button until Prt Quality Pgs appears, and then press .
Resetting the Printer appears briefly, followed by a clock, and then Ready appears.
Notice the maximum fill line on . 3 Release the buttons when the clock appears, and wait for CONFIG MENU to guide you...


