Lenovo IdeaPad Z460 Support Question
Lenovo IdeaPad Z460 Support Question
Find answers below for this question about Lenovo IdeaPad Z460.Need a Lenovo IdeaPad Z460 manual? We have 6 online manuals for this item!
Question posted by baduian on July 25th, 2014
Lenovo Ideapad Z460 Manual And How To Make Bios Settings
The person who posted this question about this Lenovo product did not include a detailed explanation. Please use the "Request More Information" button to the right if more details would help you to answer this question.
Current Answers
Related Lenovo IdeaPad Z460 Manual Pages
Lenovo IdeaPad Z460/Z465/Z560/Z565 UserGuide V1.0 - Page 64
... must be determined by turning the equipment off and on a circuit different from Lenovo authorized dealers. Product specific Notices
Electronic emissions notices
The following measures: • ...using other than recommended cables or connectors or by one or more of the following information refers to Lenovo IdeaPad Z460 / Z465 / Z560 / Z565, machine type 20059, 0913 / 20065, 4309 / 20060, ...
Lenovo IdeaPad Z460/Z465 Hardware Maintenance Manual - Page 3
Contents
About this manual iv
Safety information 1 General safety 2 Electrical safety 3 Safety inspection guide 5 Handling devices that are ... Supervisor password 24 Power management 25 Screen blank mode 25 Sleep (standby) mode 25 Hibernation mode 26
Lenovo IdeaPad Z460/Z465 27 Specifications 27 Status indicators 29 Fn key combinations 31 FRU replacement notices 32
Screw notices 32 ...
Lenovo IdeaPad Z460/Z465 Hardware Maintenance Manual - Page 4

Before servicing a Lenovo IdeaPad product, make sure to read all the information under "Safety information" on page 1 and "Important service information" on page 16. iv Important: This manual is divided into the following Lenovo IdeaPad product:
Lenovo IdeaPad Z460/Z465 Use this manual to troubleshoot problems effectively. Use this manual to troubleshoot problems. The manual is intended ...
Lenovo IdeaPad Z460/Z465 Hardware Maintenance Manual - Page 25

...•• Replace the system board. •• If the problem continues, go to "Lenovo IdeaPad Z460/Z465" on page 22
Checking the AC adapter
You are servicing. 3. Checking operational charging
To ... checkout
To verify a symptom, follow the steps below : 1. Turn off the computer. 2. Make sure that has less than 50% of the AC adapter cable. Unplug the AC adapter cable...
Lenovo IdeaPad Z460/Z465 Hardware Maintenance Manual - Page 31

..." on page 33 •• "Locations" on page 70 •• "Parts list" on page 72
Specifications
The following table lists the specifications of the Lenovo IdeaPad Z460/Z465 : Table 1. Specifications
Feature Processor Core Chipset Bus architecture
Graphic memory chip Display Standard memory CMOS RAM Hard disk drive Optical drive
I/O port
MODEM slot...
Lenovo IdeaPad Z460/Z465 Hardware Maintenance Manual - Page 33
... all alphabetic characters (A-Z) in sleep mode. White: System is enabled. Off:
System is enabled.
To enable or disable Caps Lock mode, press the CapsLk key.
Lenovo IdeaPad Z460/Z465
Status indicators
The system status indicators below show the computer status:
12
3
4
5
6
Table 2. Status indicators
Indicator
1 Caps Lock
2 Num lock 3 Power on the keyboard...
Lenovo IdeaPad Z460/Z465 Hardware Maintenance Manual - Page 35
... Fn with a function key. Enable/Disable the scroll lock. Lenovo IdeaPad Z460/Z465
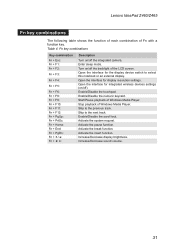
Fn key combinations
The following table shows the function of each combination of Windows Media Player. Open the interface for display resolution settings. Enter sleep mode. Open the interface for integrated wireless devices settings (on /off ). Activate the insert function. Increase/Decrease...
Lenovo IdeaPad Z460/Z465 Hardware Maintenance Manual - Page 37

...cables. DANGER Before removing any FRU, review "FRU replacement notices" on page 32. 3. Make sure to replacement. Remove them in the order in square callouts. 5. When replacing an... parts are in the procedures.
An untrained person runs the risk of the page.
Lenovo IdeaPad Z460/Z465
Removing and replacing an FRU
This section presents exploded figures with one hand or using...
Lenovo IdeaPad Z460/Z465 Hardware Maintenance Manual - Page 39

Removal steps of dummy cards
Remove two dummy cards in the direction shown by arrows 1 2.
1 2
1 2
35 Lenovo IdeaPad Z460/Z465 1020 Dummy cards
For access, remove this FRU: •• "1010 Battery pack" on page 34 Figure 2.
Lenovo IdeaPad Z460/Z465 Hardware Maintenance Manual - Page 41

Lenovo IdeaPad Z460/Z465
1040 Hard disk drive
For access, remove these FRUs in order: •• "1010 Battery pack" on page 34 •• "1030 Hard disk ...
Lenovo IdeaPad Z460/Z465 Hardware Maintenance Manual - Page 43

... optical drive in the direction shown by arrow 3.
1
Step
1
Screw (quantity) M2.5 × 10 mm, flat-head, nylon-coated (1)
Color Black
Torque
0.6 Nm (6 kgfcm)
2 3
39 Lenovo IdeaPad Z460/Z465
1050 Optical drive
For access, remove these FRUs in the direction shown by arrow 2, and then pull the optical drive out in order: •...
Lenovo IdeaPad Z460/Z465 Hardware Maintenance Manual - Page 45

...;• "1030 Hard disk drive (HDD)/Memory/CPU (Central processing unit)
compartment cover" on page 36
Figure 7. Lenovo IdeaPad Z460/Z465
1070 Fan assembly and Heat Sink assembly
For access, remove these FRUs in the direction shown by arrow 3.
1
1 1
1 2
2
2
1
2
3
When installing: Make sure that the fan connector is attached firmly to the system board.
Lenovo IdeaPad Z460/Z465 Hardware Maintenance Manual - Page 53

Lenovo IdeaPad Z460/Z465
Figure 11. Removal steps of keyboard (continued)
Lift the keyboard a little 2, unlock the FPC connector and then detach the connector in the direction shown by arrows 3 4.
2
4 3
When installing: Make sure that the FPC connector is attached firmly and then lock the FPC connector.
49
Lenovo IdeaPad Z460/Z465 Hardware Maintenance Manual - Page 55
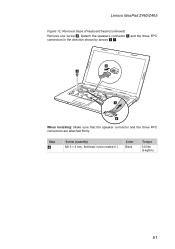
... FPC connectors in the direction shown by arrows 6 7.
5 4
7
6
When installing: Make sure that the speaker connector and the three FPC connectors are attached firmly. Step
4
Screw (quantity) M2.5 × 4 mm, flat-head, nylon-coated (1)
Color Black
Torque
0.6 Nm (6 kgfcm)
51
Lenovo IdeaPad Z460/Z465
Figure 12. Removal steps of keyboard bezel (continued)
Remove one...
Lenovo IdeaPad Z460/Z465 Hardware Maintenance Manual - Page 59

Lenovo IdeaPad Z460/Z465
1140 System board and ExpressCard slot assembly
Important notices for wireless LAN/WAN" on page 46 •...an ESD mat or conductive corrugated material.
For access, remove these FRUs in the direction shown
by arrows 1.
1
1
When installing: Make sure that has a hard surface,
such as metal, wood, or composite. • Avoid rough handling of any kind. • In ...
Lenovo IdeaPad Z460/Z465 Hardware Maintenance Manual - Page 61

... the audio jack and the microphone jack are attached to the base cover, adjust the placement of the wireless radio switch as shown in b , and make sure that both of the switch or those jacks might cause a damage.
57 Lenovo IdeaPad Z460/Z465
Figure 14.
Lenovo IdeaPad Z460/Z465 Hardware Maintenance Manual - Page 67

Lenovo IdeaPad Z460/Z465
Figure 16. Remove one screw 3 and then remove the USB assembly in the direction shown by arrow 4.
3
4
When installing: Make sure that the power connector is attached firmly. Step
3
Screw (quantity) M2.0 × 3 mm,...)
Remove the power assembly in the direction shown by arrows 2.
2
2
When installing: Make sure that the USB connector is attached firmly.
Lenovo IdeaPad Z460/Z465 Hardware Maintenance Manual - Page 71
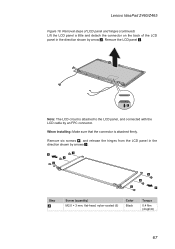
When installing: Make sure that the connector is attached to the LCD panel, and connected with the LCD cable by an FPC connector.
Removal steps of LCD panel ... by arrows 5.
5 4
4 4
4 4
4
5
Step
4
Screw (quantity) M2.0 × 3 mm, flat-head, nylon-coated (6)
Color Black
Torque
0.4 Nm (4 kgfcm)
67 Note: The LCD circuit is attached firmly. Lenovo IdeaPad Z460/Z465
Figure 18.
Lenovo IdeaPad Z460/Z465 Hardware Maintenance Manual - Page 73

..." on page 66 Figure 20. As you route the cables, make sure that they are not subjected to be damaged by arrows 1.
1
1
When installing: Route the antenna cables along the cable guides and secure the antenna boards with adhesive tapes. Lenovo IdeaPad Z460/Z465
1200 Antenna assembly and LCD cover
For access, remove these...
Lenovo IdeaPad Z460/Z465 Hardware Maintenance Manual - Page 75

manual N Mini PCI ExpressCard slot compartment
13
12
11
10
9
8
14
7
6
5
4
3 1 2
71 Right-side view
1 Microphone jack 2 Headphone jack 3 Optical drive 4 USB port 5 AC power adapter jack
Lenovo IdeaPad Z460/Z465
5
4 3 2 1
Bottom and Left-side view
1 HDMI port 2 ExpressCard®slot (Select models only) 3 USB port or eSATA/USB combo port 4 USB port 5 VGA port...
Similar Questions


How To Enter Bios Settings In Windows 7 For Lenovo Ideapad G570
(Posted by mastefedaik 9 years ago)

Lenovo U510 Laptop Dvdrive Not Detected & No Drivers Installed In Bios Set Up
hi team, my lenovo u510 laptop's dvd drive is not opening and its drivers are not visible in bios se...
hi team, my lenovo u510 laptop's dvd drive is not opening and its drivers are not visible in bios se...
(Posted by karthikved 10 years ago)

What Is The Battery Part Number Of Lenovo Ideapad Z460 I5
(Posted by vaquino98 12 years ago)

How To Turn On The Integrated Camera On An Ideapad Z460
(Posted by Anonymous-28783 12 years ago)