Lenovo G580 Support Question
Lenovo G580 Support Question
Find answers below for this question about Lenovo G580.Need a Lenovo G580 manual? We have 1 online manual for this item!
Question posted by 99azo on August 4th, 2014
How To Install Battery In Lenova Laptop G580
The person who posted this question about this Lenovo product did not include a detailed explanation. Please use the "Request More Information" button to the right if more details would help you to answer this question.
Current Answers
Related Lenovo G580 Manual Pages
User Guide - Page 1
Lenovo G480/G485/ G580/G585/G780
User Guide V1.0
Read the safety notices and important tips in the included manuals before using your computer.
User Guide - Page 2
... are using other operating systems, some operations may be available on your computer and/or your computer may include features that you are for Lenovo G580 unless otherwise stated. • The illustrations in this manual may not be slightly different.
User Guide - Page 6
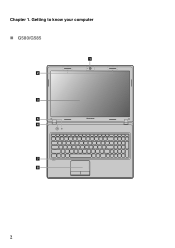
Chapter 1. Getting to know your computer
„ G580/G585
1 2 3 5 4
7 8
2
User Guide - Page 9
... fan louvers are blocked or else overheating of the computer may occur. c VGA port
Connects to know your computer
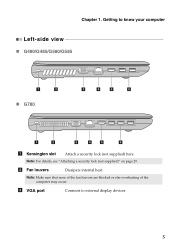
Left-side view
„ G480/G485/G580/G585
1
2
„ G780
3
4
5
6
1
2
3
4
5
6
a Kensington slot
Attach a security lock (not supplied) here. Note: For details, see "Attaching a security lock (not supplied)" on page 29.
b Fan louvers...
User Guide - Page 11
c Optical drive
Reads/Burns optical discs.
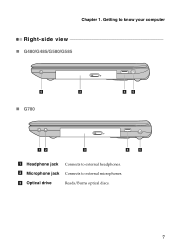
7 Getting to know your computer
Right-side view
„ G480/G485/G580/G585
6
3
„ G780
45
12
3
4
5
a Headphone jack Connects to external microphones. b Microphone jack Connects to external headphones.
Chapter 1.
User Guide - Page 13
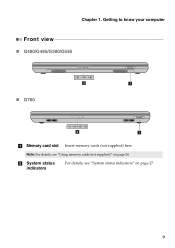
Chapter 1. Getting to know your computer
Front view
„ G480/G485/G580/G585
„ G780
2
1
2
1
a Memory card slot Insert memory cards (not supplied) here. b System status indicators
For details, see "Using memory cards (not supplied)" on page 27.
9 Note: For details, see "System status indicators" on page 24.
User Guide - Page 16

Getting to know your computer
„ G580/G585
1
2
3
5
4
5
12 Chapter 1.
User Guide - Page 20
... when it is first used. The configuration process may need to the power
The supplied battery pack is running on the computer.
„ Configuring the operating system
You may include the... the power button to turn on AC power. Installing the battery pack Refer to the supplied Setup Poster to an electrical outlet. The battery is automatically charged while the computer is not fully...
User Guide - Page 25

... G480/G485
The keyboard has keys that, when enabled, work as a 10-key numeric keypad. To enable or disable the numeric keypad, press Fn+F8 .
G580/G585/G780 The keyboard has a separate numeric keypad. To enable or disable the numeric keypad, press the Num Lock key. Note: The Num lock indicator...
User Guide - Page 26
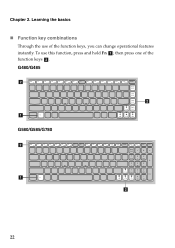
then press one of the function keys, you can change operational features instantly. Chapter 2. G480/G485 b
b a G580/G585/G780 b
a b
22 To use of the function keys b . Learning the basics
„ Function key combinations
Through the use this function, press and hold Fn a ;
User Guide - Page 27
....
Fn + F9:
Start/Pause playback of each function key.
Fn + PgDn (G480/G485): Activate the insert function. Fn + F1:
Enter sleep mode.
Chapter 2. Fn + Insert (G580/G585/
G780):
Enable/Disable the scroll lock. Fn + Esc:
Turn on /off). Fn + F10:
Stop playback of the LCD screen. Fn
Increase/Decrease sound volume...
User Guide - Page 31
G480/G485/G580/G585
G780
3
4
1
1
2
3
4
5
6
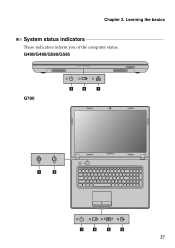
27 Chapter 2. Learning the basics
System status indicators
These indicators inform you of the computer status.
User Guide - Page 39
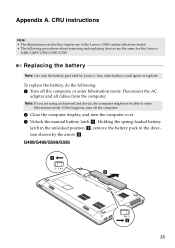
... the following procedures about removing and replacing devices are the same for the Lenovo
G480/G485/G580/G585/G780. G480/G485/G580/G585
1
3
2
35 Any other battery could ignite or explode. Replacing the battery
Note: Use only the battery provided by the arrow c . If this chapter are using an ExpressCard device, the computer might not...
User Guide - Page 40
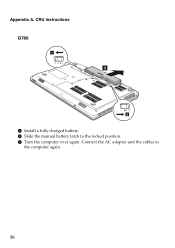
Connect the AC adapter and the cables to the locked position. 6 Turn the computer over again. Appendix A. CRU instructions G780
1
3
2
4 Install a fully charged battery. 5 Slide the manual battery latch to
the computer again.
36
User Guide - Page 44
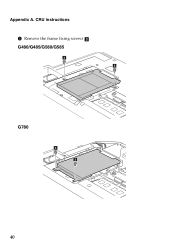
CRU instructions
5 Remove the frame fixing screws c . G480/G485/G580/G585
3 3
G780
3 3
40 Appendix A.
User Guide - Page 45
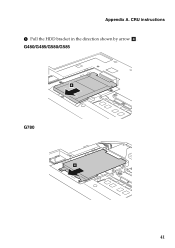
CRU instructions 6 Pull the HDD bracket in the direction shown by arrow d. Appendix A. G480/G485/G580/G585
4
G780
4
41
User Guide - Page 46
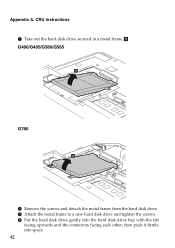
... the tab
facing upwards and the connectors facing each other; CRU instructions 7 Take out the hard disk drive secured in a metal frame e. Appendix A. G480/G485/G580/G585
5
G780
5
8 Remove the screws and detach the metal frame from the hard disk drive. 9 Attach the metal frame to a new hard disk drive and...
User Guide - Page 48
... the computer. 3 Close the computer display, and turn the computer over. 4 Remove the battery again. 5 Remove the Hard disk drive (HDD)/Memory/CPU (Central processing unit)/Mini PCI Express... an option-in various capacities.
Note: • Use only the memory types supported by installing a double-data-rate three synchronous dynamic random access memory (DDR3 SDRAM)-available as listed below...
User Guide - Page 51
...adapter and the cables to
the computer again. Note: If only one DDR3 SDRAM is installed correctly, do as follows: 1 Turn the computer on both edges of memory installed in SLOT-1 ( : upper slot). Appendix A. B Turn the computer over again. ... shows the total amount of the socket are servicing, the card must be installed in SLOT-0 ( : lower slot), but not in your computer.
47 A Reinstall the...
User Guide - Page 54

CRU instructions
Removing the optical drive
To remove the optical drive, do the following: G480/G485/G580/G585 1 Remove the Hard disk drive/Memory/Central processing unit/Mini PCI
Express Card slot compartment cover. 2 Remove the screw shown in the illustration a . 3 Gently pull the optical drive out b .
1 2
50 Appendix A.
Similar Questions

How To Install Windows 7 Operating System To Lenova Laptop G570
(Posted by brfit 9 years ago)


Can A Call Of Duty Modern Warfare Game Installable To My Lenovo G580 Loptap.
(Posted by umakin12 10 years ago)

Where Can I Find The Product Key For My Lenova Laptop G580 For Microsoft Office?
(Posted by roshnie1022 11 years ago)