Kyocera TASKalfa 180 Support Question
Kyocera TASKalfa 180 Support Question
Find answers below for this question about Kyocera TASKalfa 180.Need a Kyocera TASKalfa 180 manual? We have 11 online manuals for this item!
Question posted by arunp4790 on June 3rd, 2012
How To Remove
how to remove paper jam in Kyocera TASKalfa 180
Current Answers
Related Kyocera TASKalfa 180 Manual Pages
KM-NET ADMIN Operation Guide for Ver 2.0 - Page 102
... device or by a specific device condition, such as install, configure, or remove ...paper jam.
x
User Guide Report A scheduled communication that reflects a particular set of polling that allows you its subscribers and the groups it is due for all KMnet Admin counters to zero. Role The set of security and prevent unauthorized printing to the SNMPv3 printing device...
PRESCRIBE Commands Command Reference Manual Rev 4.8 - Page 181

...are delivered to the last specified tray, and so on until it also becomes full. By removing all pages in the reverse order of tray parameters. This command cancels the mailbox mode and...
If the tray parameters are omitted, all trays excluding the bulk tray are delivered first to remove paper. COPY; EXIT; It instructs the printing system to the maximum
Function
The MSTK command is ...
180/220 Operation Guide Rev-2 - Page 6
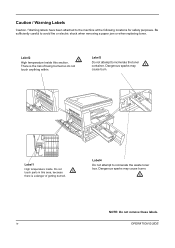
... the risk of getting burned. Label2
High temperature inside . Caution / Warning Labels
Caution / Warning labels have been attached to avoid fire or electric shock when removing a paper jam or when replacing toner. Be sufficiently careful to the machine at the following locations for safety purposes. Do not touch parts in this section.
180/220 Operation Guide Rev-2 - Page 50

... it off . overnight), turn the main power switch off at the
main power switch. vacation), remove the power plug from humidity.
3-2
OPERATION GUIDE Basic Operation
Power On/Off
Power On
Turn the ...Power Off
Open the main power switch cover located on ( | ).
CAUTION: Remove paper from the cassettes and seal it in the paper storage bag to warm up.
2 Once warm-up is completed, the Start indicator ...
180/220 Operation Guide Rev-2 - Page 125

....
cover.
Printouts are skewed. type? OPERATION GUIDE
8-3
Copies have black lines.
Check the position of the supported Remove the paper, turn it in good condition?
Are there any loose scraps or Remove any jammed paper.
8-9
jammed paper in the Image
4-4
pattern (dots grouped photograph? Set the correct density level for the original? Quality Mode...
180/220 Operation Guide Rev-2 - Page 128

... copies of the originals it is open.
Check the MP Tray paper. Remove the jammed
8-9
paper.
MP tray empty.
Set paper in the MP Tray in .
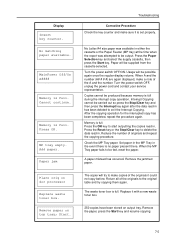
Return all of the originals to... of the cassette is set properly. MainPower Off/On A####
Memory is no paper present there.
Paper jam
Place orig on doc processor
Corrective Procedure
The left cover #.
Check the key...
180/220 Operation Guide Rev-2 - Page 129
... tray; Set the cassette.
8
Shake the toner container. Set the Toner
7-9
Container.
Use the numeric keys to enter 6-9 the assigned Section Code to display "= = =" again. Remove paper on DP.
representative. "= = =" appears on the Original Table after copying is a notification that corresponds to the original table and try copying them to the
2-4
lighting...
180/220 Operation Guide Rev-2 - Page 131
...light up again and the error message will be sure to remove any loose scraps of getting burned.
A page affected by a paper jam will be displayed as there is a danger of paper from inside the machine.
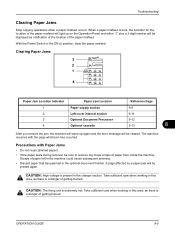
Clearing Paper Jams 3 2 1
4
Paper Jam Location Indicator 1 2 3 4
Paper Jam Location Paper supply section Left cover internal section Optional Document Processor Optional cassette...
180/220 Operation Guide Rev-2 - Page 132
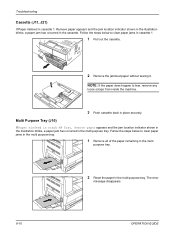
... indicator shown in the illustration blinks, a paper jam has occurred in the multi purpose tray. Remove paper appears and the jam location indicator shown in the illustration blinks, a paper jam has occurred in the cassette. NOTE: If the paper does happen to clear paper jams in the multi purpose tray.
1 Remove all of the paper remaining in the multi
purpose tray.
2 Reset...
180/220 Operation Guide Rev-2 - Page 133
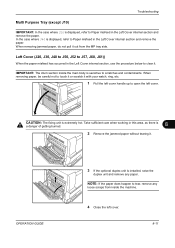
... clear it. Take sufficient care when working in the Left Cover internal section and remove the paper. In the case where J40 is displayed, refer to Paper misfeed in this area, as there is
a danger of getting burned.
8
2 Remove the jammed paper without tearing it with your watch, ring, etc.
1 Pull the left cover handle up...
180/220 Operation Guide Rev-2 - Page 134
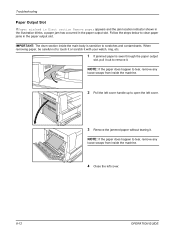
... main body is seen through the paper output
slot, pull it out to scratches and contaminants. NOTE: If the paper does happen to clear paper jams in the paper output slot.
Troubleshooting
Paper Output Slot
If Paper misfeed in Eject section Remove paper appears and the jam location indicator shown in the illustration blinks, a paper jam has occurred in the paper output slot.
180/220 Operation Guide Rev-2 - Page 135

....
2 Open the left cover. NOTE: If the original does happen to tear, remove any
loose scraps from inside the document processor.
Failure to do so may cause another paper jam later.
8
4 Raise the paper feed unit A.
5 Remove the jammed originals without tearing it
1 Remove all of the originals remaining in the optional Document Processor, use the procedure...
180/220 Operation Guide Rev-2 - Page 136

... from the cassette.
3 Close the left cover of paper is jammed inside, remove it
carefully so as shown in the optional cassette, use the procedure below to clear it.
1 Remove the left cover to its original position.
NOTE: If the paper is torn, be sure to remove all the originals and start copying again. Troubleshooting
6 Turn...
180/220 Operation Guide Rev-2 - Page 148
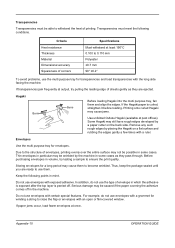
... adhesive is exposed after the top layer is curled, straighten it before loading. Remove any such rough edges by a paper cutter on a flat surface and rubbing the edges gently a few times with ... cases as they pass through. Storing envelopes for envelopes.
Keep the following conditions.
If paper jams occur, load fewer envelopes at least 190°C 0.100 to withstand the heat of ...
180/220 Operation Guide Rev-2 - Page 149
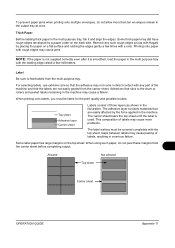
... sheet. Gaps between labels may still have rough edges developed by the force applied in the output tray at once. Remove any part of labels, resulting in the illustration. To prevent paper jams when printing onto multiple envelopes, do not peel these margins from the multi purpose tray. Allowed
Not allowed
Top sheet...
Operation Guide - Page 9

... careful to the machine at the following locations for safety purposes.
CAUTION LABELS
Caution labels have been attached to avoid fire or electric shock when removing a paper jam or when replacing toner. Do not touch parts in this area, because there is a danger of getting burned. Dangerous sparks may cause burns. Label 2
High...
Operation Guide - Page 28
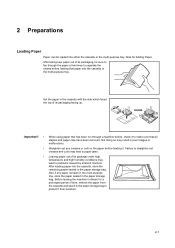
... to paper jams.
• Leaving paper out of its packaging, be loaded into the cassette, store the remaining paper sealed in the paper storage bag to separate the sheets before loading it to problems caused by ambient moisture. Also if any creases or curls in disuse for Adding Paper After taking new paper out of time, remove the paper...
Operation Guide - Page 63

... same way as the standard cassette provided with cassettes that can be set are provided to allow paper to be removed when a paper jam occurs. Optional Equipment
Paper Feeder
In addition to the cassette(s) provided with the main body, a paper feeder (with the main body. (See page 2-1.)
The left covers are : A3, B4, A4, A4R, B5...
Operation Guide - Page 77
... copying from the
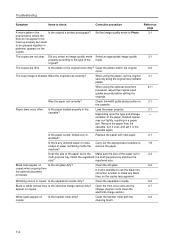
cassette, turn it in the Make sure the size of paper remaining inside the remove the paper.
Is the separation needle dirty? Clean the transfer roller with new paper.
2-1
wrinkled? The copies are dirty.
correction function to make any jammed paper or loose Carry out the appropriate procedure to the type of the...
Operation Guide - Page 80
... .
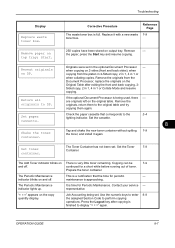
The waste toner box is full. Display
Insert key counter.
Press the Paper Selection key and select the supply cassette, then press the Start key. Paper will be produced because memory is set properly.
Check the MP Tray paper. Remove the jammed paper.
Remove the paper, press the Start key and resume copying.
7-5 Memory is full. Start.
Memory...
Similar Questions

How To Fix Paper Jam Problem Kyocera Taskalfa 4501i From Tray 1
(Posted by 15111967g 1 year ago)

How Can I Solve Paper Jam 10 ? No Paper Are Seen In Drum Unit.
model : kyocera taskalfa 180 troble : paper jam 10 findings : no piece of paper are found in drum un...
model : kyocera taskalfa 180 troble : paper jam 10 findings : no piece of paper are found in drum un...
(Posted by budhasamdhi 9 years ago)


Kyocera Taskalfa 180 Photocopy
how to program password on taskalfa 180 photocopy machine?
how to program password on taskalfa 180 photocopy machine?
(Posted by samuelamagiti 10 years ago)